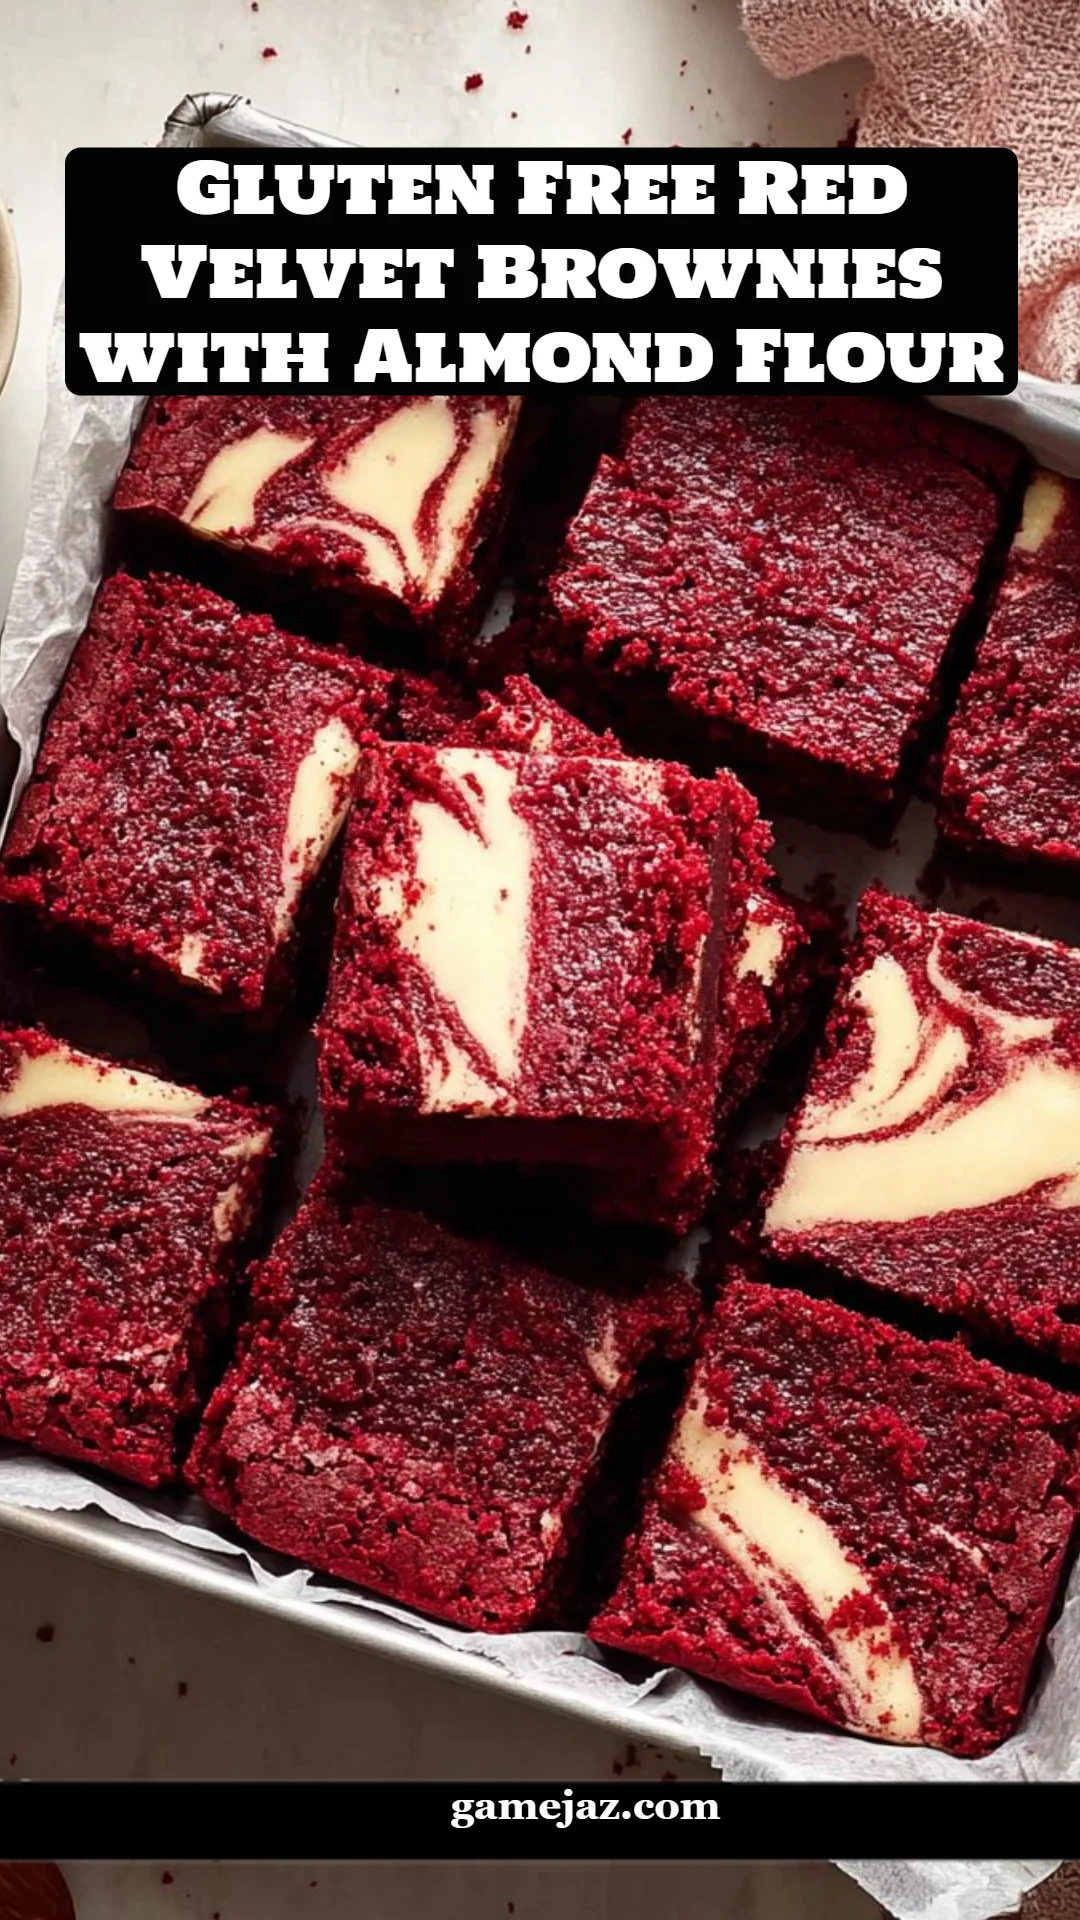
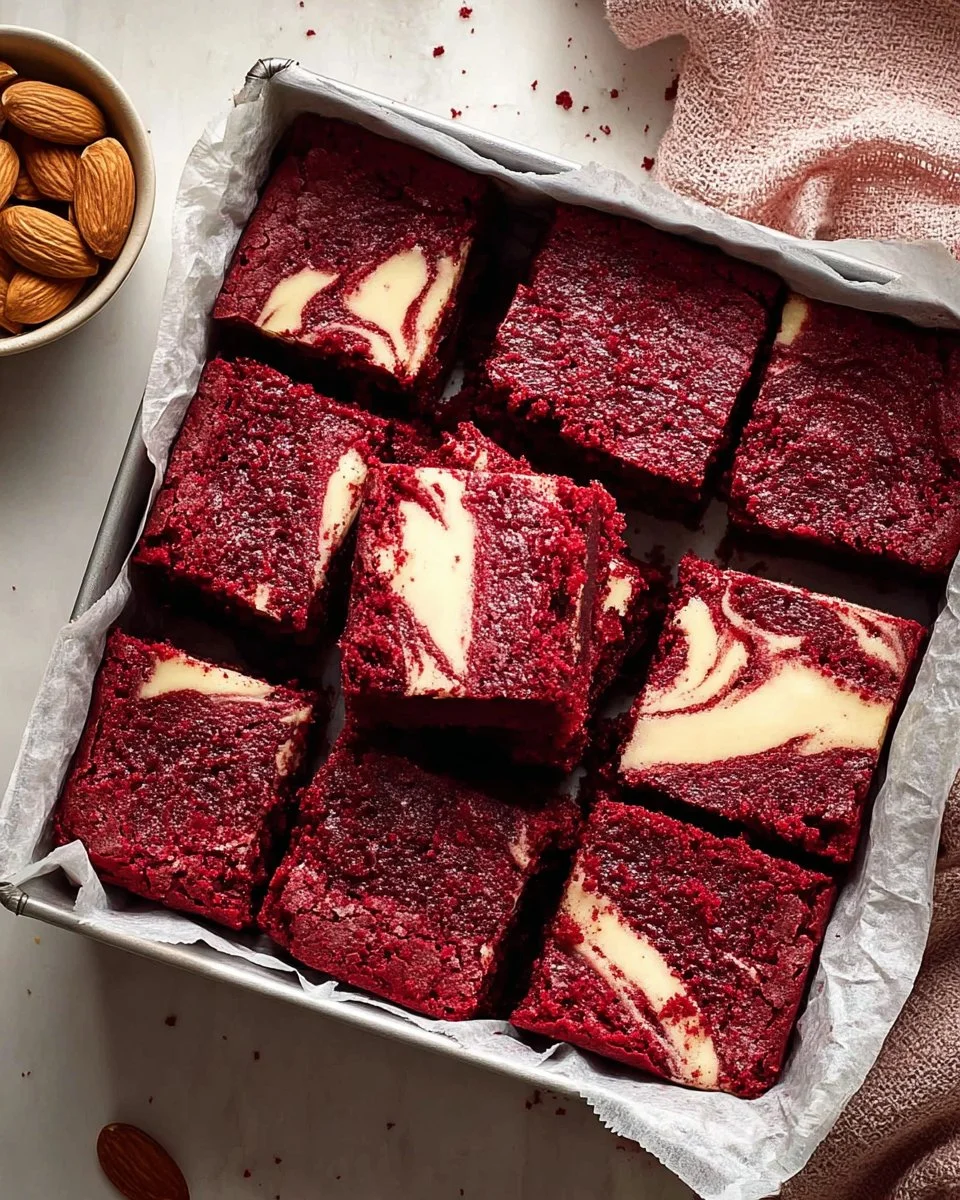
Irresistibly Decadent Gluten Free Red Velvet Brownies with Almond Flour
Ah, the bittersweet aroma of freshly baked brownies wafting through the kitchen, bringing back memories of lovingly prepared treats shared with family. Growing up, each holiday season meant indulging in my grandma’s famous red velvet cake, layered high with cream cheese frosting. Little did I know back then that I could recreate that joyous experience with a twist: Gluten Free Red Velvet Brownies with Almond Flour!
These aren’t just your average brownies—they’re incredibly fudgy with a soft, velvety texture that melts in your mouth, making them the perfect treat for anyone, gluten-free or not. The almond flour not only makes them gluten-free but adds a delightful nutty flavor that enhances the richness of the chocolate and the vibrant red hue of the cocoa. Trust me when I say that you won’t miss the wheat flour!
In this post, you’re going to learn why this particular recipe stands head and shoulders above others—both in taste and health—and why they’ll steal the show at any gathering. I can’t wait to share it with you and help you create new sweet memories for your family!
What Are Gluten Free Red Velvet Brownies with Almond Flour?
Gluten Free Red Velvet Brownies with Almond Flour have a delightful history rooted in tradition. Typically, red velvet desserts are all about that elegant, eye-catching color and a subtle chocolate flavor that charms every sweet tooth. These brownies pack that same warmth but take on a fudgy, chewy texture that elevates the classic recipe to dizzying heights.
Unlike traditional red velvet cakes, these brownies leverage the health benefits of almond flour while delivering a rich cocoa taste that dances on your palate. They are definitely a crowd-pleaser—perfect for birthdays, potlucks, or even just a cozy night in with a good book. When you need a little comfort or a pick-me-up after a long day, making a batch of these brownies is just the remedy you need!
Why You’ll Love This Recipe
- Decadent and Fudgy: Unlike some store-bought brownies that can be dry or lack flavor, these Gluten Free Red Velvet Brownies are rich and melt-in-your-mouth good. The almond flour keeps them moist, ensuring each bite is an experience.
- Cost-Effective: Let’s face it, gluten-free desserts can be pricey! However, making your own means you know exactly what’s going in, and it can be much more affordable than splurging at specialty bakeries.
- Customizable: Want to amp up the decadence? Add in some chocolate chips or nuts! You can mix it up based on what you have on hand or your flavor preferences.
- Easy to Make: This recipe is super straightforward—if you can whisk and mix, you can whip these brownies up in no time! Perfect for both beginner and experienced bakers alike.
- Healthier Option: Sure, they’re still brownies—but with almond flour and a sugar substitute, this recipe provides a lighter take on the usually calorie-laden treat.
Chef’s Tip: Remember to account for cooling time; these brownies are best enjoyed after they’ve set a bit!
Ingredients
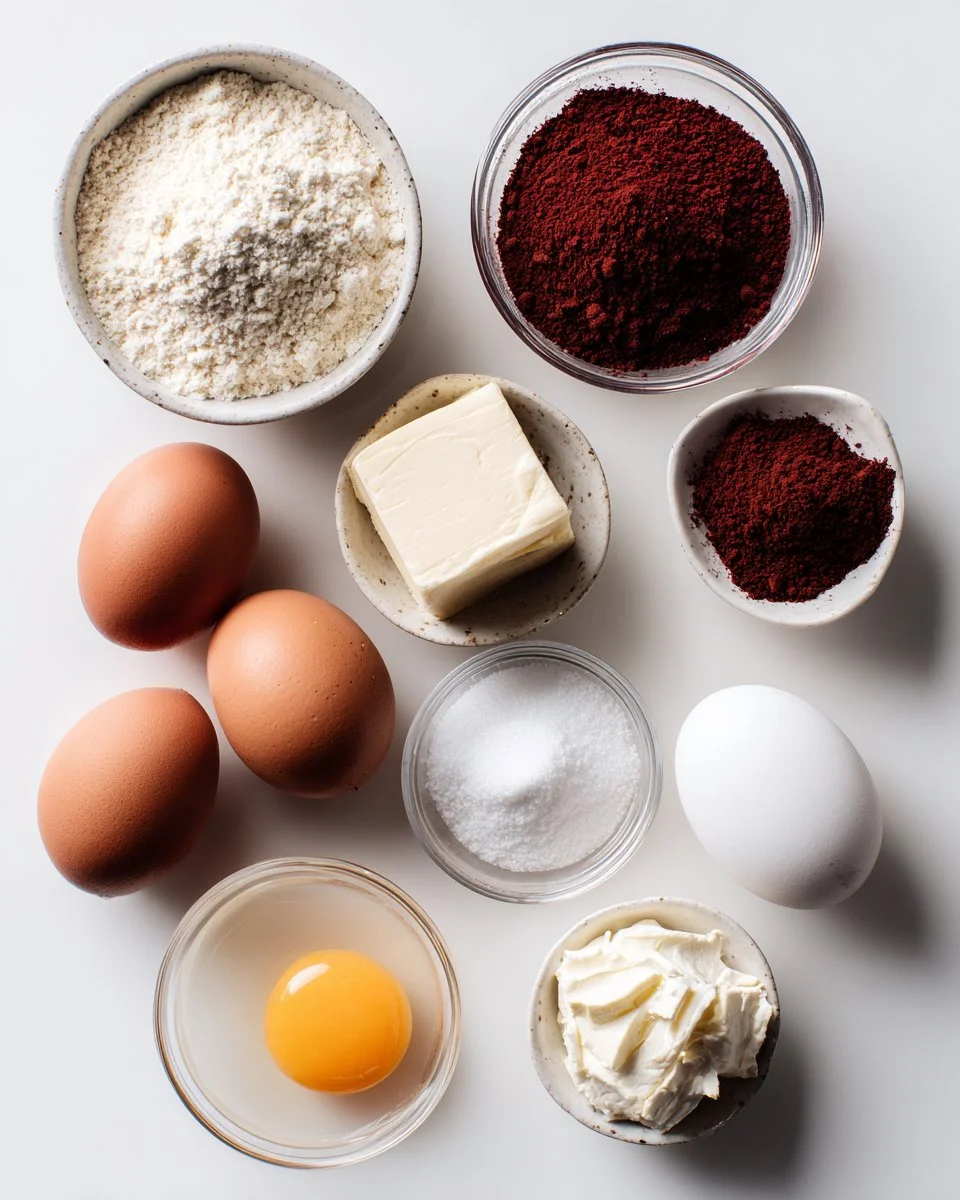
- 3/4 cup almond flour: This nutty flour is a great gluten-free alternative that brings moisture and flavor.
- 3 eggs: Room temperature eggs whisk better and contribute to the batter’s fluffiness.
- 10 tbsp butter: Melted butter adds richness. Be sure to let it cool slightly before adding to the eggs.
- 1/3 cup cocoa powder: Use high-quality Dutch-processed cocoa for a deeper flavor.
- 3/4 cup sweetener: I recommend using a granulated sugar alternative, such as erythritol or coconut sugar, for that sweetness without the carbs.
- 1 tsp baking powder: This helps your brownies rise slightly for a light texture.
- 1 tsp vinegar: A little acid helps activate the baking powder and complements the cocoa.
- 1 tbsp red food coloring: It wouldn’t be red velvet without that pop of color!
- 1/4 tsp salt: Balance is key, and salt enhances the overall flavor.
- 6 oz cream cheese: Softened—this will be the delicious swirl in your brownies.
- 1/4 cup sweetener (for cream cheese layer): If you want it sweet, you could also leave this unsweetened for a different flavor profile.
- 1 egg (for cream cheese layer): This adds creaminess and binds the cream cheese mixture.
- 1 1/2 tsp vanilla: Quality vanilla extract brings out all the flavors beautifully.
Note: Feel free to substitute any sweetener according to your dietary needs—just remember to adjust the measurements to match sweetness levels.
Step-by-Step Instructions
Preheat your oven to 350 degrees F and grease an 8×8 inch baking pan. This ensures easy release once baked.
Prepare the cream cheese layer: In a bowl, beat the cream cheese, 1/4 cup sweetener, 1 egg, and vanilla until smooth and creamy. This should take about 2 minutes. Set this aside.
Melt the butter: In a microwave-safe bowl, melt your 10 tbsp of butter until just melted, then let it cool for 5 minutes.
Combine wet ingredients: In another bowl, whisk together the 3 eggs, vinegar, and red food coloring. Add the slightly cooled melted butter and mix thoroughly until combined. This should be about 1-2 minutes.
Mix the dry ingredients: In a separate bowl, whisk together the almond flour, cocoa powder, 3/4 cup sweetener, baking powder, and salt until well incorporated.
Fold: Gradually fold the dry ingredients into the wet mixture. Be careful not to overmix; just combine until you see no dry flour—this should take about 30 seconds.
Assemble: Pour the brownie batter into the prepared baking pan and dollop the cream cheese mixture on top. Use a knife or a toothpick to swirl the two together for a marbled effect.
Bake: Bake for 25-30 minutes, or until the edges are set, and a toothpick inserted into the center comes out with a few moist crumbs.
Cool: Let the brownies cool in the pan for about 15 minutes before transferring to a wire rack. This cooling ensures they firm up and are easier to cut.
Chef’s Tip: Keep an eye on the brownies in the last few minutes of baking—ovens vary!
Expert Tips & Tricks
- Use Fresh Ingredients: Make sure your baking powder and cocoa powder are fresh for the best rise and flavor.
- Room Temperature Ingredients: Allow your eggs and cream cheese to come to room temperature before mixing; this will give a smoother batter.
- Add Ins: For an extra layer of flavor, consider adding chopped pecans or a handful of mini chocolate chips.
- Storage: These brownies can be stored at room temperature for up to 3 days or in the refrigerator for a week.
- Make-Ahead: Mix the batter a day ahead and store it in the fridge until you’re ready to bake.
- Troubleshooting: If your brownies are falling apart after baking, they may need a few more minutes to set!
Serving Suggestions
These Gluten Free Red Velvet Brownies are delightful alongside a cold glass of almond milk or a scoop of dairy-free vanilla ice cream for a lovely dessert combo. For an elegant presentation, dust with a sprinkle of powdered sugar or serve with fresh raspberries on the side. If you are making these for a special occasion, consider layering them with whipped cream and fresh berries for a stunning dessert that steals the show!
Variations & Substitutions
- Different Flavor Combinations: Try substituting half of the cocoa powder for white chocolate chips for a unique twist.
- Dietary Restriction Adaptations: For a vegan version, use flax eggs instead of eggs, and coconut oil instead of butter.
- Seasonal Variations: Add a dash of peppermint extract around the holidays for a festive flair or sprinkle in some cinnamon for a fall-inspired treat.
Nutrition & Storage Info
- Prep Time: 15 minutes
- Cook Time: 25-30 minutes
- Total Time: 45 minutes
- Yield: 16 servings
- Estimated Calories: Approximately 150-200 calories per brownie, depending on sweetener used.
- Storage Instructions: Store at room temperature in an airtight container for up to 3 days, in the fridge for a week, or in the freezer for up to 3 months.
FAQ Section
Can I make these brownies without red food coloring?
- Absolutely! You can omit it for a chocolate brownie or substitute with beet powder for natural coloring.
Is there a substitution for almond flour?
- Yes, you can use coconut flour but note that it absorbs more moisture. You’ll need to adjust the liquid in your recipe.
How can I tell when my brownies are done?
- The edges will set, and a toothpick inserted in the center should come out with a few moist crumbs clinging to it.
Can I freeze these brownies?
- Yes! Just wrap them tightly in plastic wrap, and they will last up to three months in the freezer.
What can I serve these brownies with?
- They pair beautifully with ice cream, whipped cream, or even a dollop of Greek yogurt for a tangy contrast!
Can I use regular sugar instead of sweetener?
- Yes, you can substitute with granulated sugar or brown sugar, keeping in mind the calorie count will increase.
What if my brownie batter seems too thick?
- If it feels too thick, add a tablespoon of milk or water to loosen it slightly.
Are these brownies gluten-free?
- Yes! Using almond flour instead of wheat flour makes them entirely gluten-free.
How do I get my cream cheese mixture to swirl well?
- You may want to slightly warm the cream cheese mixture if it’s too thick; it should be a spreadable consistency.
Can I add nuts to this recipe?
- Definitely! Chopped walnuts or pecans would add a delicious crunch to your brownies.
Conclusion
Gluten Free Red Velvet Brownies with Almond Flour are not just a dessert; they’re a nostalgia-inducing treat that invites you to indulge without the guilt. With the incredible texture and rich flavor, they’re perfect for any occasion or simply as a sweet treat for yourself after a long day. I encourage you to give this recipe a try and experience the joy that comes from creating something delicious!
I’d love to hear your feedback, so please drop a comment below if you’ve tried them or if you have any tips of your own. And while you’re here, check out some of my other favorite recipes on the blog—you just might find your next baking adventure!