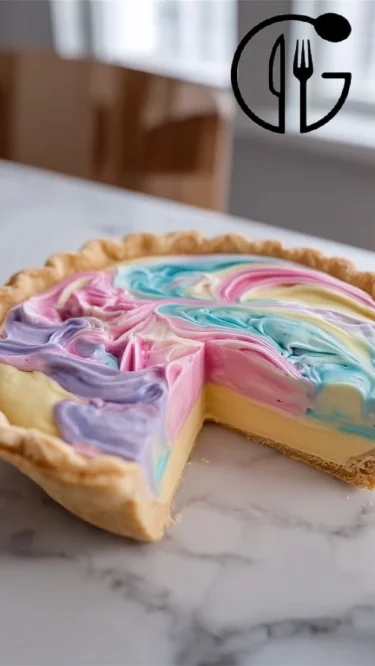
Colorful Easter Swirl Pie: A Festive Twist on a Classic Dessert
As a passionate food lover, there’s a certain magic that fills the air during the Easter season. Memories of my family gathered around a table, sharing joyful stories, laughter, and, of course, delicious desserts flood my mind. One treat that has become a staple in our household is the Easter Swirl Pie—a vibrant, creamy delight that captures the essence of springtime! This particular pie is special not just for its stunning appearance but for the nostalgic moments it evokes with every slice.
Why is this Easter Swirl Pie different from the rest? It’s the textural balance of smooth cream cheese and fluffy whipped cream that makes it stand out, along with the artistic flair of the pastel swirl that beckons to be admired and devoured. With this recipe, you won’t just make a pie; you’ll create a centerpiece for your holiday gatherings that harmonizes taste, beauty, and cherished family memories.
So, roll up your sleeves, my fellow bakers! In this post, I’ll guide you step-by-step through creating a vibrant Easter Swirl Pie that’s not only easy but also deeply satisfying. You’ll learn tips and tricks along the way to ensure your pie is a showstopper. Let’s get started and make some sweet memories together!
What Are Easter Swirl Pies?
Easter Swirl Pies are a delightful fusion of creamy filling and a mesmerizing visual swirl created using pastel food coloring. Traditionally enjoyed during the Easter holidays, this pie captures the essence of rebirth and renewal reflected in the spring season. Originating from various cream pies, their playful appearance mimics the colorful decorations of Easter eggs and floral blooms, making them an ideal dessert for festive gatherings.
When you take your first bite, you’ll experience the silky smooth texture of the cream cheese and the lightness of the whipped cream perfectly balanced with the sweet touch of powdered sugar. The hints of vanilla and the playful colors wrap up the pie’s charm, making it a feast for both the eyes and the palate.
Whether you’re celebrating Easter or simply embracing the arrival of spring, this pie is perfect for family gatherings, brunches, or simply as a treat for yourself. It’s an intersection of taste, texture, and beauty that leaves everyone reaching for seconds!
Why You’ll Love This Recipe
You may wonder why you should make your own Easter Swirl Pie instead of picking one up from the store. Here are five compelling reasons that highlight what makes this recipe a must-try:
Bursting with Flavors: Unlike store-bought versions that often skimp on quality, this pie is crafted with fresh ingredients that elevate the overall taste. You control the sweetness and the flavors, making it customizable to your liking.
Cost-Effective: Crafting your Easter Swirl Pie at home is not only fun but can also save you a considerable amount compared to buying a similarly fancy pie from a bakery. With just a few simple ingredients, you can create a stunning dessert that looks and tastes gourmet without breaking the bank.
Customizable Creations: Want to try a different flavor? Go ahead! You can easily adapt this recipe by adding your favorite flavors or ingredients, like citrus zest or different extracts, making each Easter Swirl Pie uniquely yours.
Simplicity and Ease: This recipe is suitable for all skill levels, from beginner bakers to seasoned pros. It requires minimal effort and only about an hour of active time, leaving you plenty of time to enjoy with friends and family.
Memorable Moments: Baking this pie creates an opportunity to bond with loved ones, bringing a sense of nostalgia as you create memories just like I did with my family. It’s not just about the dessert; it’s about the fun and love sprinkled throughout the process.
So, are you ready to dive into the world of colorful baking? Let’s get started on your Easter Swirl Pie adventure!
Ingredients
Here’s what you’ll need to make your own Easter Swirl Pie:
1 pie crust
- Tip: I personally prefer a buttery homemade crust, but store-bought works just fine if you’re in a pinch!
1 cup cream cheese, softened
- Tip: Make sure it’s at room temperature for easy blending. I’ve found that Philadelphia brand cream cheese gives the best smoothness!
1 cup powdered sugar
- Note: For a less sweet version, you can reduce this to 3/4 cup.
1 teaspoon vanilla extract
- Pro Tip: Use high-quality pure vanilla extract for the best flavor.
1 cup whipped cream
- Homemade or store-bought: I often make my own for a fresh taste or use brands like Reddi-wip if I’m short on time.
Food coloring (pastel colors)
- Suggestions: Look for gel food coloring for vibrant colors that won’t dilute your filling.
Here’s how to prep for success: Let your cream cheese come to room temperature to avoid lumps, and if you’re making a homemade crust, roll it out while your oven is preheating.
Step-by-Step Instructions
Preheat your oven to 350°F (175°C). This ensures your pie will bake evenly.
Roll out the pie crust and fit it into a pie pan. A little overhang is fine, as you can always trim it once it’s placed in the pan for a cleaner edge.
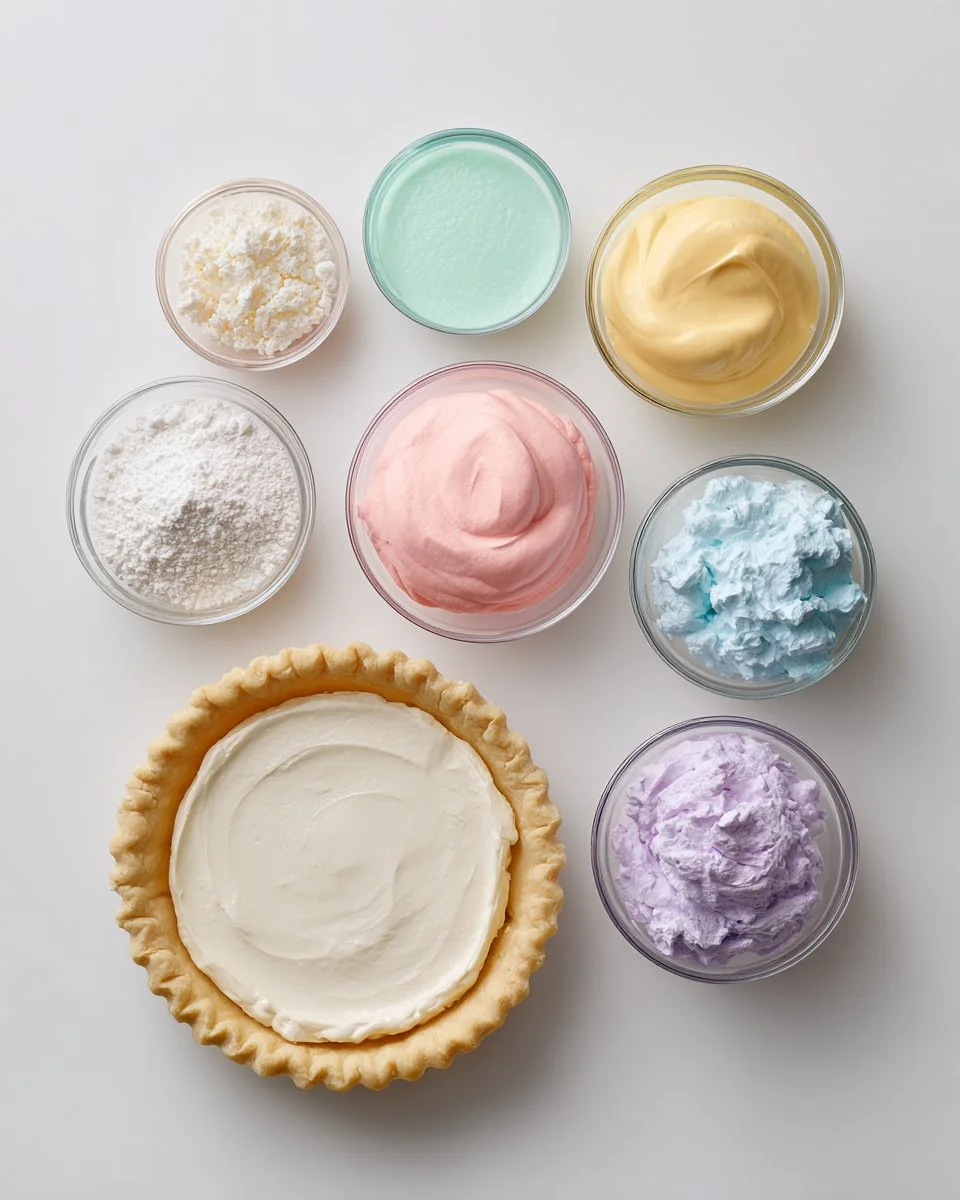
In a mixing bowl, beat the cream cheese, powdered sugar, and vanilla extract until smooth—about 2 minutes with an electric mixer. You want it light and fluffy!
Gently fold in the whipped cream until well combined; be careful not to deflate that air! A spatula works wonders here.
Divide the filling into separate bowls; I typically use three or four for a more colorful effect. Add different food coloring to each bowl, stirring until the desired pastel colors are achieved.
Using a spoon, dollop the colored fillings into the pie crust alternately. Don’t worry about perfection; aim for a fun, free-spirited pattern!
Use a knife to gently swirl the colors together for a marbled look. Be careful not to over-swirl, as you want distinct colors.
Bake the pie for 30-35 minutes or until set in the center. Your kitchen will smell divine!
Allow to cool completely, then refrigerate for at least 2 hours before serving to let the flavors meld into a creamy dream. Enjoy your colorful Easter dessert!
Chef’s Tips:
- If you prefer a firmer pie, chill it overnight.
- Be cautious not to overmix the fillings after adding the whipped cream, as achieving that light texture is key!
Common mistakes to avoid:
- Forgetting to let your cream cheese soften can lead to lumps in your filling.
- Don’t skip cooling and chilling; it makes all the difference in texture!
Expert Tips & Tricks
To elevate your baking game, here are some expert tips that I’ve gathered over the years:
Quality Ingredients Matter: Always opt for good quality cream cheese and heavy cream. It can elevate the flavors and textures of your pie.
Custom Flavoring: Experiment with different extracts! Almond extract can add a lovely twist alongside vanilla.
Storage Tips: Store any leftovers tightly covered in the refrigerator for up to five days. You can also freeze the unbaked pie for up to 2 months; just let it thaw and bake when you’re ready.
Make-Ahead Magic: You can prepare the filling a day in advance and keep it chilled, then assemble and bake it just before your event.
Troubleshooting: If your pie cracks while baking, it might have cooked too long, so keep an eye on the time as ovens can vary.
Presentation Power: Dust the top with powdered sugar before serving or add fresh berries for a pop of color and flavor. A dollop of whipped cream never hurts either!
Serving Suggestions
Pair your Easter Swirl Pie with fresh fruit salads or a light whipped cream topping for a delightful balance of sweetness. Consider serving a refreshing lemonade or iced tea alongside to complement the richness of the pie.
For presentation, you could sprinkle edible flowers or pastel sprinkles on top before serving to highlight the pie’s vibrant colors! This pie is perfect for Easter gatherings, spring brunches, or just to treat your family on a sunny afternoon.
Variations & Substitutions
Want to mix things up? Try these variations:
- Flavor Combinations: Add lemon or lime zest for a zesty twist, or use chocolate pudding for an indulgent version.
- Dietary Adaptations: For a gluten-free option, use a gluten-free pie crust or create a crustless version in a springform pan!
- Seasonal Swaps: In the fall, swap the pastel colors for autumn hues and add pumpkin spice flavoring for a harvest-themed dessert.
Nutrition & Storage Info
- Prep time: 20 minutes
- Cook time: 30-35 minutes
- Total time: Approximately 2 hours (including cooling and refrigeration time)
- Yield: 8 servings
- Estimated calories per serving: 280 calories
- Storage: Keep pie covered in the refrigerator for up to 5 days or freeze for 1-2 months. Make sure to wrap tightly!
FAQ Section
Can I use a different type of crust?
Absolutely! This filling works well with cookie crusts or even a graham cracker crust for a twist.What if my cream cheese is lumpy?
Ensure cream cheese is at room temperature before beating. If it’s still lumpy, mix longer; make sure your mixer is thoroughly cleaned first.Can I make this pie vegan?
Yes! Substitute with vegan cream cheese and whipped coconut cream, and use a vegan pie crust.How can I decorate the pie?
Consider topping it with fruit, edible flowers, or a drizzle of chocolate sauce for an elegant finish!Is it safe to leave it out?
It’s best served cold and consumed within two hours if left at room temperature.Do I have to bake it?
While baking firms up the filling, it’s not necessary. You can chill it for a no-bake version, adjusting the setting time.Can I use regular food coloring?
Gel food coloring is preferred for more vibrant hues without adding too much liquid.What type of whipped cream is best?
Homemade whipped cream adds a lovely freshness, but store-bought creams work well in a pinch.Can I double the recipe?
Yes, simply double all ingredients and use a larger pie pan or make two smaller pies!What can I do with leftovers?
Use the filling in parfaits layered with granola and fruit, or make mini tartlets with leftover crust.

Conclusion
This Easter Swirl Pie is more than just a dessert; it’s a canvas for creativity and a delicious way to bring joy to your table. From its delightful presentation to its heavenly taste, it captures the spirit of the season and creates lasting memories. So why wait? Try your hand at this colorful creation, and I encourages you to share your feedback—what did your family think?
And don’t forget to check out more festive recipes on my blog, like my Spring Berry Tart or Lemon Meringue Pie for additional sweet treats to celebrate the season. Happy baking, and may your kitchen be filled with color and joy!