Decadent Reese’s Peanut Butter Oreo Truffles: The Ultimate Indulgence for Every Occasion
It was one of those chilly Saturday afternoons, the kind that calls for something sweet and comforting. I scoured my pantry and stumbled upon a pack of Oreo cookies, a jar of creamy peanut butter, and an almost-empty tub of cream cheese. As I mused over what to create, I remembered the Decadent Reese’s Peanut Butter Oreo Truffles I’d stumbled upon a year earlier. I decided to whip up a batch, taking me straight back to my childhood. I can still hear the laughter around the kitchen table as my family enjoyed gooey chocolate treats that I would sneakily prepare whenever I wanted to share a little love.
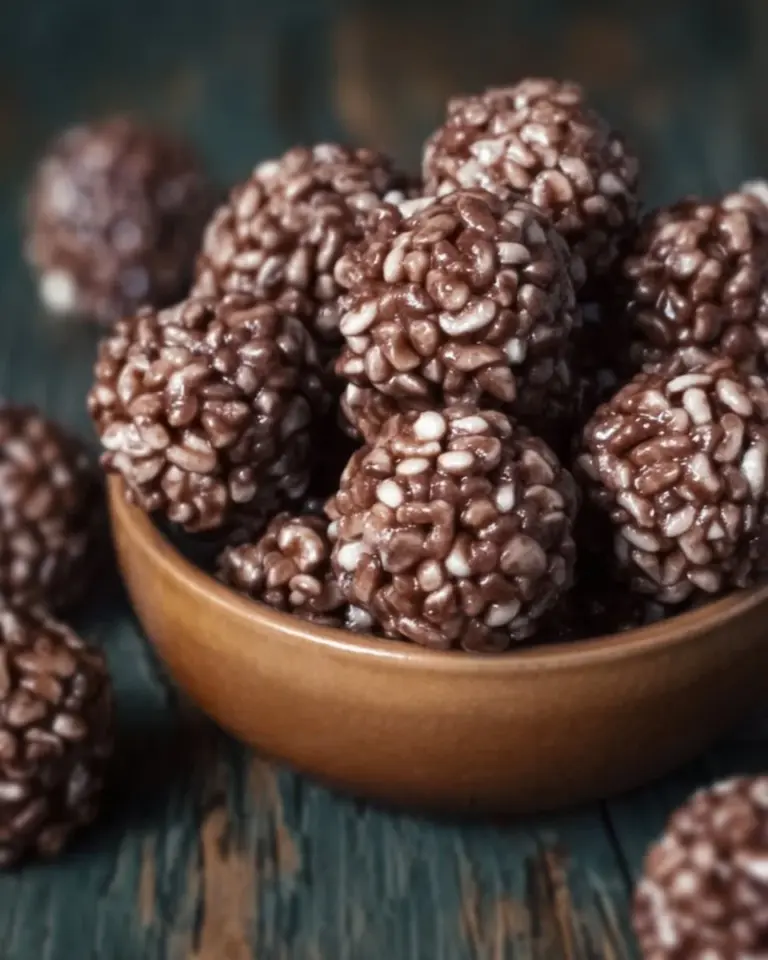
These delightful truffles are not just any dessert; they are a heavenly blend of crispy Oreos, creamy peanut butter, and rich chocolate. What sets my take on Decadent Reese’s Peanut Butter Oreo Truffles apart from others is how simple and satisfying the process is, creating rich flavors that dance on the tongue. Each bite encapsulates pure bliss, evoking those warm memories of family gatherings and cozy nights in.
In this recipe, I’ll teach you the secrets to making these truffles so that you too can bring a sprinkle of joy to your home. Your friends and family will be begging for your “special dessert,” and I promise you—they’ll never believe how easy it is to make!
What Are Decadent Reese’s Peanut Butter Oreo Truffles?
You might be wondering where the magic of these truffles began. Combining the beloved Oreo cookie with peanut butter and cream cheese, this recipe draws inspiration from both nostalgia and indulgence. The truffles are rich and decadent, featuring a smooth, creamy center that melts in your mouth, enveloped by a luscious chocolate coating.
What makes Decadent Reese’s Peanut Butter Oreo Truffles stand out is their luscious texture and intense flavor balance. The crunch from the Oreo cookies gives a delightful contrast to the creamy interior—each bite is a delicious surprise! Whether you’re celebrating a special occasion or simply looking to treat yourself, these truffles are a perfect choice.
You can whip them up for holidays, parties, or even a cozy night in—anytime you crave a bit of decadence!
Why You’ll Love This Recipe
There are countless reasons why you’ll fall in love with these Decadent Reese’s Peanut Butter Oreo Truffles!
Irresistible Taste: The combination of Oreo cookies and peanut butter is a classic that never disappoints. Just imagine the rich chocolate paired with the creamy, nutty center—it’s a match made in dessert heaven!
Cost-Effective: Homemade is often better (and cheaper) than store-bought treats! This recipe will save you a few bucks while delivering an extravagant flavor experience.
Customization Options: Want to swap out the Oreos for gluten-free cookies? Or maybe use a different nut butter—almond or cashew, perhaps? The possibilities are endless, and you can make these truffles your own.
Easy to Make: If baking intimidates you, don’t worry! This recipe is incredibly beginner-friendly, taking less than an hour from start to finish. Plus, minimal cleanup means more time to enjoy your creations!
Perfect for Any Occasion: Birthdays, holidays, or just a well-deserved treat after a long day—these truffles fit any scenario. They make fantastic gifts too; packaged cutely, they can spread laughter and cheer to your loved ones!
Ingredients
To create these heavenly Decadent Reese’s Peanut Butter Oreo Truffles, you’ll need the following ingredients:
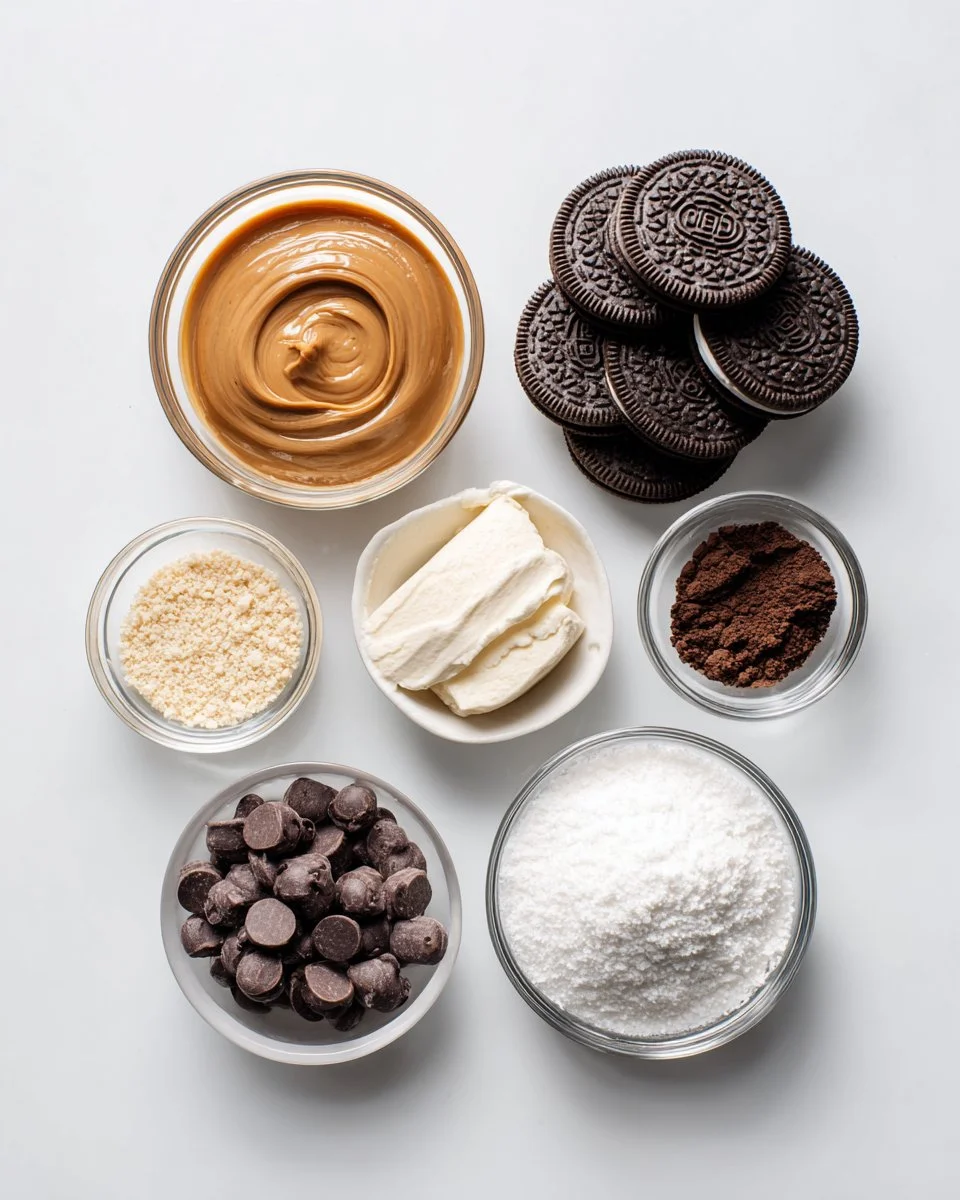
- 1 package Oreo cookies (I recommend using regular Oreos for the classic flavor, but feel free to experiment with your favorite variations!)
- 1 cup peanut butter (creamy or crunchy—your choice!)
- 8 oz cream cheese, softened (full-fat cream cheese works best for a smooth texture)
- 2 cups chocolate chips (semi-sweet or dark chocolate—both yield delicious results!)
- 1 tablespoon coconut oil (optional, this helps with the melting and smoothness of the chocolate)
Prep Notes
- Cream Cheese: Be sure to leave your cream cheese at room temperature. This makes it easier to blend with the peanut butter and Oreo crumbs.
- Oreo Cookies: You can crush them by hand, but a food processor makes it quick and easy.
- Chocolate Chips: If you’re feeling adventurous, you can also add a splash of flavored extract (like vanilla or peppermint) to your melted chocolate for an extra kick.
Step-by-Step Instructions
Ready to dive into creating your Decadent Reese’s Peanut Butter Oreo Truffles? Follow these simple steps:
Crush the Oreo cookies: Add the Oreo cookies into a food processor and pulse until they turn into fine crumbs. This will take about 30 seconds. If you don’t have a processor, you can place them in a ziplock bag and crush them with a rolling pin.
Make the Filling: In a large mixing bowl, combine the crushed Oreos with 1 cup of peanut butter and 8 oz of softened cream cheese. Mix until completely blended—it should look like cookie dough! (2–3 minutes of mixing should do the trick.)
Form the Balls: Use your hands to roll the mixture into bite-sized balls (about 1 inch in diameter). Place them on a baking sheet lined with parchment paper. You should yield approximately 20-24 truffles.
Freeze: Place the baking sheet in the freezer and let the balls freeze for about 30 minutes. This will help them hold their shape when you dip them in chocolate.
Melt the Chocolate: While the truffles freeze, melt the chocolate chips in a microwave-safe bowl or a double boiler. If using coconut oil, add it while melting for a smooth consistency. Melt in 30-second intervals, stirring in between until smooth and glossy (about 1-2 minutes total).
Dip the Truffles: Remove the truffles from the freezer, and one at a time, dip each frozen ball into the melted chocolate, using a fork to help coat it evenly. Let the excess chocolate drip off, then place them back on the parchment paper.
Set the Chocolate: Allow the chocolate to set at room temperature, or speed up the process by placing the truffles back in the fridge for about 15 minutes.
Enjoy: Once the chocolate has hardened, grab a friend, plop down on the couch, and dive into your truffles!
Expert Tips & Tricks
To ensure your Decadent Reese’s Peanut Butter Oreo Truffles are a hit, keep these tips in mind:
Quality Ingredients: The better the ingredients, the better the outcome! Go for top-shelf chocolate and natural peanut butter for the best flavor.
Make-Ahead Option: You can make the filling a day in advance. Just store it in an airtight container in the fridge until you’re ready to roll.
Storage: These truffles can be stored in the fridge for up to a week or in the freezer for up to a month (just make sure they are well-wrapped).
Common Mistakes to Avoid: Ensure your chocolate isn’t too hot when dipping, as that could melt the filling. If it firms up while you’re dipping, simply reheat gently to get it flowing again.
Presentation: Use colored sprinkles or crushed nuts for a fun topping and to give your truffles a festive look!
Serving Suggestions
These Decadent Reese’s Peanut Butter Oreo Truffles shine on their own, but here are a few ideas to elevate your serving game:
- Pair them with a side of fresh strawberries or raspberries for a burst of fruity freshness.
- Serve alongside vanilla ice cream for an indulgent treat.
- For a themed dessert table, complement them with other chocolate delights, like brownies or chocolate-covered pretzels.
They’re perfect for birthday parties, holiday gatherings, or simply sharing with your loved ones as a sweet surprise!
Variations & Substitutions
The beauty of Decadent Reese’s Peanut Butter Oreo Truffles lies in its versatility. Here are a few variations to consider:
Flavor Combinations: Try swapping out regular Oreos for mint-flavored or peanut butter Oreos for a twist.
Dietary Adaptations: Use gluten-free Oreos or nut-free butter (like sunflower or soy nut butter) for allergen-friendly options.
Seasonal Variations: For festive occasions, add crushed peppermint candies on top around the holidays, or a dash of pumpkin spice in the filling for fall-themed treats.
Nutrition & Storage Info
- Prep Time: 15 minutes | Cook Time: 5 minutes | Chill Time: 30 minutes | Total Time: 50 minutes
- Yield: Approximately 20-24 servings
- Estimated Calories Per Serving: Approximately 180 calories
Storage Instructions
- Room Temperature: Keep in a cool, dry area for 2-3 days.
- Refrigerator: Store in an airtight container for up to a week.
- Freezer: Keep for up to a month. Thaw before serving for the best flavor and texture.
FAQ Section
Can I use low-fat cream cheese?
Yes! While full-fat cream cheese gives the best flavor, low-fat cream cheese can work, though it might affect the truffle’s texture slightly.Are these truffles gluten-free?
If you use gluten-free Oreos, then yes, these truffles can be gluten-free!Can I leave out the peanut butter?
Yes, but you would need to substitute it with another nut or seed butter to maintain a similar texture.How do I make them vegan?
Use dairy-free cream cheese and chocolate, plus substitute peanut butter with a vegan option.What is the best way to melt chocolate?
A double boiler is ideal, but if you’re using the microwave, make sure to do it in short intervals and stir until smooth to avoid burning.How long do they last?
These truffles will stay fresh in the fridge for about a week or in the freezer for up to a month.Can the truffles be made without coconut oil?
Yes, it’s optional! The coconut oil just adds a bit of sheen and smoothness but isn’t necessary for flavor.What if my chocolate hardens before I dip?
Gently reheat it, adding a little more coconut oil if needed to loosen it up.Can I add toppings?
Absolutely! Sprinkles, crushed Oreos, or even chopped nuts make great toppings.Do I have to freeze the truffles?
Freezing helps them maintain their shape during coating; however, you can refrigerate them for 20-30 minutes as an alternative.
Conclusion
These Decadent Reese’s Peanut Butter Oreo Truffles are a wonderful way to indulge your sweet tooth while evoking cherished memories. The blend of Oreos, creamy peanut butter, and rich chocolate create a dessert you’ll be proud to share. So why not gather your loved ones and whip up a batch together? I’d love to hear how yours turns out! Drop a comment below, and don’t forget to check out my other sweet creations, like Chocolate Hazelnut Lava Cakes or No-Bake Strawberry Cheesecakes, right here on the blog. Enjoy the sweetness!

Decadent Reese’s Peanut Butter Oreo Truffles
Ingredients
Method
- Crush the Oreo cookies in a food processor until they turn into fine crumbs.
- In a large mixing bowl, combine the crushed Oreos, peanut butter, and softened cream cheese, mixing until blended.
- Roll the mixture into bite-sized balls (about 1 inch in diameter) and place on a baking sheet lined with parchment paper.
- Freeze the balls for about 30 minutes to help them hold their shape.
- Melt the chocolate chips in a microwave-safe bowl or a double boiler, adding the coconut oil for smoothness.
- Dip each frozen ball into the melted chocolate, letting the excess drip off, then place them back on the parchment paper.
- Allow the chocolate to set at room temperature or speed up the process by refrigerating for about 15 minutes.
- Enjoy your truffles with friends or family, savoring the sweet, nostalgic flavors.