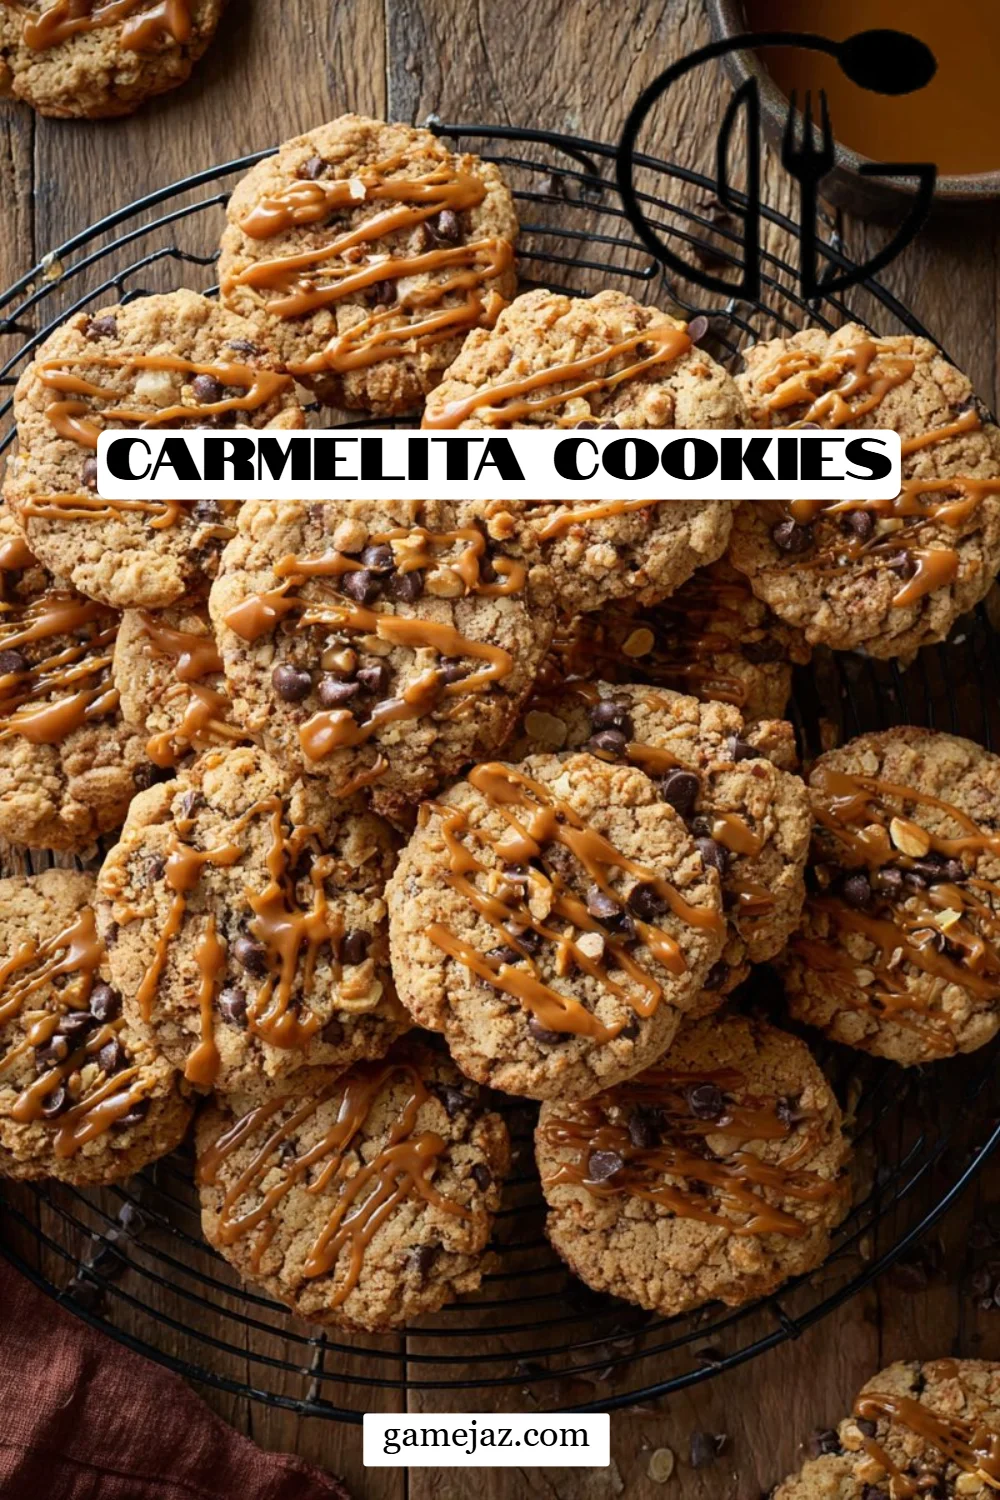
Growing up, my kitchen was always filled with the comforting aroma of freshly baked goodies. One particular treat that would consistently bring my family together was my Aunt Lucy’s famed Carmelita Cookies. With their chewy texture, gooey chocolate, and rich caramel goodness, these cookies quickly became a family favorite. I can still picture my younger self eagerly waiting by the oven, eyes wide with anticipation, and a sweet tooth ready for indulgence.
But why are these Carmelita Cookies so special, you ask? It’s not just the perfect blend of oats and chocolate that makes them irresistible; it’s the memories that linger long after the last crumb is gone. Each bite takes me back to cozy family gatherings and laughter animating the air, reminding me of the things that truly matter.
This recipe is better than others you’ll find online not only for its delightful balance of flavors but also because of the tips and tricks I’ve gleaned from years of baking adventures. In this post, you’ll learn how to make these decadent Carmelita Cookies your own, introducing customizable twists and ensuring that they turn out perfectly every time. So, grab your apron and let’s create some sweet memories together!
What Are Carmelita Cookies?
Carmelita Cookies hold a special place in the hearts of cookie lovers everywhere. These delightful treats have their roots in North America, where they are often hailed as a classic dessert bar that packs a flavor punch in every bite. They boast a unique combination of chewy oats, rich chocolate, and indulgent caramel. A tantalizing mix that creates not just a cookie, but a full-on festive experience for the palate.
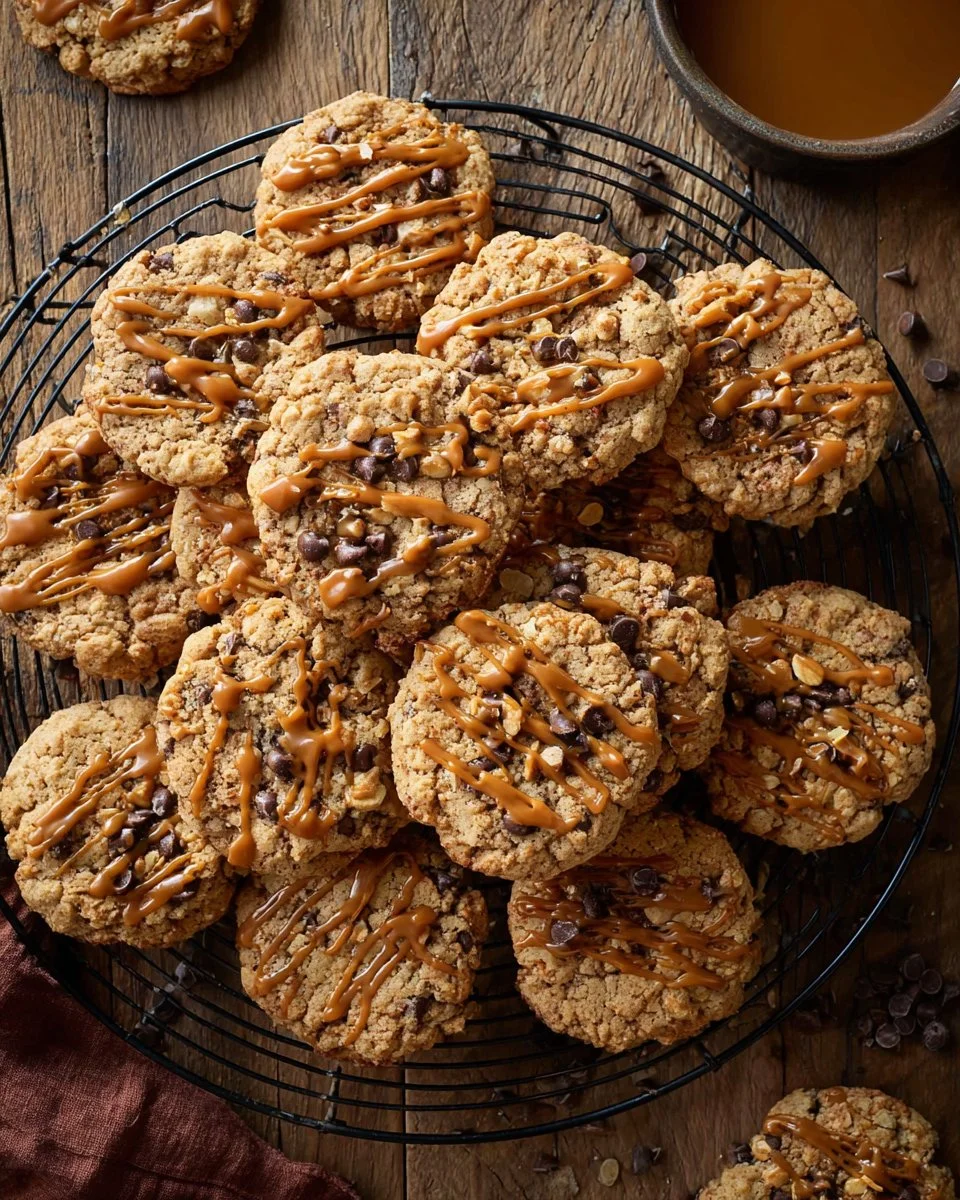
These cookies have a beautifully structured texture—crisp on the edges with a soft and gooey center. When you bite into one, you encounter the warm, buttery scent of oats mingling with chocolate. Each batch is uniquely satisfying, making these cookies an ideal treat for gatherings, holiday parties, or simply an afternoon pick-me-up. They are often made when you want to impress guests with minimal effort, making them a go-to option as the perfect crowd-pleaser.
Why You’ll Love This Recipe
Easier Than You Think: Many people shy away from baking cookies, fearing they won’t turn out. Trust me, this Carmelita Cookies recipe is incredibly simple! With only a few key steps, anyone can achieve cookie perfection without the fuss.
Cost Effective: Why pay a premium for gourmet cookies at the store when you can make your own at home? The ingredients are mostly pantry staples and can easily be adjusted based on what you have on hand—saving you time and money!
Customizable: One of the best aspects of this recipe is its flexibility. You can swap out the chocolate chips for your favorite type, add nuts or even a sprinkle of sea salt on top for that gourmet touch. The possibilities are endless!
Healthier Twist Available: If you’re health-conscious, don’t worry! You can substitute some ingredients—for instance, using whole wheat flour or coconut sugar without compromising on taste.
Quick Turnaround: You’ll have these delightful cookies ready in no time! With just 7-8 minutes of baking and minimal prep, you can satisfy your sweet cravings without spending hours in the kitchen.
So get ready to dive into the delicious world of Carmelita Cookies—this recipe is your ticket to cookie bliss!
Ingredients
Here’s what you’ll need to whip up your very own batch of Carmelita Cookies, complete with notes on quality and substitutions:
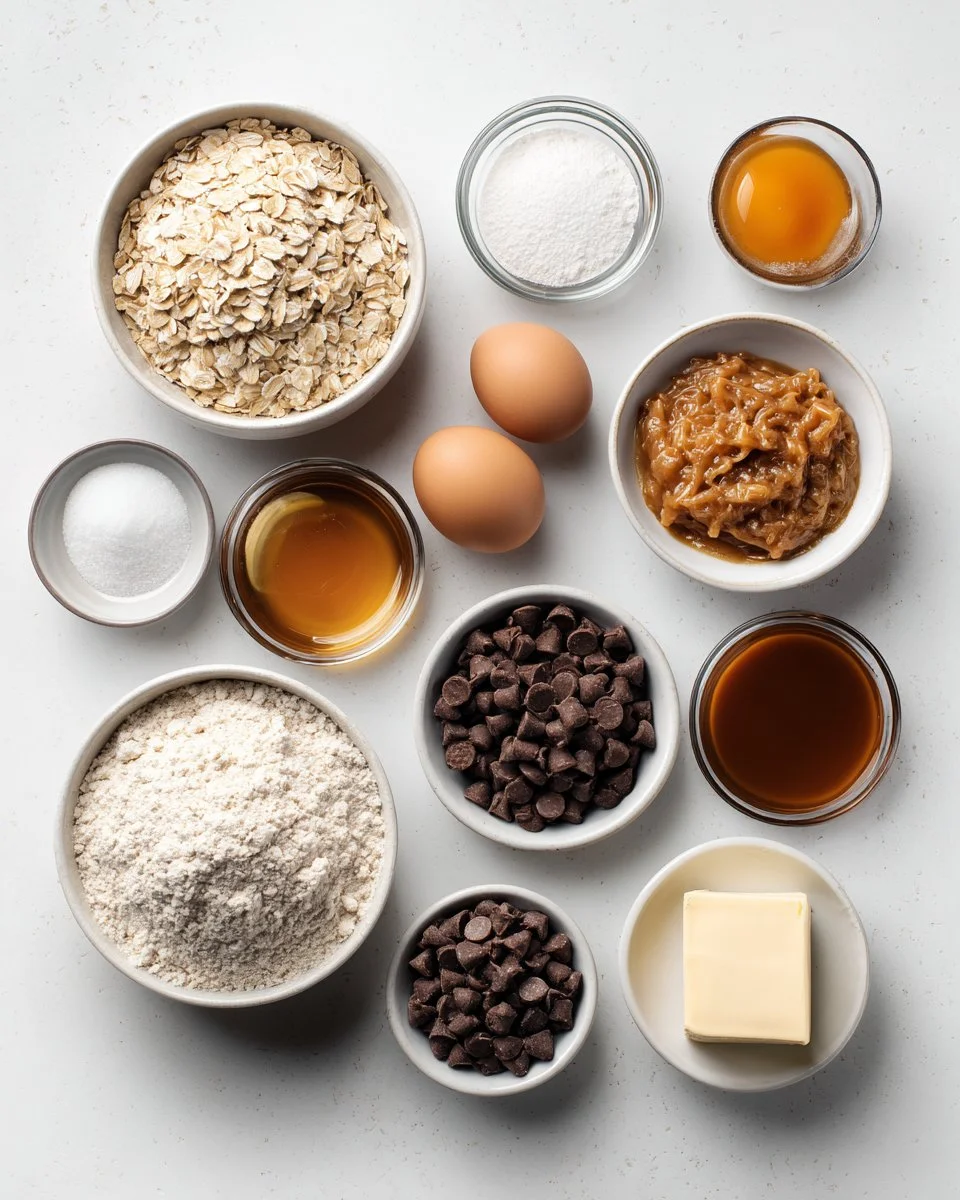
- 2 cups old-fashioned oats: For that chewy texture; quick oats can be used, but they may result in a softer cookie.
- 1 1/2 cups all-purpose flour: Regular or whole wheat flour works beautifully; just watch the texture.
- 1/2 teaspoon baking powder: Ensure your cookies rise perfectly.
- 1/2 teaspoon baking soda: This adds a gentle lift and helps with browning.
- 1/2 teaspoon kosher salt: Essential for balancing the sweetness.
- 1/2 cup unsalted butter, room temperature: I recommend using high-quality butter for the best flavor; let it sit out for about 30 minutes before baking.
- 1 cup light brown sugar, packed: Adds depth and moisture to the cookies.
- 2 large eggs, room temperature: If you forget to take them out, just place them in warm water for a few minutes to bring their temperature up.
- 1 tablespoon molasses: This ingredient provides a hint of warmth and richness to the cookie base.
- 1 teaspoon vanilla extract: For that wonderful aromatic note that brings all the flavors together.
- 1 cup caramel bits: These little treasures add that gooey, sticky deliciousness.
- 1 cup semi-sweet chocolate chips: The perfect counterpart to the caramel—feel free to substitute with dark or milk chocolate if preferred.
- Caramel sauce, for garnish: Drizzle this on top just before serving to elevate your cookies and provide an extra layer of flavor.
DIY tip: Use premium brands like Land O’Lakes for butter and Ghirardelli for chocolate chips if you want to treat yourself!
Step-by-Step Instructions
Let’s get baking! Follow these detailed steps and your kitchen will soon be filled with the heavenly scent of warm cookies.
Preheat the Oven: Preheat your oven to 400°F (200°C). This is crucial—starting with a hot oven will help the cookies bake evenly.
Prepare Your Baking Sheet: Line a baking sheet with parchment paper to prevent sticking.
Combine Dry Ingredients: In a large mixing bowl, whisk together the oats, flour, baking powder, baking soda, and salt. This step ensures that the leavening agents are evenly distributed for a perfect rise.
Mix the Wet Ingredients: In a stand mixer, beat the room-temperature butter and brown sugar on low speed until smooth. Add in the eggs, molasses, and vanilla, mixing until well combined (about 2-3 minutes).
Chef’s Tip: Scrape down the sides of the bowl to ensure nothing gets left behind.
Combine Dry and Wet: Gradually add the dry mixture to the wet, mixing until fully incorporated—a soft dough should form.
Fold in Treats: Gently mix in the caramel bits and chocolate chips until evenly distributed throughout the dough.
Scoop and Shape: Using a 2-tablespoon scoop, drop the dough onto the prepared baking sheet, and flatten them slightly to ensure even baking.
Bake: Place the sheet in the preheated oven and bake for 7-8 minutes, or until the edges are golden brown. The centers will look slightly underbaked, which is okay—they’ll firm up as they cool!
Cool and Drizzle: Allow the cookies to rest on the baking sheet for 2-3 minutes before transferring to a wire rack to cool completely. Drizzle with caramel sauce before serving.
Common Mistakes to Avoid: Make sure the butter is at room temperature—cold butter will not cream well, affecting the cookie’s texture.
Expert Tips & Tricks
Storage: Keep your cookies in an airtight container at room temperature for up to one week. For longer-lasting cookies, store them in the freezer, where they will last for up to three months.
Make-Ahead Instructions: You can prepare the dough ahead of time and refrigerate it for up to 48 hours. Just add a few minutes to the baking time if baking from the fridge.
Troubleshooting: If your cookies spread too much, check that your butter is at the right temperature and make sure not to overmix the batter.
Rest Before Baking: Cool the dough in the refrigerator for about 30 minutes before baking if you find your cookies spreading.
Variations: Try mixing in nuts like walnuts or pecans for an added crunch, or even dried fruits for a chewy surprise.
Scaling: Need to make a larger batch? Simply double the ingredients for a big batch that’s perfect for gatherings!
Serving Suggestions
There’s just something special about enjoying Carmelita Cookies warm from the oven. Pair them with a glass of cold milk or a warm cup of coffee for that classic combo. They also shine at holiday parties or family gatherings where they can be dramatically displayed on a dessert platter. Consider serving them alongside vanilla ice cream for an indulgent sundae!
Variations & Substitutions
Flavor Combinations: Swap in butterscotch chips for a sweet twist or add in a sprinkle of cinnamon for a warm flavor boost.
Dietary Adaptations: For vegan modifications, substitute the eggs with flax eggs (1 tablespoon flaxseed meal mixed with 2.5 tbsp water per egg) and use dairy-free butter and egg replacement.
Seasonal Variants: In fall, try adding some pumpkin spice; in summer, mix in fresh cherries instead of chocolate for a fruity delight!
Nutrition & Storage Info
- Prep Time: 15 minutes
- Cook Time: 8 minutes
- Total Time: 23 minutes
- Yield: About 24 cookies
- Estimated Calories: 150 calories per cookie (Note: calorie count may vary based on specific ingredients used)
Storage Instructions:
- Room Temperature: Store in a sealed container for up to 1 week.
- Refrigerator: Can be kept for up to 2 weeks if properly sealed.
- Freezer: Store in an airtight container for up to 3 months.
FAQ Section
Can I use different types of oats?
Yes! Old-fashioned oats are best for texture, but quick oats will work too if that’s what you have.What if I don’t have caramel bits?
You can chop up soft caramels or use homemade caramel that you can drizzle on top!Why are my cookies spreading too much?
Ensure your butter isn’t too warm, and consider chilling the dough before baking.How do I make them less sweet?
Reduce the sugar by 1/4 cup or use dark chocolate instead of semi-sweet.Is it necessary to line the baking sheet?
Yes, lining with parchment paper helps prevent sticking while ensuring an even bake.Can I double the recipe?
Absolutely! Just use twice the ingredients and keep an eye on baking time.Are these cookies freezable?
Yes! Freeze them in an airtight container for up to three months.Can modifications affect the taste?
Substituting ingredients may alter texture and flavor—experiment with care!Do I need to chill the dough?
You don’t have to chill it, but it can enhance flavor and prevent spreading.How do I ensure chewy cookies?
Do not overbake them! Take them out when they still look a bit underbaked.
Conclusion
These Carmelita Cookies bring a wave of nostalgia and warmth to any gathering while inspiring new sweet memories. With their combinative beauty of oats, caramel, and chocolate, they are irresistibly delightful! I encourage you to give this recipe a try. I can’t wait for you to experience the joy they’ll bring your family and friends. Please feel free to share your thoughts and feedback in the comments—I love hearing how you made it your own! And for more recipes to delight your taste buds, check out related posts on my blog!
Happy baking!

Carmelita Cookies
Ingredients
Method
- Preheat your oven to 400°F (200°C).
- Line a baking sheet with parchment paper.
- In a large mixing bowl, whisk together the oats, flour, baking powder, baking soda, and salt.
- In a stand mixer, beat the room temperature butter and brown sugar until smooth. Add in the eggs, molasses, and vanilla, mixing until well combined (about 2-3 minutes).
- Gradually add the dry mixture to the wet, mixing until fully incorporated—a soft dough should form.
- Gently mix in the caramel bits and chocolate chips until evenly distributed.
- Using a 2-tablespoon scoop, drop the dough onto the prepared baking sheet, and flatten them slightly.
- Bake for 7-8 minutes, or until the edges are golden brown.
- Allow the cookies to rest on the baking sheet for 2-3 minutes before transferring to a wire rack to cool completely.
- Drizzle with caramel sauce before serving.