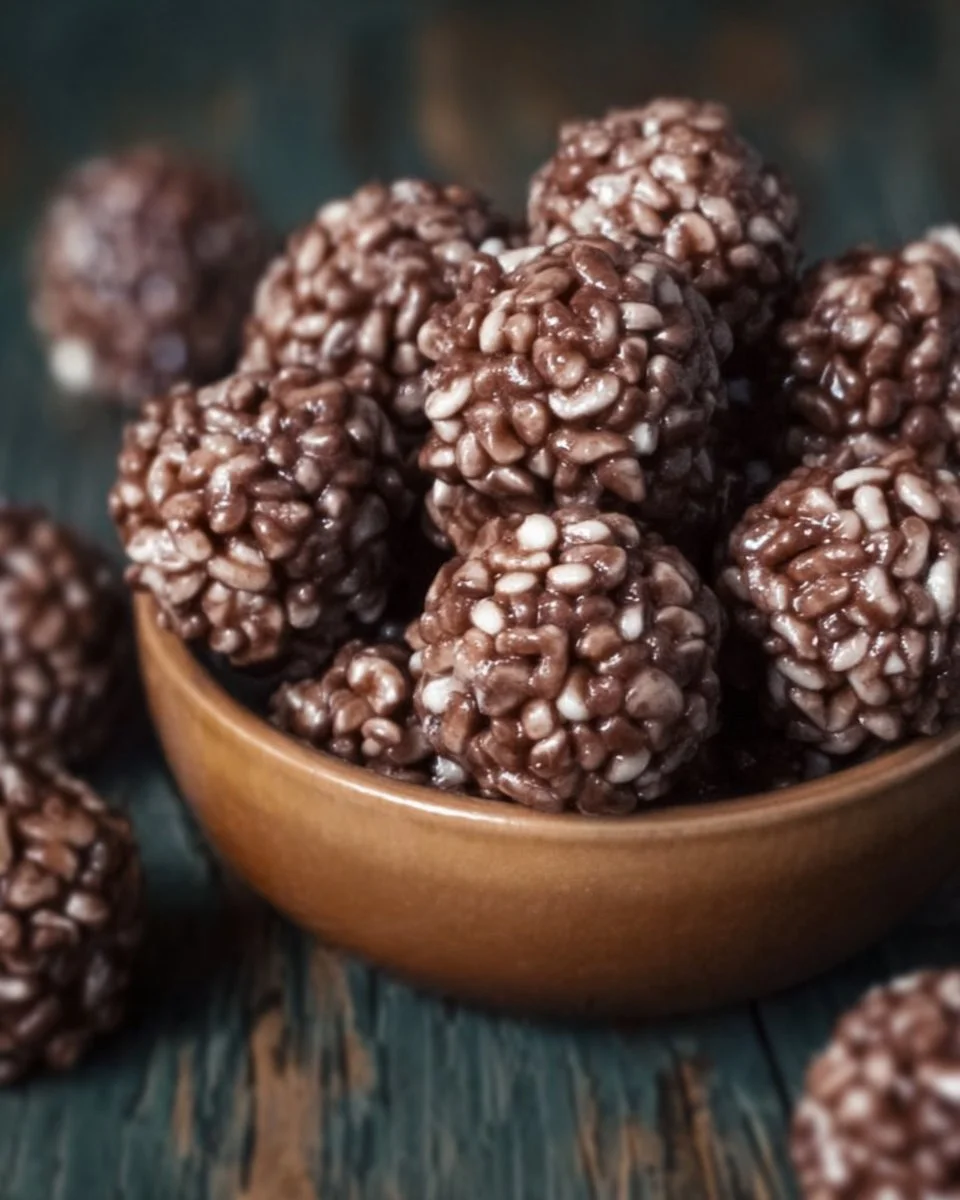
Irresistible Chocolate Rice Krispie Balls: Your New Favorite Treat!
Every time I see a box of Rice Krispies cereal on the shelf, I’m whisked back to my childhood—long summer days filled with laughter, snacks, and the sweet scent of melting chocolate wafting through the air. One of my fondest memories is spending time in the kitchen with my mom, stirring warm peanut butter and honey into a gooey concoction to create our beloved Chocolate Rice Krispie Balls. These delightful no-bake treats have been a family favorite for years, and I can’t help but share the joy they bring.
What makes my Chocolate Rice Krispie Balls stand out from the rest? It’s all about the rich flavor and unexpected texture combo—the crunchiness of the Rice Krispies, the creaminess of peanut butter, and the melty chocolate embracing each bite create an experience that I guarantee you’ll remember. Plus, they’re incredibly easy to whip up, making them the ultimate comfort food and a perfect surprise for family gatherings or simple snack time.
In this post, I promise you’ll learn all the ins and outs of making these heavenly treats, from the list of must-have ingredients to my favorite professional tips. Trust me—you’ll want to keep this recipe close at hand!
What Are Chocolate Rice Krispie Balls?
Chocolate Rice Krispie Balls have a nostalgic charm that transcends generations. While Rice Krispies treats first burst onto the scene in the 1930s, my version combines the classic ingredients with a delightful twist. Imagine round, bite-sized morsels of crispy cereal coated in a luscious chocolate-peanut butter blend, offering bursting textures and flavors that keep you reaching for more.
The texture is a perfect balance of crunch from the Rice Krispies, creaminess from the savory peanut butter, and a rich chocolatey coating. There’s something uniquely comforting about these little delights, making them the perfect treat for both kids and adults alike.
You can whip up a batch for a weekend family movie night, or surprise coworkers with a sweet treat for the office. These Chocolate Rice Krispie Balls are versatile; whether it’s a casual gathering or a holiday occasion, they’re sure to make an impression.
Why You’ll Love This Recipe
Simple and Quick: With just a few ingredients and no baking required, you can have these scrumptious Chocolate Rice Krispie Balls ready in under 30 minutes. Perfect for those last-minute cravings or unexpected guests!
Cost-Effective: Making these at home is not only a delightful experience but also a budget-friendly option compared to overpriced store-bought treats. Why pay more when you can make these easy recipes at home for a fraction of the cost?
Total Customization: One of my favorite parts of this recipe is the freedom to make it your own. Want to swap peanut butter for almond butter? Go for it! Have leftover candy? Sprinkle those on top instead. The options are endless and can be tailored to satisfy any craving or preference.
Family Bonding Activity: This recipe makes for a fantastic family activity. Gather the kiddos in the kitchen, let them help shape the balls and smother them in chocolate. You’ll make memories and enjoy some quality bonding time!
Great for All Occasions: From birthday parties to holiday celebrations, these Chocolate Rice Krispie Balls fit right in! They can easily be turned into themed treats by adding festive sprinkles or coloring the chocolate coating.
Ingredients Section
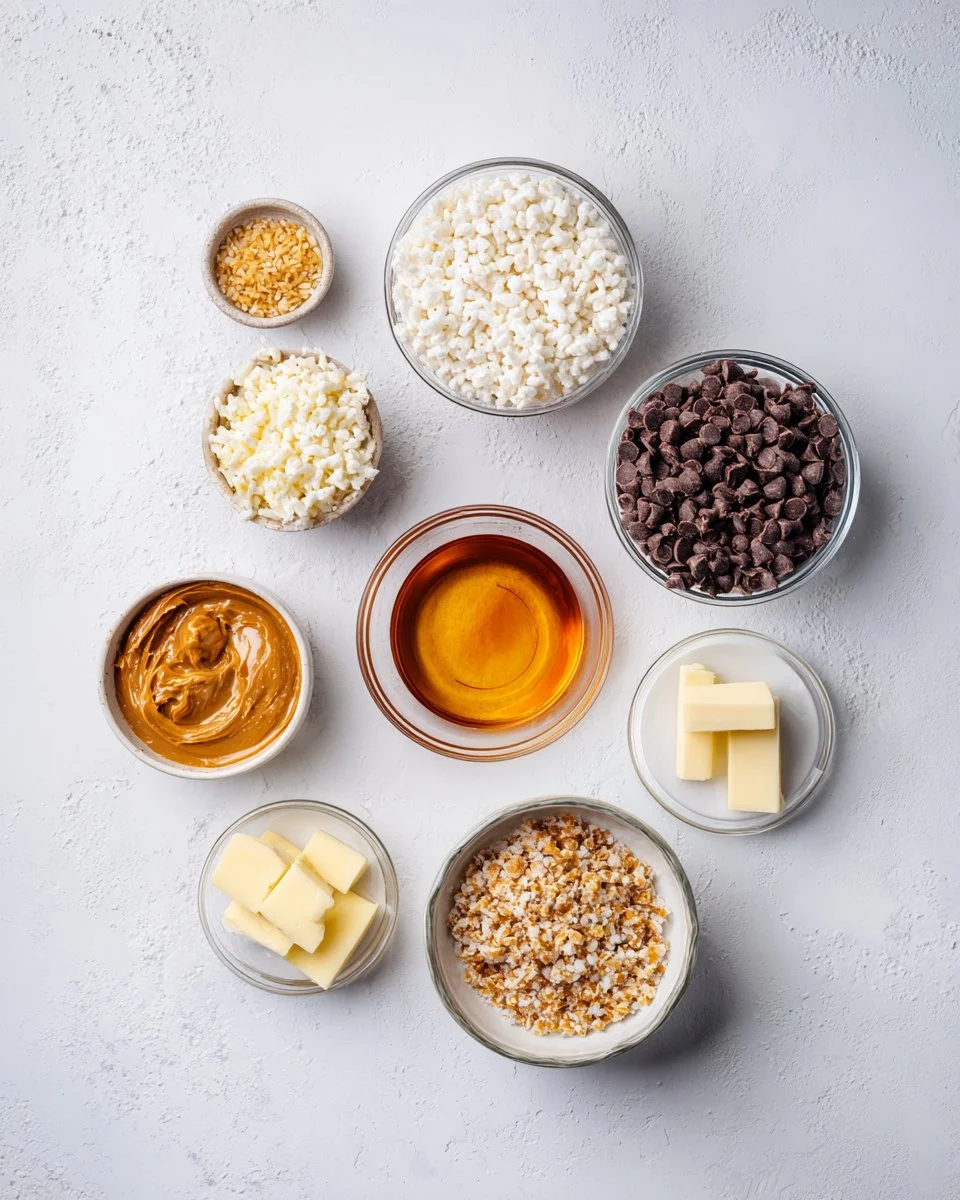
To make your very own Chocolate Rice Krispie Balls, you’ll need:
- 3 cups Rice Krispies cereal: The classic crispies you know and love.
- 1/2 cup peanut butter (creamy or crunchy): For that rich and nutty flavor; I often use Jif or Skippy for their perfect texture.
- 1/2 cup honey or light corn syrup: This adds just the right touch of sweetness and allows the balls to hold together.
- 1 cup semi-sweet chocolate chips: I usually go for Ghirardelli; their chocolate has a rich flavor that really shines.
- 1/2 cup butter: Make sure it’s at room temperature for easy mixing.
- 1 teaspoon vanilla extract: Because what’s better than the smell of vanilla wafting through your kitchen?
- Optional: Sprinkles or crushed nuts for topping—to make your Chocolate Rice Krispie Balls pop with color and added texture!
Prep Notes: Make sure your butter is room temperature for easier mixing. Also, if you’re dealing with crunchy peanut butter, stir it well to combine the oils!
Step-by-Step Instructions
Prepare Your Workspace: Begin by clearing your countertop and lining a baking sheet with parchment paper. This will help with easy cleanup later.
Melt the Mixture: In a large saucepan, over medium heat, combine 1/2 cup of butter and 1/2 cup of peanut butter. Stir until completely melted and smooth, about 2-3 minutes. Chef’s Tip: Keep an eye on it to avoid burning the mixture!
Mix in the Sweetener: Once melted, stir in 1/2 cup of honey or light corn syrup and 1 teaspoon of vanilla extract. Mix well until you have a uniformly smooth mixture. This should take about 1 minute.
Add the Cereal: Remove your saucepan from heat and carefully fold in 3 cups of Rice Krispies cereal. Ensure every piece is coated in the peanut butter mixture.
Form the Balls: Using your hands (I recommend rubbing a bit of butter on them to prevent sticking), grab small handfuls of the mixture and roll into balls about 1 inch in diameter. Place them on the lined baking sheet. Pro Tip: If the mixture is too sticky, refrigerate it for a few minutes before rolling!
Melt the Chocolate: In a microwave-safe bowl, add 1 cup of semi-sweet chocolate chips. Heat in 30-second intervals, stirring in between, until the chocolate is completely melted.
Coat the Balls: Dip each Rice Krispie ball in the melted chocolate, ensuring it’s fully coated. Use a fork to lift it out and tap gently to remove excess chocolate. Place each coated ball back on the parchment paper.
Decorate (Optional): Before the chocolate sets, sprinkle with crushed nuts or colorful sprinkles for extra flair.
Cool and Set: Allow the chocolate to harden at room temperature or place in the fridge for quicker results—about 20 minutes.
Chef’s Tip: If you’re in a hurry, pop them in the freezer for 10 minutes!
Expert Tips & Tricks
Ingredient Quality Matters: The better the ingredients, the better the end product. Use high-quality chocolate and nut butters for richer flavors.
Storage Recommendations: Store your Chocolate Rice Krispie Balls in an airtight container at room temperature for up to a week. For longer storage, keep them refrigerated for up to 2 weeks.
Make-Ahead Instructions: Feel free to prepare the mixture a day in advance. Just roll and coat them the day you plan to serve!
Troubleshooting: If your chocolate doesn’t coat smoothly, add a teaspoon of vegetable oil to thin it out.
Experiment with Flavors: Try adding a pinch of sea salt on top of the chocolate coating for a delightful sweet-and-salty kick.
Serving Suggestions
Pair your Chocolate Rice Krispie Balls with a tall glass of milk or a warm cup of hot cocoa for the ultimate treat experience. For a festive touch, consider plating them on a decorative cake stand dusted with powdered sugar—it’s sure to impress your guests! They’re also perfect for family movie nights or to share as party favors.
Variations & Substitutions
- Nut-Free: Replace peanut butter with sunflower seed butter or omit it altogether.
- Dark Chocolate: Swap out semi-sweet chocolate chips for dark chocolate for a richer flavor.
- Add-ins: Consider including dried fruits, mini marshmallows, or even crushed pretzels for added texture and flavor.
- Seasonal: Use colored chocolate melts (like orange for Halloween) for festive variations.
Nutrition & Storage Info
- Prep Time: 10 minutes
- Cook Time: 15 minutes
- Total Time: 25 minutes
- Yield: About 24 balls
- Estimated Calories per Serving: Approximately 120 calories (based on one ball)
Storage Instructions: Keep in an airtight container at room temperature for up to 1 week or in the fridge for up to two weeks. For longer storage, freeze for up to three months. To enjoy later, simply let them thaw at room temperature.
FAQ Section
Can I use other cereals?
Yes! Try using different cereals like Cornflakes or Frosted Flakes for unique flavors.What can I substitute for honey?
Light corn syrup works wonderfully, or you could try maple syrup for a different sweetness.How do I ensure my chocolate coating is smooth?
Microwave in short intervals and stir frequently. Adding a teaspoon of coconut oil can also help.Can I make these vegan?
Absolutely! Replace butter with coconut oil and use dairy-free chocolate chips.How long does it take for the chocolate to set?
At room temperature, it takes about 20 minutes. Speed it up by placing them in the fridge.What should I do if my mixture is too sticky to roll?
Refrigerate the mixture for about 10-15 minutes to firm it up before rolling.Can I add protein powder to this recipe?
Yes! Just replace a portion of the peanut butter with protein powder for a health boost.Are these gluten-free?
Yes! Rice Krispies are generally gluten-free, but check the packaging to be safe.How can I make it chocolatey without using chocolate chips?
Consider using cocoa powder mixed into the peanut butter mixture for added chocolate flavor.What’s the best way to package these as gifts?
Place them in a cute jar or box, and add a personalized label for a perfect homemade gift!
Conclusion
This Chocolate Rice Krispie Balls recipe is special not only for its ease and delicious flavors but also for the memories it helps create—whether binding friends and family together in the kitchen or bringing them joy at gatherings. I encourage you to try making these delightful treats and share your creations with me—I love hearing how my recipes come to life in your kitchens. If you’re looking for more sweet inspiration, don’t miss my other popular recipes on the blog! Let’s keep this baking journey alive together—happy baking!

Chocolate Rice Krispie Balls
Ingredients
Method
- Begin by clearing your countertop and lining a baking sheet with parchment paper.
- In a large saucepan, over medium heat, combine 1/2 cup of butter and 1/2 cup of peanut butter. Stir until completely melted and smooth, about 2-3 minutes.
- Once melted, stir in 1/2 cup of honey or light corn syrup and 1 teaspoon of vanilla extract until smooth.
- Remove your saucepan from heat and carefully fold in 3 cups of Rice Krispies cereal until coated.
- Using your hands, grab small handfuls of the mixture and roll into balls about 1 inch in diameter. Place them on the lined baking sheet.
- In a microwave-safe bowl, melt 1 cup of semi-sweet chocolate chips in 30-second intervals, stirring in between until fully melted.
- Dip each Rice Krispie ball in the melted chocolate, ensuring it’s fully coated. Tap gently to remove excess chocolate.
- Before the chocolate sets, sprinkle with crushed nuts or colorful sprinkles if desired.
- Allow the chocolate to harden at room temperature or refrigerate for quicker results, about 20 minutes.