Whimsical Cotton Candy Cake: A Sweet Adventure You Can Bake at Home
Introduction
There’s something magical about a freshly baked cake—especially when it teeters on the edge of nostalgia and whimsy, like my beloved Cotton Candy Cake. I remember when I first stumbled upon this delightful treat at a summer fair. The fluffy sweetness of cotton candy instantly transported me back to childhood memories of carefree days and bright carnival lights. The colors, the flavors, all wrapped up in a slice of cake—it was a celebration of everything good!
Now, you might be wondering, "How is this Cotton Candy Cake different from any other cake?" Well, not only does it look like a party on a plate, but this recipe also features layers of vibrant cotton candy flavors that make your taste buds dance. This cake is special because it doesn’t just rely on traditional vanilla or chocolate; it embodies the joyous, airy taste of cotton candy itself.
Cakes often remind us of family gatherings or birthdays, creating bonds over sweet moments. My goal is to help you create your own cherished memories with a cake that promises to bring smiles, laughter, and a dash of fun to your day. Prepare to dive into a baking adventure where you’ll learn how to whip up this eye-catching, mouthwatering Cotton Candy Cake, from start to finish!
What Are Cotton Candy Cakes?
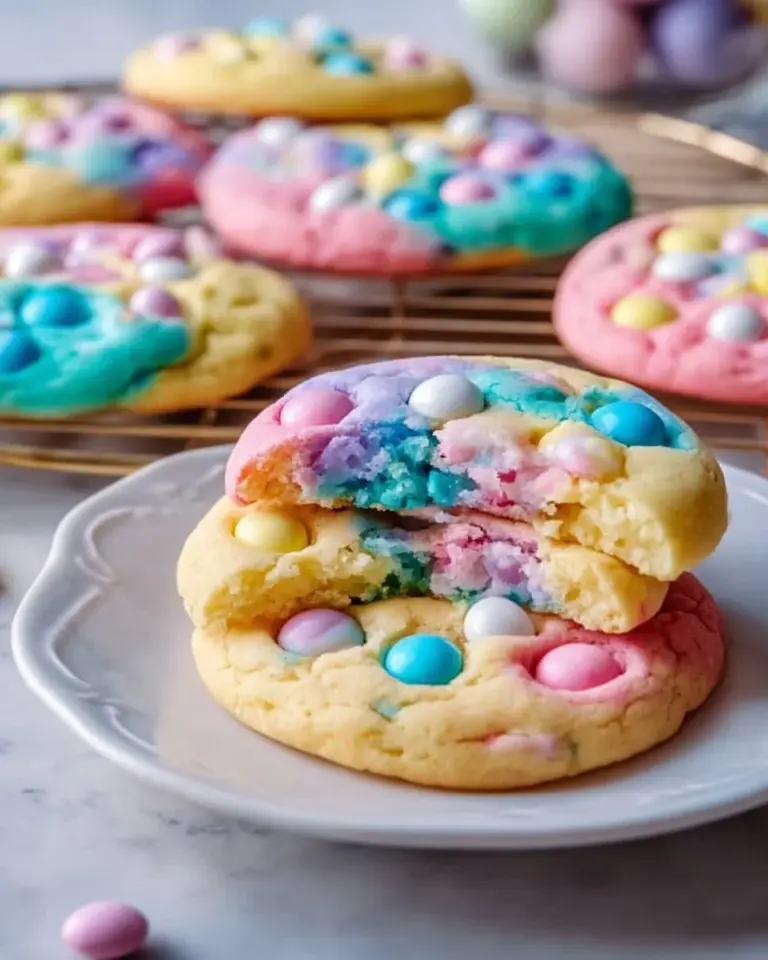
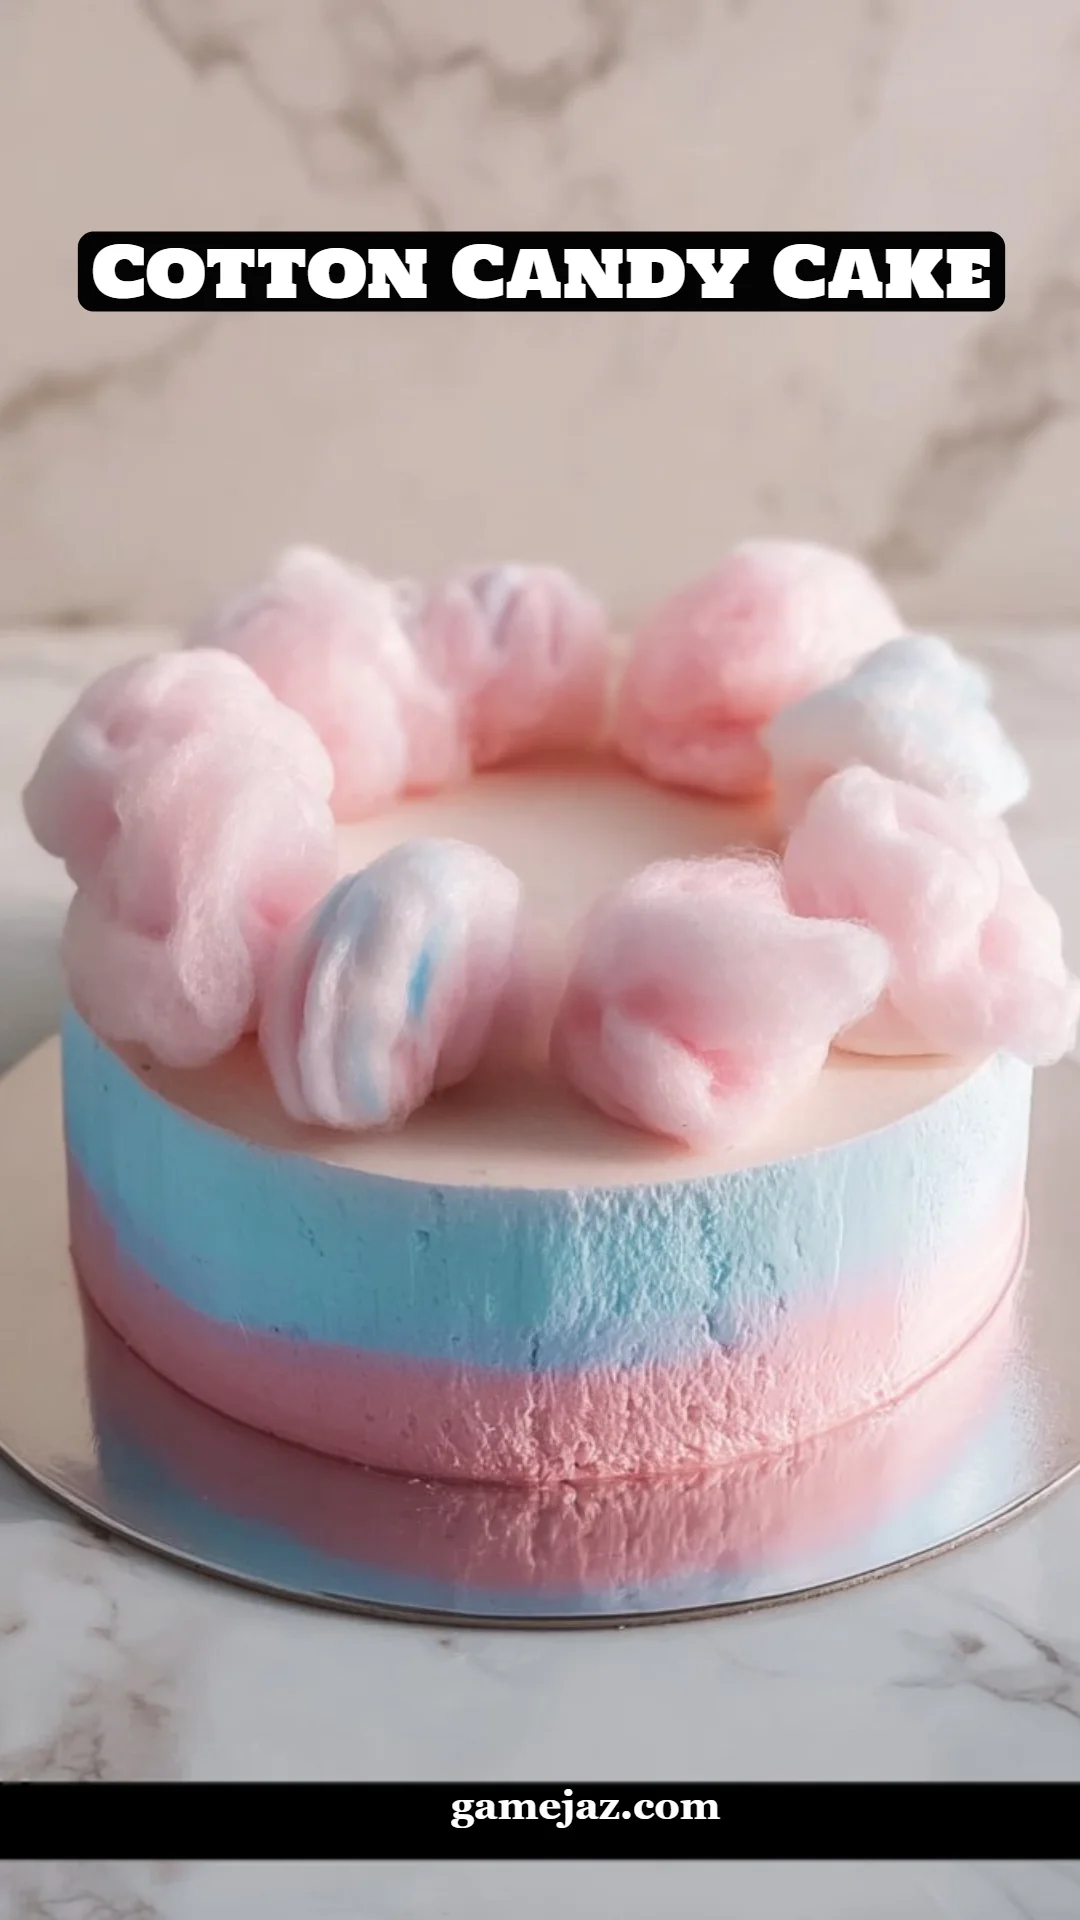
Cotton Candy Cake is a twist on the classic layered cake, infused with the nostalgic flavors of the delightful spun sugar treat we love. This charming dessert combines fluffy cake layers colored in bright pastel shades, reminiscent of cotton candy clouds at a fairground. The taste is an enchanting blend of sweetness, combining rich vanilla with a hint of fluffy cotton candy flavor, giving it a unique twist that sets it apart from other cakes.
These colorful creations aren’t just pretty to look at; they evoke joy and youthful energy, making them perfect for celebrations—be it a birthday bash, a summer picnic, or even a whimsical tea party. Whether you’re baking with kids or sharing it with friends, Cotton Candy Cake is a delightful way to spread happiness through cake!
Why You’ll Love This Recipe
Uniquely Flavorful: Unlike store-bought cakes that often taste artificial, this homemade version captures the essence of cotton candy with real flavoring, ensuring a delightful experience in every bite. You can taste the care in each layer.
Cost-Effective: If you’ve ever glanced at the price tags of specialty cakes, you’ll understand how wallet-friendly this homemade gem is. With simple ingredients readily available, you can whip up an impressive cake without breaking the bank.
Customizable: This recipe allows for endless creative variations. Want a more intense flavor? Feel free to add more cotton candy flavoring! Prefer a different color scheme? The sky’s the limit! You can customize it for any occasion or personal preference.
Simple Yet Stunning: While visually striking, creating this cake doesn’t require professional skills. This is perfect for beginner bakers who want to impress their friends or family without feeling overwhelmed.
Family Bonding: Baking is a wonderful opportunity to spend quality time with loved ones. Gather your family in the kitchen, and let the laughter and stories flow as you create this delightful cake together!
Ingredients
Before diving into the fun of baking, let’s gather our ingredients. Here’s what you’ll need to create this delightful Cotton Candy Cake:
For the Cake:
- 2 1/2 cups all-purpose flour
- 1 tbsp baking powder
- 1/2 tsp salt
- 1 cup unsalted butter, at room temperature (choose high-quality butter for the best flavor)
- 1 3/4 cups granulated sugar
- 4 large egg whites, at room temperature (for fluffiness)
- 1 tbsp vanilla extract (I love using pure vanilla for a richer flavor)
- 1 cup whole milk, at room temperature
- Pink food coloring
- Blue food coloring
For the Frosting:
- 1 1/2 cups unsalted butter, at room temperature
- 4 1/2 cups powdered sugar, sifted (to avoid lumps)
- 2-3 tbsp whole milk or heavy cream
- 1 1/2 tsp cotton candy flavoring (a must-have for that authentic taste)
- 1/2 cup buttercream (reserved from frosting for filling)
- 1 tsp extra cotton candy flavoring (optional)
- A touch of extra food coloring for decoration
Prep Notes: Make sure all dairy ingredients are at room temperature for the best mixing results. Use high-quality flavoring for the most authentic taste!
Step-by-Step Instructions
Let’s get into the fun part—baking! Follow these detailed steps to create your Cotton Candy Cake:
Preheat the Oven: Start by preheating your oven to 350°F (175°C). Grease three 8-inch round cake pans and line them with parchment paper to prevent sticking.
Prepare Dry Ingredients: In a medium bowl, whisk together the flour, baking powder, and salt. Set this mix aside as it will help the cake rise beautifully.
Cream Butter and Sugar: In a large mixing bowl, beat the room-temperature butter and granulated sugar together until the mixture is pale and fluffy—around 3-5 minutes. This is crucial for a light cake!
Add Egg Whites: Gradually add the egg whites, one at a time, ensuring each is well incorporated before adding the next. Stir in the vanilla extract until evenly mixed.
Combine Ingredients: Alternate adding the dry mixture and milk into the butter mixture, starting with the flour and ending with it. Mix until just combined—don’t overmix!
Color the Batter: Divide the batter into three bowls. Color one pink, one blue, and leave the last one uncolored. Pour each batter into the prepared pans (you can make them ‘look’ ombre by swirling them together or keep them apart for distinct layers).
Bake: Bake in the preheated oven for 25-28 minutes, or until a toothpick inserted into the center comes out clean. Allow them to cool in the pans for 10 minutes before transferring to wire racks.
Make the Frosting: For the frosting, beat the room-temperature butter until smooth. Slowly add the powdered sugar, then mix in milk and cotton candy flavoring until you have a light and fluffy frosting.
Reserve and Color Frosting: Reserve 1/2 cup of frosting for the filling later. Color the remaining frosting pink and blue as desired.
Layer and Frost: Spread a thin layer of marbled filling over the uncolored cake layer. Top with the pink layer, spread more filling, and stack the blue layer on top. Apply a crumb coat with plain buttercream, chill for about 20 minutes, and frost with the colored buttercream. Decorate beautifully, allowing your creativity to shine!
Chef’s Tips:
- To avoid dry cake layers, ensure you don’t overbake; check for doneness a couple of minutes early!
- If your cakes dome on top, trim them for a level surface before stacking.

Expert Tips & Tricks
Use Quality Ingredients: The flavor of your Cotton Candy Cake relies heavily on the quality of ingredients, especially butter and flavorings. Opt for organic or high-quality brands whenever possible.
Proper Storage: If you have leftovers, keep the cake in an airtight container at room temperature for up to 3 days. You can also refrigerate it for up to a week or freeze it for longer storage.
Make-Ahead Options: You can bake the cake layers ahead of time. Wrap them tightly in plastic wrap and freeze them for up to a month. Just thaw and frost when you’re ready to serve!
Troubleshooting Texture: If your cake is dense, you may have overmixed the batter. Always mix until just combined for the best texture.
Vegan Version: To convert this recipe to vegan, replace the butter with plant-based margarine, the egg whites with aquafaba (the liquid from a can of chickpeas), and use plant-based milk.
Flavor Variations: Swapping out cotton candy flavoring for other options like strawberry or bubblegum can create an entirely new cake experience!
Serving Suggestions
The Cotton Candy Cake itself is quite the showstopper, but here are a few ideas to elevate your presentation:
- Serve with a Scoop of Ice Cream: A side of vanilla or cotton candy-flavored ice cream complements the sweetness beautifully.
- Presentation Ideas: Use colorful sprinkles or edible glitter to make the cake even more festive. Consider cake stands or tiered platters to showcase its layers.
- Occasion Recommendations: This cake is perfect for summer birthday parties, carnival-themed events, baby showers, or even just as a sweet pick-me-up on a Sunday afternoon.
Variations & Substitutions
While the classic Cotton Candy flavor is delightful, don’t hesitate to explore variations:
- Different Flavor Combinations: Try mixing flavors like raspberry or lemon for added zest. Just swap the cotton candy flavoring for your choice.
- Dietary Restrictions: For gluten-free bakers, substitute the all-purpose flour with a gluten-free blend; just ensure your other ingredients are also gluten-free.
- Seasonal Variations: Toss in some seasonal fruits like strawberries in the summer or even pumpkin spice during fall to change things up while keeping the spirit of the cake alive!
Nutrition & Storage Info
- Prep Time: 30 minutes
- Cook Time: 28 minutes
- Total Time: Approximately 1 hour
- Yield: Serves about 12 people
- Estimated Calories: About 350 calories per slice
- Storage Instructions: Room temperature for up to 3 days, refrigerated for 1 week, or frozen for up to 3 months. Make sure to wrap slices tightly for freshness!
FAQ Section
Can I make this cake ahead of time?
Absolutely! You can bake the layers a day or two in advance. Just wrap them tightly and store them in the refrigerator.Can I use a different cake size?
Yes! You can adjust the baking time if you opt for other sizes, like a 9-inch round pan or even cupcakes. Just keep an eye on them as they bake!What can I use instead of cotton candy flavoring?
You can experiment with other flavorings like vanilla, bubblegum, or even cotton candy extract if you can find it.What if my cake layers aren’t even?
No worries! You can use a serrated knife to level the tops of the cakes before stacking them.Can I use whole eggs instead of egg whites?
Using whole eggs will give a richer color and flavor, but stick to egg whites for a lighter, fluffier cake!How can I fix a dry cake?
Make sure to check your cakes a few minutes before the suggested baking time. If they seem dry, consider reducing the baking time next time.What do I do if my frosting is too thick?
Add a bit more milk to loosen it up to your desired consistency.Can I decorate this cake in advance?
Yes! You can frost and decorate the cake a day ahead. Store it covered to keep it fresh.Is this recipe easily adaptable for lactose-free diets?
Definitely! Substitute the butter with a dairy-free version and use lactose-free milk.What’s the best way to slice this cake?
Using a knife dipped in warm water makes clean slices. Wipe the knife between cuts for beautiful layers.
Conclusion
Baking this Cotton Candy Cake is not just about creating a stunning dessert; it’s about making sweet memories to savor. The blend of vibrant colors and delightful flavors creates an experience that you can share with friends and family. I encourage you to give this recipe a try and let the magic of baking fill your kitchen with laughter and joy.
I’d love to hear your thoughts! How did your Cotton Candy Cake turn out? Share your tips, modifications, or stories in the comments below! And don’t forget to check out other whimsical creations on my blog!

Cotton Candy Cake
Ingredients
Method
- Preheat your oven to 350°F (175°C). Grease three 8-inch round cake pans and line them with parchment paper to prevent sticking.
- In a medium bowl, whisk together the flour, baking powder, and salt. Set this mix aside.
- In a large mixing bowl, beat the room-temperature butter and granulated sugar together until pale and fluffy, around 3-5 minutes.
- Gradually add egg whites, one at a time, ensuring each is well incorporated. Stir in vanilla extract.
- Alternate adding the dry mixture and milk into the butter mixture, starting with flour and ending with it. Mix until just combined; do not overmix.
- Divide the batter into three bowls. Color one pink, one blue, and keep the last uncolored. Pour each batter into the prepared pans.
- Bake in the preheated oven for 25-28 minutes, or until a toothpick inserted comes out clean. Cool in pans for 10 minutes before transferring to wire racks.
- For the frosting, beat the room-temperature butter until smooth. Gradually add powdered sugar, then mix in milk and cotton candy flavoring until light and fluffy.
- Reserve 1/2 cup of frosting for filling. Color the remaining frosting pink and blue as desired.
- Spread a thin layer of reserved buttercream over the uncolored cake layer. Top with the pink layer, spread more filling, and stack the blue layer on top.
- Apply a crumb coat with plain buttercream and chill for about 20 minutes.
- Frost with colored buttercream and decorate as desired.