Ah, the comforting aroma of freshly baked cookies wafting through the house! It reminds me of my childhood when my mom would whip up a batch of her famous School Day Cookies. There was something magical about the way those golden treats hit the kitchen counter, still warm, sweet aromas mingling with a hint of orange zest. No matter how busy life got, those carefully baked goodies brought us all back to the table, sharing stories and laughter over chocolate smeared faces.
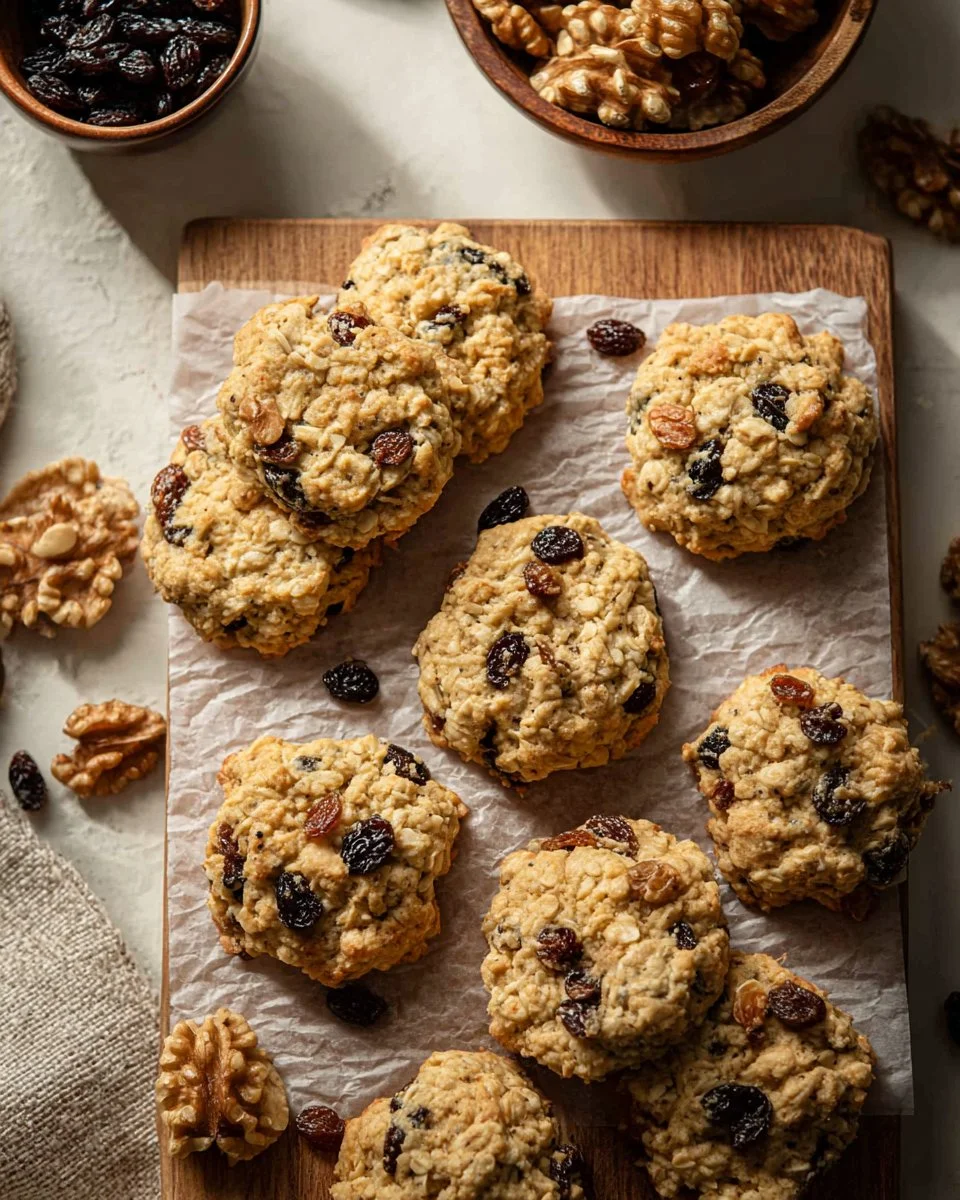
What makes these School Day Cookies so special? It’s not just the melt-in-your-mouth texture or the delicious balance of sweet and citrus; it’s the memories they evoke. These cookies are crispy on the outside yet chewy on the inside, with each bite offering a delightful mix of raisins and walnuts. I promise you, this recipe elevates the beloved classic to a whole new level, infusing it with a burst of freshness and wholesome goodness.
In this blog post, you’ll learn how to recreate these nostalgic treats that are not only delicious but also incredibly versatile. Whether packing them for lunch or serving them at holiday parties, these School Day Cookies will quickly become a cherished family favorite. Let’s get baking!
What Are School Day Cookies?
The origin of School Day Cookies is rooted in my family’s tradition of baking simple yet delicious treats to pack in lunchboxes. They emerged from a need for a wholesome snack that kids would love without the excessive sweetness one often finds in store-bought cookies. Made with a blend of essentials like old-fashioned oats, butter, and fresh orange juice, these cookies are as wholesome as they are tasty.
In terms of taste and texture, imagine biting into a cookie that has a delightful chewiness from the oats, a warm, buttery essence, paired with the unexpected zing of orange. The raisins add a natural sweetness, while walnuts provide a satisfying crunch, rounding out the flavor sensation perfectly.
These cookies are perfect for all occasions. Bake them for school events, family gatherings, or simply as a comforting snack after a long day. No matter when you make them, they’re sure to delight!
Why You’ll Love This Recipe
Nostalgic Flavor: If you’re seeking that childhood comfort, these School Day Cookies take you right back to snack time at school but elevated with fresh ingredients.
Cost-Effective: With simple, pantry-friendly ingredients, you’ll find this recipe a budget-friendly alternative to expensive store-bought options.
Customizable: This recipe invites personalization! Add your favorite mix-ins like chocolate chips, dried cranberries, or coconut for an extra twist, making every batch uniquely yours.
Easy to Make: Enjoy the straightforward process; even novice bakers can master these cookies in under 30 minutes.
Make Ahead and Freeze Options: These cookies freeze beautifully! You can bake a large batch and store them for future cravings or quick lunches, ensuring sweet snacks are always on hand.
By prioritizing fresh ingredients and customization, these cookies stand out far beyond typical grocery store treats. Trust me, once you take that first bite, there’s no turning back!

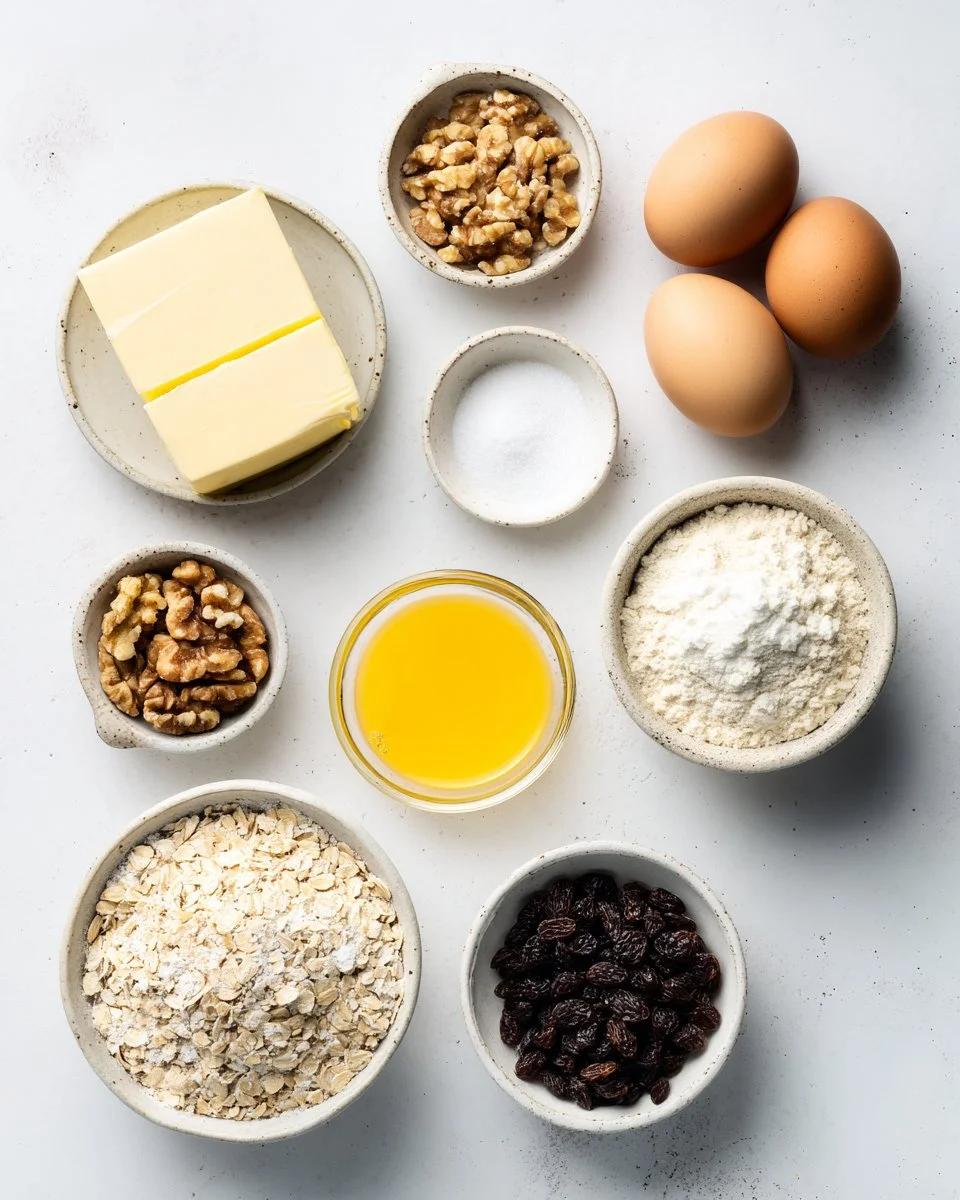
Ingredients
Here’s what you’ll need to whip up these delightful School Day Cookies:
- 1 cup (2 sticks / 227 g) unsalted butter, room temperature: Opt for high-quality butter for a rich flavor.
- 1 cup (200 g) granulated sugar: For a balanced sweetness that isn’t overpowering.
- 2 large eggs, room temperature: Get those eggs to room temperature for the best mixing consistency.
- 1/4 cup (62 g) orange juice, freshly squeezed: Fresh juice amps up the flavor; do not use bottled!
- 2 tablespoons orange zest: Brightens the cookie and complements the orange juice.
- 2 teaspoons vanilla extract: Use pure vanilla extract for depth of flavor.
- 2 cups (250 g) all-purpose flour: For the right structure and chew.
- 2 cups (180 g) old-fashioned oatmeal: Adds heartiness and chew; do not use instant oats.
- 1/2 teaspoon kosher salt: Balances sweetness.
- 1/2 cup (72.5 g) raisins: Offers a nice bite of sweetness; swap with cranberries if desired.
- 1/2 cup (58.5 g) chopped walnuts: Add crunch; feel free to replace with pecans or leave out if nut-free.
Tip: Ensure your butter is at room temperature before you start; this will help it cream perfectly with the sugar, leading to fluffy cookies!
Step-By-Step Instructions
Preheat and Prepare: Preheat your oven to 375°F (190°C). Line three large baking sheets with parchment paper to prevent sticking.
Cream Butter and Sugar: In a stand mixer, cream together the room-temperature butter and granulated sugar on medium speed until the mixture is smooth and fluffy (about 2-3 minutes).
- Chef’s Tip: You want the mixture to be light and airy; this makes for a tender cookie.
Incorporate Eggs: Add eggs one at a time, mixing well after each addition until fully combined.
Add Juices and Flavorings: Pour in the freshly squeezed orange juice, orange zest, and vanilla extract. Mix on low speed for just a few seconds until combined.
Combine Dry Ingredients: In a separate bowl, whisk together the flour, oatmeal, and kosher salt. Gradually add this mixture to the wet ingredients, mixing on low speed until just combined.
- Visual Cue: The dough should be slightly sticky but hold its shape.
Fold in Mix-ins: Gently fold in the raisins and walnuts with a spatula, being careful not to overmix.
Scoop the Dough: Using a 2-tablespoon cookie scoop, drop dough onto your prepared baking sheets, spacing cookies about 2 inches apart. Flatten each cookie slightly with your hand.
Bake to Perfection: Bake in the preheated oven for 12-14 minutes or until the cookies are golden brown.
- Chef’s Tip: Watch for the edges to set while the center remains soft; they’ll continue to cook on the sheets as they cool.
Cool Down: Let the cookies cool for a few minutes on the baking sheet before transferring them to a cooling rack.
Expert Tips & Tricks
Perfectly Measure Your Flour: Use the spoon and level method for accurate flour measurement; this prevents dense cookies.
Storage: Store the cookies in an airtight container at room temperature for up to 5 days or refrigerate for longer freshness.
Make Ahead: The dough can be prepped and chilled for up to 2 days in advance. You can also freeze the dough in balls and bake them directly from the freezer—just add a minute or two to the bake time!
Common Pitfalls: Avoid overbaking! Cookies continue to firm up as they cool, so remove them while they have a slight softness in the center.
Substitutions: Need gluten-free? Swap the all-purpose flour with a 1-to-1 gluten-free flour blend.
Creative Additions: Think about adding spices, like cinnamon or nutmeg, for a warm flavor twist or almond extract for a different profile.
Serving Suggestions
These School Day Cookies are delightful on their own but can be enhanced by serving them alongside a tall glass of cold milk or a warm cup of tea. For a fun presentation, try stacking them on a decorative platter or placing them in a clear treat bag tied with twine for a charming gift idea. They’re perfect for school events, family gatherings, or simply as a cozy treat while curling up with a book or movie.
Variations & Substitutions
- Nut-Free: Omit the walnuts entirely or substitute with pumpkin seeds for a delightful crunch.
- Dried Fruits: Experiment with chopped dried apricots or cranberries for a chew that varies!
- Spice It Up: Try adding spices like cinnamon, nutmeg, or even a touch of cardamom for a unique flavor profile.
- Chocolate Lovers: Mix in semi-sweet or dark chocolate chips for a sweeter variant that’s sure to please!
Nutrition & Storage Info
- Prep time: 15 minutes
- Cook time: 12-14 minutes
- Total time: 30-35 minutes
- Yield: Approximately 24 cookies
- Estimated calories per serving: ~150 calories
- Storage instructions: Store cookies at room temperature in an airtight container for up to 5 days, in the fridge for up to a week, or in the freezer for up to 3 months.
FAQ Section
Can I freeze these cookies?
- Absolutely! Baked cookies can be frozen for up to 3 months. Just ensure they’re in a sealed container.
What can I substitute for oats?
- If you’re looking to avoid oats, consider using finely shredded coconut for added texture.
How can I make these cookies chewier?
- Bake slightly less than the recommended time, allowing the center to remain soft for a chewy texture.
Can I use margarine instead of butter?
- While you can use margarine, real butter gives the best flavor and texture to the cookies.
What can I do if the dough is too wet?
- If you find the dough is too sticky, gradually add a bit more flour (one tablespoon at a time) until it’s manageable.
Can the orange juice be replaced with another liquid?
- Yes, you can substitute apple juice or buttermilk for a different flavor twist.
Are these cookies suitable for gift-giving?
- Definitely! They pack well and can be kept fresh, making them a fantastic homemade gift for friends and family.
How can I make these cookies more festive?
- For a seasonal touch, add festive sprinkles or colored sugar before baking!
Are School Day Cookies easy to make?
- Yes! The recipe requires no complicated techniques, ensuring a fuss-free baking experience.
What’s the best way to soften butter?
- If you forgot to take your butter out ahead of time, cut it into small chunks and let it sit at room temperature for about 15 minutes.
Conclusion
These School Day Cookies are more than just a treat; they’re a recipe infused with nostalgia, warmth, and the promise of homemade goodness. I encourage you to try baking them; I can’t wait for you to taste them! I would love to hear your thoughts, variations, or any family stories that come to mind while you enjoy these cookies. Also, feel free to explore more related recipes on the blog; there’s a whole world of deliciousness waiting for you!
Now, preheat that oven and let’s create some delicious memories together!
Chicken and Rice Taco Skillet: 5 Flavorful Reasons to Love It

School Day Cookies
Ingredients
Method
- Preheat your oven to 375°F (190°C). Line three large baking sheets with parchment paper.
- In a stand mixer, cream together the room-temperature butter and granulated sugar on medium speed until the mixture is smooth and fluffy (about 2-3 minutes).
- Add eggs one at a time, mixing well after each addition until fully combined.
- Pour in the freshly squeezed orange juice, orange zest, and vanilla extract. Mix on low speed until combined.
- In a separate bowl, whisk together the flour, oatmeal, and kosher salt. Gradually add this mixture to the wet ingredients, mixing on low speed until just combined.
- Gently fold in the raisins and walnuts with a spatula, being careful not to overmix.
- Using a 2-tablespoon cookie scoop, drop dough onto your prepared baking sheets, spacing cookies about 2 inches apart. Flatten each cookie slightly with your hand.
- Bake in the preheated oven for 12-14 minutes or until the cookies are golden brown.
- Let the cookies cool for a few minutes on the baking sheet before transferring them to a cooling rack.