Indulge Your Sweet Tooth: Heavenly Nutella Cake Filling Recipe
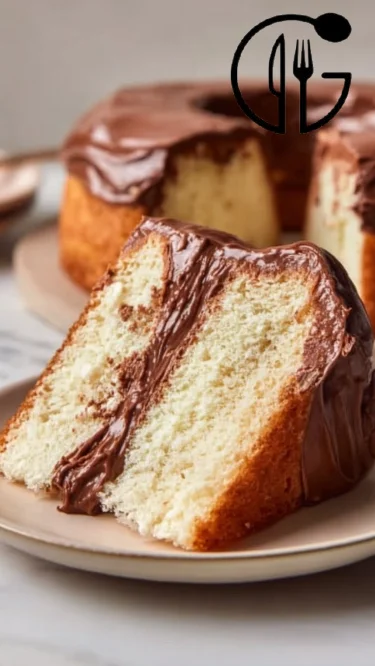
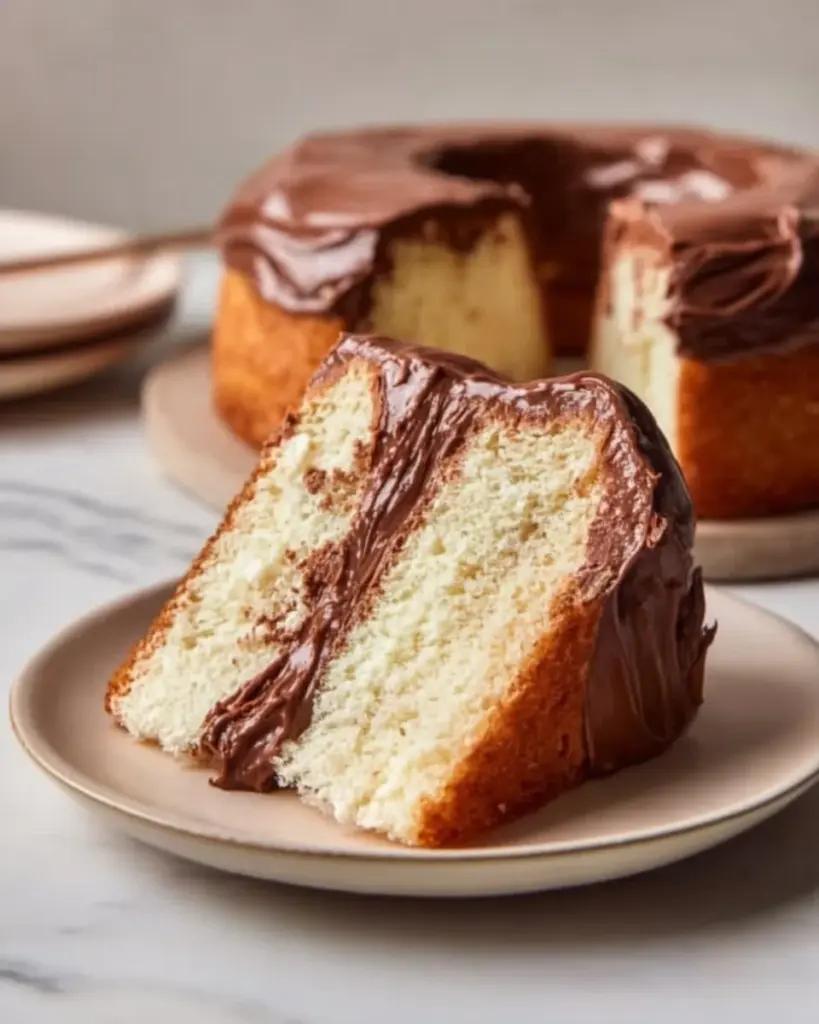
Let me take you back to my childhood, where every birthday seemed to be a grand celebration marked by the sweet aroma of cakes wafting through the house. My sister and I would hover in the kitchen, eagerly waiting for our mom to whip up something magical. The pinnacle of those delicious moments was her unforgettable chocolate cake, elegantly layered with a mesmerizing Nutella cake filling that was nothing short of heaven. It was Rich, creamy, and lusciously indulgent—every bite sent me into a blissful reverie.
What makes this Nutella cake filling so special? Well, it perfectly marries the nutty, chocolatey richness of Nutella with a light, airy texture, ensuring it’s not just another common filling. Unlike other recipes, this one is crafted with love and simplicity, utilizing just four ingredients that allow the Nutella to shine.
Creating this scrumptious filling isn’t just about the flavor; it carries a world of memories and happy family moments. It’s comfort food at its finest—perfect for any occasion, whether it’s a special celebration or simply to treat yourself. In this post, I’m excited to guide you through the steps of making this Nutella cake filling, ensuring you end up with a delightful treat that will have your loved ones coming back for seconds and thirds!
What Are Nutella Cake Fillings?
Nutella cake fillings are rich and creamy delights that have become a favorite among dessert lovers. Originating from the beloved Italian spread Nutella, these fillings strike the perfect balance between nutty and chocolaty, resulting in a taste that feels both luxurious and comforting.
The texture is velvety smooth and spreads like a dream, making it an ideal choice for layering cakes, filling cupcakes, or piping into pastries. Unlike traditional buttercream, this filling elevates your desserts to gourmet status without needing extensive baking skills or fancy ingredients. They are suitable for any occasion when a sweet tooth strikes—birthdays, holidays, or even just a spur-of-the-moment treat.
For those eager to impress, this Nutella cake filling offers a unique twist, turning ordinary baked goods into something that feels special—because let’s face it, who wouldn’t want a slice of cake with a dreamy Nutella core?
Why You’ll Love This Recipe
Quick and Simple: Unlike intricate cake fillings, this Nutella cake filling requires minimal effort and time. With just a few steps, you’ll have a luscious filling ready to elevate your desserts.
Cost-Effective: With pantry staples like Nutella, heavy cream, powdered sugar, and vanilla extract, you won’t have to break the bank! This recipe provides tons of flavor without a hefty price tag.
Customizable: Feel free to get creative! Add a hint of espresso for a mocha twist, a splash of orange zest for brightness, or even mix in some crushed nuts for added texture.
No More Store-Bought: Once you try this filling, you’ll forget about those overpriced, store-bought options that just don’t compare in taste and quality. Your homemade Nutella filling will impress even the pickiest of dessert enthusiasts!
Perfect for Any Level: Whether you’re a seasoned baker or still slightly intimidated by the kitchen, this recipe is approachable and guarantees results! With just a little whisking, you’ll master this Nutella filling like a pro.
Just wait till you see how easy it is to recreate this filling in your own kitchen—every spoonful is a moment to savor.
Ingredients
1 cup Nutella: The star of the show! Use a high-quality Nutella brand for the best flavor, or try a natural hazelnut spread if you prefer a lighter option.
1 cup heavy cream: For the best results, use chilled heavy cream. Organic brands often yield superior taste and texture.
1/2 cup powdered sugar: This sweetens the filling while keeping it light and fluffy. You can substitute with a sugar alternative, but I recommend powdered sugar for the best consistency.
1 teaspoon vanilla extract: Always opt for pure vanilla extract for the richest flavor. It elevates the Nutella, creating a beautifully aromatic filling.
Prep Notes: Ensure that the heavy cream is chilled; this assists in achieving the best airy texture. Room temperature Nutella blends effortlessly into the cream, making it easier to work with.

Step-By-Step Instructions
Combine the Nutella and heavy cream: In a mixing bowl, add 1 cup of Nutella and 1 cup of chilled heavy cream. This creates a base that’s ready for transformation!
- Time: 1 minute
- Tip: Using a silicone spatula can help you scoop out every bit of Nutella!
Whisk it up: Use a hand mixer or whisk to beat the mixture until it is smooth and well combined. The goal here is a beautiful fusion.
- Time: 2-3 minutes
- Visual Cue: Look for a cream that has thickened slightly and is starting to hold some shape.
Add powdered sugar: Gradually add 1/2 cup of powdered sugar to the mixture while continuing to mix. This will create a cloud of sweetness and a fluffy filling.
- Time: 2 minutes
- Chef’s Tip: Avoid adding all at once to prevent a sugarstorm in your kitchen!
Vanilla magic: Pour in 1 teaspoon of vanilla extract and mix until fully incorporated. The vanilla will enhance the flavors, resulting in a perfect balance.
- Time: 1 minute
Fill up your desserts: This Nutella cake filling is now ready to use! Layer it between cake layers, fill cupcakes, or pipe it into pastries.
- Time: Immediate
- Common Mistake: If you’ve over-whipped the cream, the filling can become too stiff. Aim for just a fluffy texture!

Expert Tips & Tricks
Storage Recommendations: This filling can be stored in an airtight container in the fridge for up to a week. Just give it a good stir before using again!
Make-Ahead Instructions: If you’re prepping for an event, you can make the filling a day or two in advance. Just keep it well covered.
Troubleshooting Common Problems: If your filling seems too runny, you might need to whip it a little longer to incorporate more air. If it’s too thick, you can whisk in a tiny bit more heavy cream.
Serve at Room Temperature: For the best texture, let the filling come to room temperature before using it.
Don’t Hesitate to Experiment: If you’re adventurous, try adding flavors like coffee or rum for an even more decadent twist.
Serving Suggestions
This Nutella cake filling is incredibly versatile—pair it with a rich chocolate cake, light vanilla sponge, or even a luscious brownie. For an elegant presentation, top your cake with fresh berries, drizzles of chocolate ganache, or sprinkle with chopped hazelnuts for a delightful crunch.
Perfect for birthdays, anniversaries, or simply those “just because” moments—this filling always delivers joy!
Variations & Substitutions
- Flavors: Combine it with other ingredients like almond extract or peppermint for seasonal variations.
- Dietary Restrictions: If you need a dairy-free option, use coconut cream instead of heavy cream and vegan Nutella alternatives to make it suitable for your guests.
- Seasonal Options: Pair with pumpkin spice for fall or peppermint bark for the holiday season for an ultra-festive touch!
Nutrition & Storage Info
- Prep Time: 10 minutes
- Total Time: 10 minutes
- Yield: Approximately 2 cups (enough for several layers of cake and cupcakes)
- Estimated Calories: About 150 calories per serving (note: servings may vary based on use)
- Storage Instructions: Store in an airtight container in the refrigerator for up to 1 week; can also freeze for up to 3 months.
FAQ Section
Can I use low-fat cream instead of heavy cream?
While you can use lower-fat options, they may not achieve the same whipping volume or richness.Can I add other flavors to the filling?
Absolutely! You can enhance it with hazelnut liquor, instant coffee, or even fruit purees for diverse flavors.How do I know when the filling is ready?
It should be fluffy, smooth, and able to hold its shape without being too stiff.Is this filling good for piping?
Yes, it’s perfect for piping into pastries or onto cupcakes! Just ensure you’ve reached the right consistency.Can this filling be used in no-bake desserts?
Definitely! It works wonderfully in layered desserts, trifles, or as a dip for fruit.What should I do if it’s too thick?
You can gently whisk in a small amount of heavy cream until you achieve your desired consistency.Can I freeze the Nutella cake filling?
Yes, store it in a well-sealed container, and it can be frozen for up to 3 months.What cakes are best to pair with this filling?
This filling complements chocolate, vanilla, or even red velvet cakes beautifully.How do I make this filling more stable for hot weather?
You could add a stabilizer like cornstarch to help it maintain its texture.How can I make this filling more chocolatey?
Incorporate a bit of cocoa powder for an even richer chocolate flavor!
Conclusion
This Nutella cake filling holds not just a rich and decadent flavor—it carries memories, nostalgia, and a feeling of warmth wrapped in chocolatey goodness. I invite you to give this recipe a try—whether for a special occasion or just a delightful treat for yourself. I promise you won’t regret it!
Have you tried this filling? I’m eager to hear your feedback and any variations you’ve made. And don’t forget to check out my other recipes for cakes that complement this luscious filling beautifully!
Remember, every spoonful should be a sweet adventure into deliciousness!
Nutella Cake Filling
Ingredients
Method
- Combine the Nutella and heavy cream: In a mixing bowl, add 1 cup of Nutella and 1 cup of chilled heavy cream.
- Whisk it up: Use a hand mixer or whisk to beat the mixture until it is smooth and well combined, about 2-3 minutes.
- Add powdered sugar: Gradually add 1/2 cup of powdered sugar while continuing to mix for about 2 minutes.
- Vanilla magic: Pour in 1 teaspoon of vanilla extract and mix until fully incorporated.
- Fill up your desserts: Use the Nutella cake filling between cake layers, for cupcakes, or to pipe into pastries.