As winter breezes in and the world outside turns to a shimmering landscape of frost, I can’t help but be transported back to my childhood. I remember bundling up in my favorite plaid scarf, the scent of hot chocolate wafting from the kitchen as my mom prepared a warm, cozy treat. The pièce de résistance? Her Peppermint Hot Chocolate Cookies. Each bite was like a hug from the inside—a soft, chocolatey cushion, crowned with gooey marshmallow and a sprinkle of festive peppermint.
What truly makes these cookies special is the perfect blend of nostalgic flavors. Unlike many store-bought or average homemade cookies, this recipe combines rich Dutch-processed cocoa with a burst of peppermint flavor, creating a symphony of taste and warmth. It evokes memories of laughter around the dining table after a day of ice skating and snowball fights.
In this delightful recipe, I’ll share the secrets to baking these irresistible Peppermint Hot Chocolate Cookies, including ingredient tips and expert techniques that will elevate your baking game. By the end, you’ll have a comforting recipe that not only fills your home with delightful aromas but also warms your heart with every morsel.
What Are Peppermint Hot Chocolate Cookies?
Peppermint Hot Chocolate Cookies take the essence of our favorite holiday drink and transform it into a delightful cookie form. Originating from creative bakers who sought to encapsulate the cozy vibe of hot cocoa in a handheld treat, these cookies are an absolute game-changer for the holiday season.
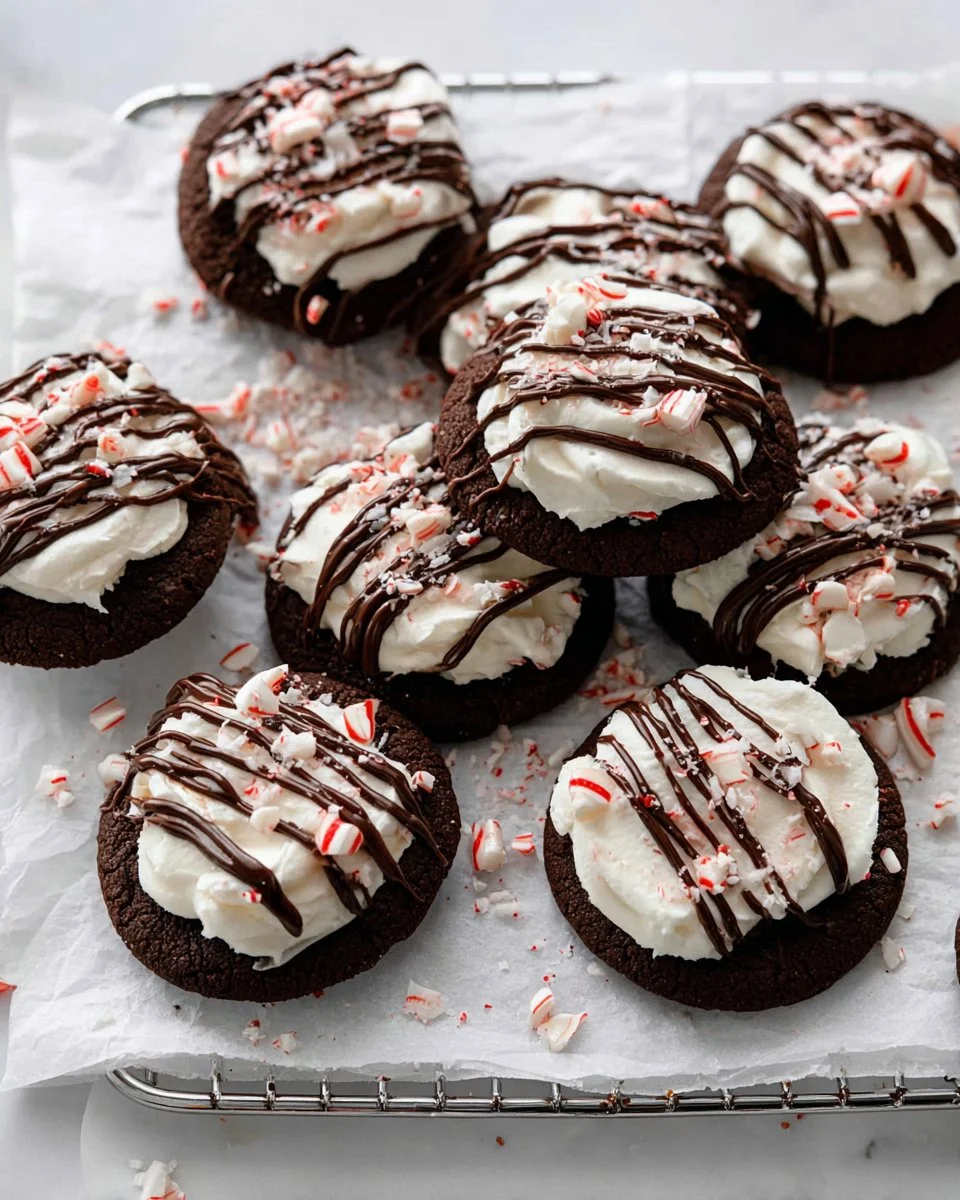
Imagine biting into a rich, chewy chocolate cookie that offers a luxurious texture thanks to the semi-sweet chocolate chips, only to be met with the delightful surprise of melted marshmallows. The refreshing hint of peppermint makes these cookies distinctively festive, perfect for cookie exchanges, holiday gatherings, or a simple treat to elevate your evening.
What makes them incredibly versatile is the ability to bake them year-round; just feel that holiday spirit any day with these delectable delights!
Why You’ll Love This Recipe
Unique Flavor Fusion: We’re not just making chocolate cookies; we’re creating a delightful flavor profile that combines the warmth of cocoa with the coolness of peppermint. This perfect balance means you won’t find these anywhere else!
Homemade vs. Store-bought: While store-bought cookies are often limp in flavor and dull in texture, these Peppermint Hot Chocolate Cookies are rich, chewy, and bursting with personality from quality ingredients. Plus, you know exactly what goes into them!
Cost-effective: Think of the savings! A batch of these cookies can be made for a fraction of the price of a fancy cafe treat—plus, the bragging rights are priceless.
Customization Options: Want to jazz them up? You can add mini chocolate chips, swirls of caramel, or even a hint of espresso for a mocha twist. The sky’s the limit!
User-friendly: As someone who’s made these numerous times, I assure you that even novice bakers will find this recipe approachable. The total time investment is minimal for cookies that bring such joy.
Ingredients Section
Before you start, let’s make sure we have everything you need to whip up these divine Peppermint Hot Chocolate Cookies:
- 1 ½ cups all-purpose flour: For the perfect cookie structure. If you’re gluten-free, feel free to substitute with a 1:1 gluten-free blend, like Bob’s Red Mill.
- ½ cup Dutch-processed cocoa powder: This gives our cookies that rich chocolate flavor and dark color. I recommend Ghirardelli for the ultimate depth of cocoa.
- ½ teaspoon kosher salt: To enhance all the sweet flavors.
- ½ teaspoon baking powder: This will help our cookies rise and fluff up beautifully.
- ¾ cup unsalted butter, room temperature: The foundation of our cookie dough. Be sure to take this out of the fridge an hour before baking.
- ¾ cup light brown sugar, packed: This adds moisture and chewiness.
- ¼ cup granulated sugar: For sweetness balance and that delightful outer crisp.
- 2 large egg yolks, room temperature: For richness. (You can save the whites for meringues!)
- 1 teaspoon peppermint extract: The magic ingredient that brings holiday cheer.
- 13 regular marshmallows, halved: For that ooey-gooey topping.
- ½ cup semi-sweet chocolate chips: Because what’s a cookie without a surprise of melted chocolate?
- Crushed peppermint candies for garnish: A festive touch that adds color and a surprising crunch.

Step-by-Step Instructions
Prepare the Baking Sheets: Line a large baking sheet with parchment paper and set aside. If you’re like me, you know that parchment means easier cleanup—win, win!
Mix Dry Ingredients: In a medium bowl, whisk together the flour, cocoa powder, salt, and baking powder. This helps distribute all the dry ingredients evenly.
Cream the Butter and Sugars: In a stand mixer fitted with the paddle attachment, add the room temperature butter, light brown sugar, and granulated sugar; mix on medium speed until creamy and fluffy, about 2-3 minutes.
Incorporate the Wet Ingredients: Add the egg yolks and peppermint extract to the butter mixture. Mix until fully incorporated, scraping the bowl to ensure no bits are left behind.
Combine the Wet and Dry Ingredients: Reduce mixer speed to low and gradually add the dry ingredients to the wet ingredients, mixing until just combined. Remember, overmixing is a cookie’s worst nightmare.
Chill the Dough: Using a cookie scoop, drop the dough onto the prepared baking sheet. Chill in the refrigerator for 1 hour to help the cookies maintain their shape and texture during baking.
Preheat the Oven: Preheat the oven to 350°F (175°C) and line two baking sheets with parchment paper.
Prepare for Baking: Transfer the chilled dough balls to the baking sheets, spacing them about an inch apart. Press an indent in the center of each dough ball.
First Bake: Bake for 9 minutes until the edges are set but the centers remain soft.
Add Marshmallows: Remove from the oven and add marshmallow halves to each cookie, cut side down. Return to the oven for an additional 2-3 minutes or until the marshmallows start to melt.
Flatten Marshmallows: Upon removing them from the oven, gently press down on the marshmallows to flatten slightly. Allow to cool on the pan for several minutes.
Melt Chocolate: While the cookies cool, melt the chocolate chips in a microwave-safe bowl in 30-second intervals, stirring until smooth.
Drizzle Chocolate: Drizzle the melted chocolate over the cooled cookies and sprinkle with crushed peppermint candies for that dazzling seasonal touch.
Let It Set: Allow the chocolate to set before serving. (Or you can enjoy them slightly warm—no judgment here!)

Expert Tips & Tricks
Room Temperature Ingredients: For the best results, always ensure your butter and eggs are at room temperature; this helps achieve a consistent texture in your cookies.
Chilling Dough: Don’t skip chilling the dough! This is crucial for preventing flat cookies and allows flavors to meld beautifully.
Storage: Store any leftover cookies in an airtight container at room temperature for up to a week, or you can freeze them uncooked for up to 3 months—simply thaw and bake fresh cookies whenever the mood strikes!
Troubleshooting: If your cookies spread too much, check that your butter wasn’t too warm. If they’re too dry (often due to over-baking), increase the baking temperature slightly.
Use Good Quality Ingredients: High-quality chocolate and pure peppermint extract make a significant difference in flavor, so splurge a little—you won’t regret it!
Make-ahead Instructions: Prepare the dough, scoop it onto the baking sheet, and freeze. Pop them in a bag once frozen solid, and bake directly from the freezer—just add an extra minute or so to the baking time.
Serving Suggestions
Pair your Peppermint Hot Chocolate Cookies with a steaming mug of your favorite hot cocoa. For an aesthetically pleasing presentation, consider serving them on a festive platter drizzled with extra melted chocolate and a sprinkle of crushed peppermint candies. They’re perfect for holiday cookie exchanges or simply enjoyed by the hearth as you curl up with a good book!
Variations & Substitutions
Flavor Combinations: Transform them into Mocha Cookies by incorporating a tablespoon of espresso powder. Or, go for a classic Peanut Butter twist by replacing half the butter with creamy peanut butter for a delightful combination.
Dietary Modifications: For a vegan option, substitute butter with coconut oil or vegan butter and use flax eggs instead of regular eggs. You can also use dairy-free chocolate chips for an allergen-friendly version.
Seasonal Variations: During Easter, you could swap out the peppermint for orange zest and a sprinkle of Easter-themed sprinkles, creating a Springtime treat that’s equally charming.
Nutrition & Storage Info
- Prep Time: 20 min
- Cook Time: 11-12 min
- Total Time: 1 hr 33 min (includes chilling)
- Yield: About 24 cookies
- Calories: Approximately 150 per cookie (serving size – 1 cookie)
- Storage: Keep in an airtight container at room temperature for up to a week or freeze for up to 3 months.
FAQ Section
Can I use regular cocoa powder?
- Yes, you can use regular cocoa powder, but Dutch-processed will give a richer flavor and darker color.
What if I don’t have peppermint extract?
- You can substitute with vanilla extract, though the cookies will lack the signature peppermint flavor.
How do I fix dry cookies?
- If your cookies turn out dry, you might have overbaked them. Always check for the soft and gooey center!
Can I freeze the dough?
- Absolutely! Freeze shaped dough balls and bake them directly from the freezer, adding a couple of minutes to baking time.
Are these cookies gluten-free?
- You can substitute the all-purpose flour with a gluten-free blend for a GF version; just be sure to check the packaging to ensure it fits your dietary needs!
How do I prevent cookies from spreading too much?
- Be sure to chill the dough fully and measure your flour correctly. Too little flour can lead to spreading.
What if I want to make them without marshmallows?
- If you want to skip the marshmallows, try adding a layer of chocolate ganache on top once they cool for a lush finish!
How do I make them smaller for cookie trays?
- Use a smaller cookie scoop, and adjust the baking time down by a minute or two.
Can I add nuts?
- Certainly! Chopped pecans or walnuts would add a delightful crunch—just fold them in during step 5.
How long do they keep?
- These cookies can be stored for up to a week in an airtight container, or frozen for 3 months.
Conclusion
These Peppermint Hot Chocolate Cookies aren’t just another cookie recipe; they’re a nostalgic treat that encapsulates the warmth of holiday magic in each bite. I encourage you to try baking them—your fam and friends will delight in every gooey, chocolatey morsel!
Have you made a batch? I’d love to hear about your experience or any personal twists you’ve added. Be sure to check out my other holiday recipes here on the blog for more delightful treats.

Peppermint Hot Chocolate Cookies
Ingredients
Method
- Line a large baking sheet with parchment paper and set aside.
- In a medium bowl, whisk together the flour, cocoa powder, salt, and baking powder.
- In a stand mixer, cream the butter, light brown sugar, and granulated sugar until creamy and fluffy.
- Add egg yolks and peppermint extract to the butter mixture, and mix until fully incorporated.
- Gradually add dry ingredients to the wet ingredients until just combined.
- Using a cookie scoop, drop the dough onto the prepared baking sheet and chill in the refrigerator for 1 hour.
- Preheat the oven to 350°F (175°C).
- Place chilled dough balls on baking sheets, spacing them about an inch apart.
- Bake for 9 minutes; the edges should be set while the centers remain soft.
- Remove from oven and top each cookie with marshmallow halves cut side down.
- Return to oven for an additional 2-3 minutes until marshmallows begin to melt.
- Gently press the melted marshmallows down and allow cookies to cool.
- Melt the chocolate chips in a microwave-safe bowl and drizzle over cooled cookies.
- Sprinkle with crushed peppermint candies before letting the chocolate set.