There’s something truly magical about recipes that carry a story—an heirloom, if you will—passed down through generations. For me, Martha Washington Candy holds a special place in my heart, where memories of bustling family gatherings and holiday celebrations dance around the aroma of freshly made sweets. Picture this: a cozy kitchen, laughter echoing through the halls, and the tantalizing scent of chocolate mingling with nutty coconut bliss filling the air. These little morsels of joy are not just a delightful treat; they’re a symbol of love and comfort.
What makes Martha Washington Candy so exceptional? It’s the harmonious balance of flavors—the indulgent sweetness of condensed milk paired with crunchy pecans and the velvety smoothness of chocolate. This homemade version surpasses any store-bought alternative with its fresh ingredients and heartfelt effort, making it the perfect addition to your dessert table or as a thoughtful gift.
In this post, I’m excited to share a family recipe that will not only inspire you to whip up a batch of these heavenly candies but will also create cherished moments around your own kitchen. You’ll learn the ins and outs of crafting Martha Washington Candy, from preparation tips to a few personal anecdotes that I hope resonate with you. Let’s dive in!
What are Martha Washington Candy?
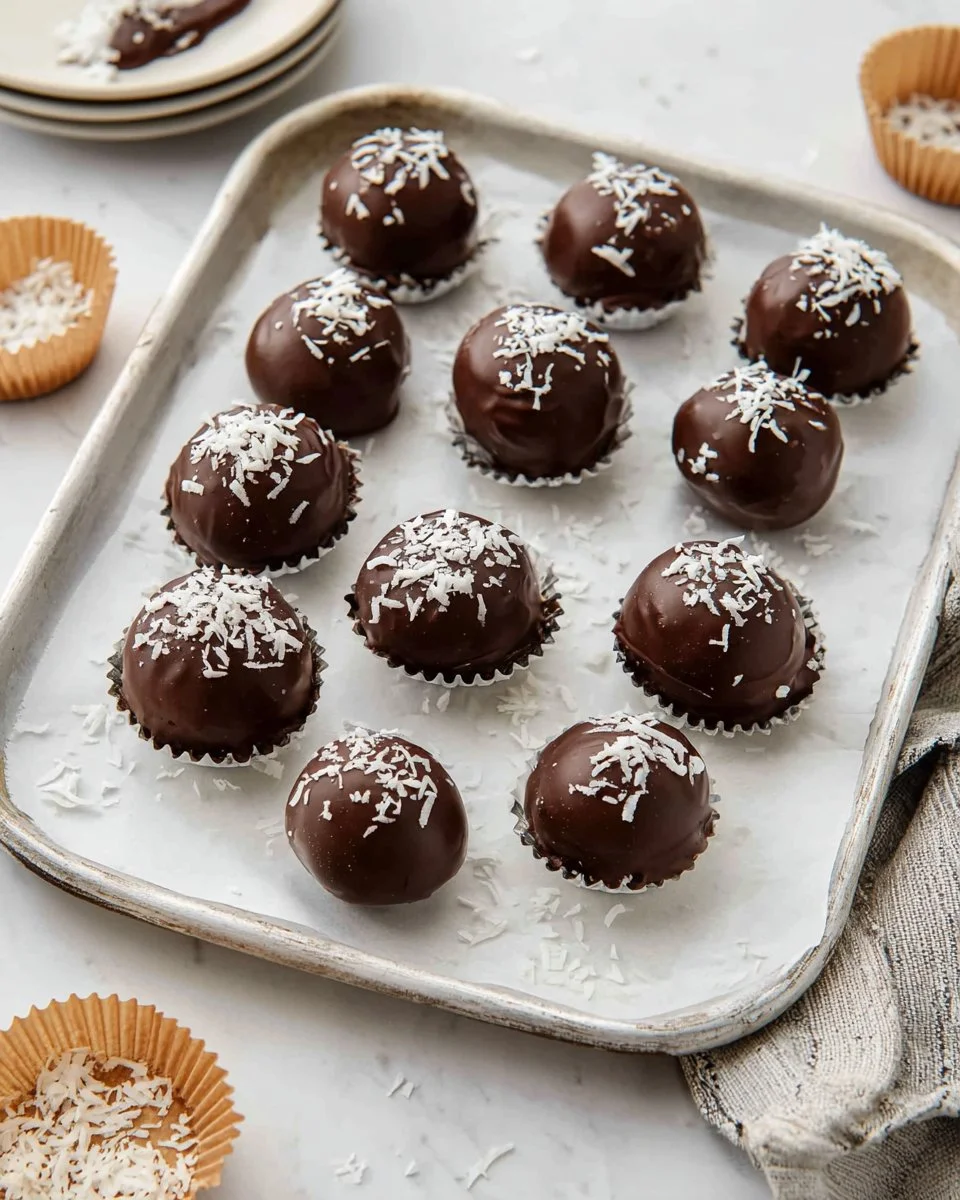
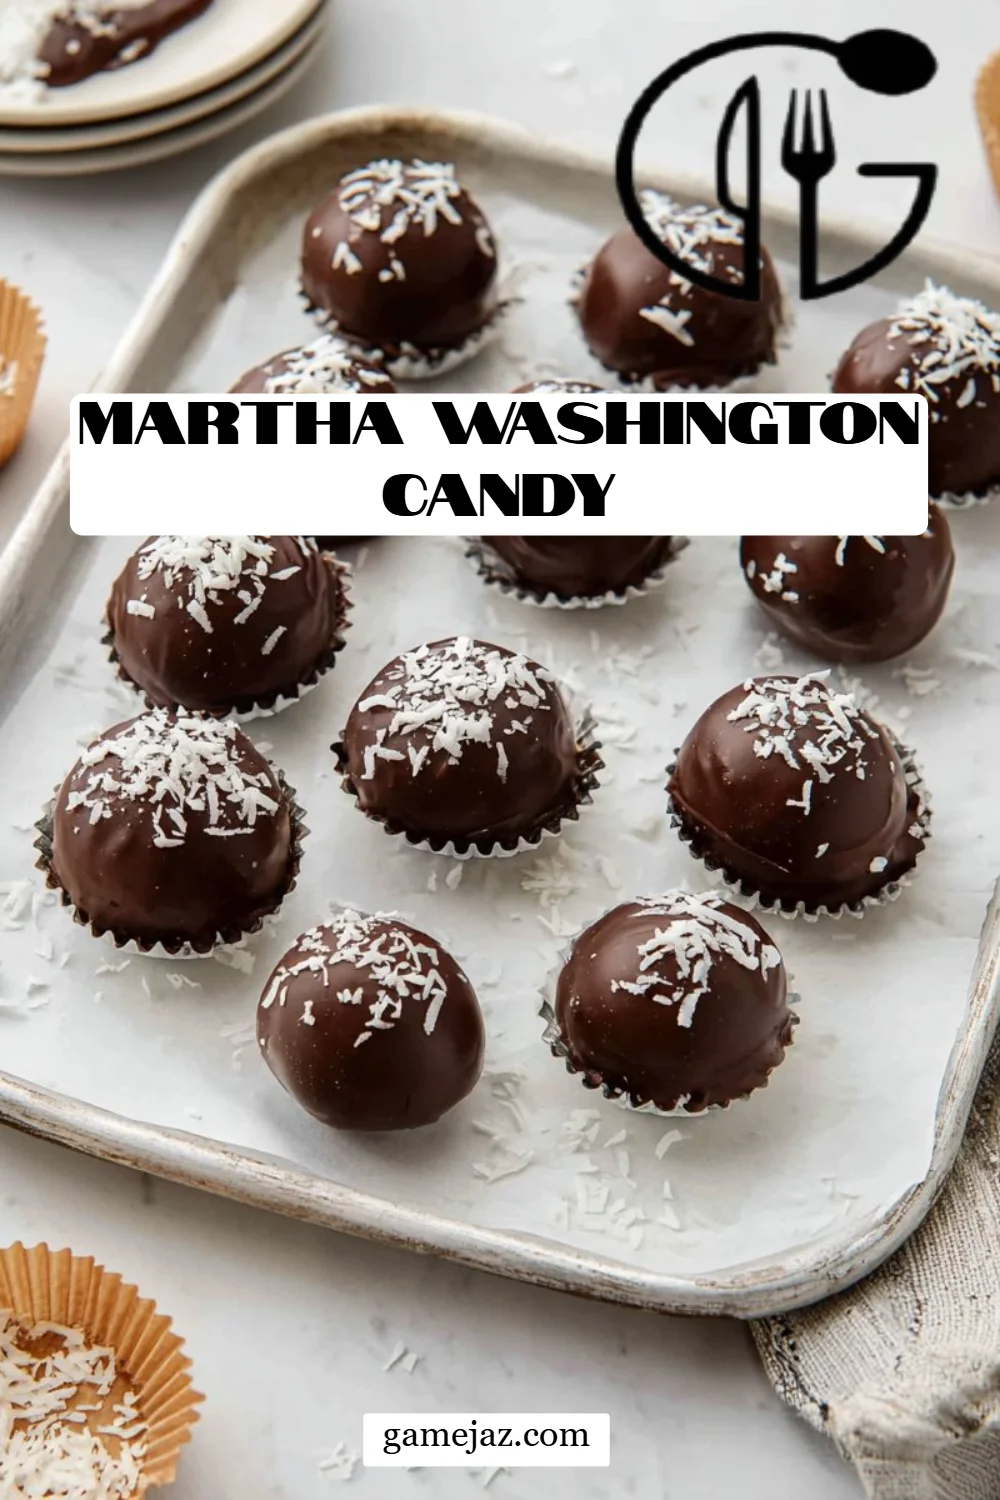
Martha Washington Candy is a no-bake confection that dates back to the 19th century, believed to have been named after the first First Lady of the United States, Martha Washington. These treats consist of a rich, creamy filling made from sweetened condensed milk, coconut, pecans, and a touch of vanilla, all encased in a smooth layer of semi-sweet chocolate.
The texture is a delightful contrast; the filling is soft and chewy, bursting with flavor, while the chocolate coating offers a satisfying snap when you bite into it. What sets these candies apart is not just their extraordinary taste but also the nostalgic appeal they bring. They’re perfect for holidays, special occasions, or simply as an afternoon pick-me-up.
Whether it’s a festive celebration or a simple indulgence for a movie night at home, Martha Washington Candy is versatile enough to suit any occasion. And the joy of sharing these with friends and family makes them even more special.
Why You’ll Love This Recipe
1. Homemade Taste That Beats Store-Bought
When it comes to candy, nothing can compare to the richness and fresh flavors of homemade Martha Washington Candy. Store-bought versions often contain preservatives and artificial flavors, while this recipe is all about real ingredients that you can see and taste.
2. Cost-Effective Indulgence
Why spend a fortune on gourmet candies when you can whip up your own at a fraction of the cost? Using affordable ingredients like butter, sugar, and coconut, this recipe lets you treat yourself without breaking the bank.
3. Customization Galore
The flexibility in this recipe allows you to put your spin on your Martha Washington Candy. Want to swap pecans for almonds or include dried fruit? Go for it! You can make these candies uniquely yours to suit your taste buds.
4. Simple Techniques
If you’ve ever felt intimidated by candy-making, rest easy. This no-bake recipe is incredibly straightforward, requiring minimal kitchen equipment, and the step-by-step instructions ensure success even for novice bakers.
5. A Make-Ahead Marvel
Perfect for busy schedules, these candies can be made in advance. Once set, they store well in the refrigerator, making them an ideal treat for unexpected guests or a sweet addition to picnics.
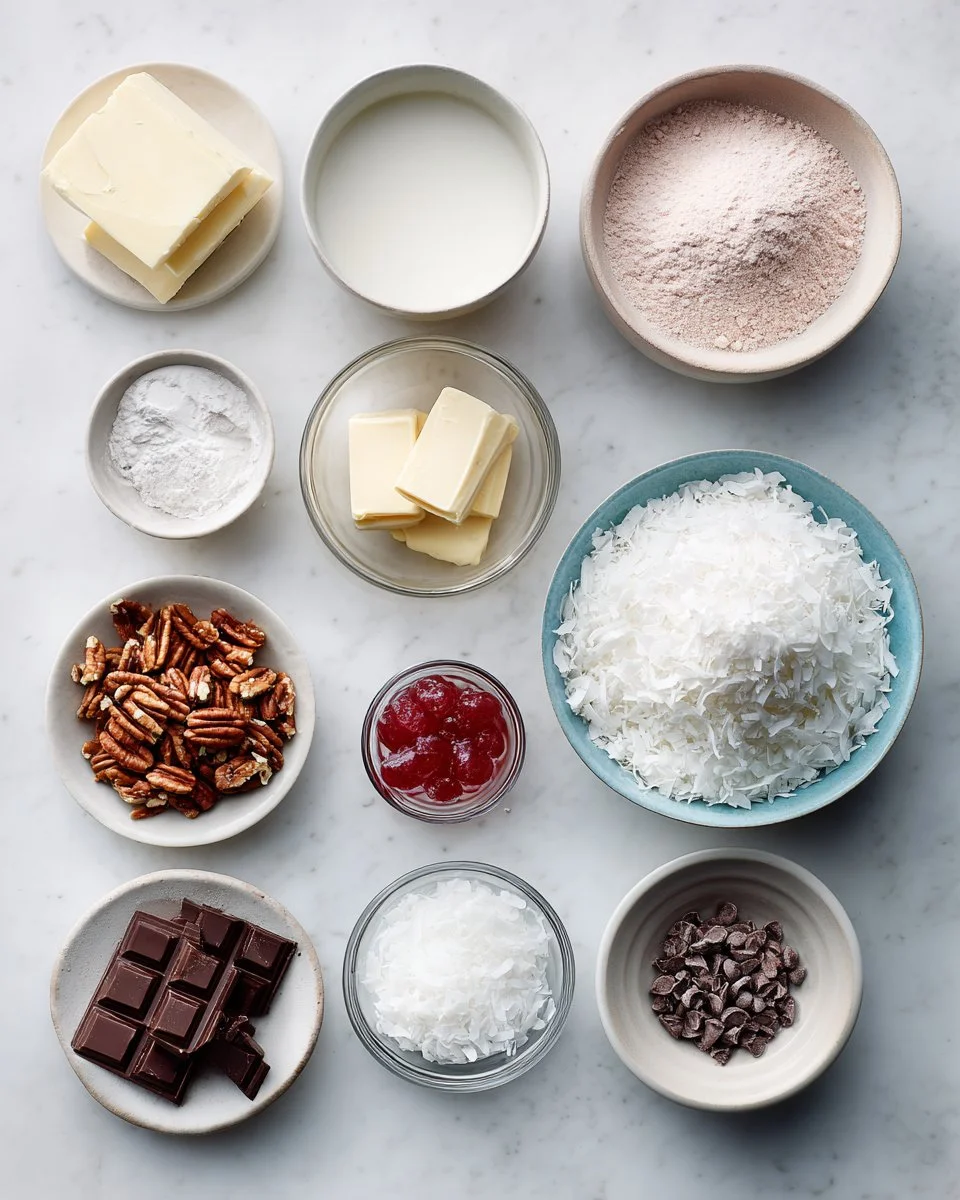
Ingredients
- 1 cup (2 sticks / 227 g) unsalted butter, softened: Using room temperature butter ensures an easy blend of ingredients for a smooth filling.
- 4 cups (500 g) confectioners’ sugar: For sweetness and texture, opt for high-quality sugar for the best finish.
- 1 can (14 ounces) sweetened condensed milk: This provides creaminess that can’t be replicated with milk alone.
- 2 cups (186 g) shredded sweetened coconut: Make sure to use sweetened for the right flavor profile.
- 2 cups (218 g) pecans, chopped: Freshly chopped pecans enhance the crunch; substitute with walnuts or almonds if desired.
- 2 teaspoons vanilla extract: Opt for pure vanilla extract for a deeper flavor.
- 1 jar (6 ounces) maraschino cherries, drained, chopped: These provide a sweet burst amidst the rich filling.
- 6 cups (1.09 kg) semi-sweet chocolate chips: A good-quality chocolate will significantly impact your final product.
- 2 tablespoons vegetable oil: This helps the chocolate melt smoothly for dipping.
- Coconut flakes, for garnish (optional): Because who doesn’t love extra coconut?
Notes: Always look for fresh, high-quality ingredients for the best results. Brands like Ghirardelli for chocolate and Fisher for nuts are great choices.
Step-by-Step Instructions
Mix the Base: In the bowl of a stand mixer with the paddle attachment, add softened butter and confectioners’ sugar. Mix on low speed until well combined—about 1-2 minutes.
Incorporate Other Ingredients: With the mixer stopped, add sweetened condensed milk, shredded coconut, chopped pecans, and vanilla extract. Mix until all ingredients are well incorporated—another 1-2 minutes.
Add Cherries: Gently fold in the chopped maraschino cherries, distributing them evenly throughout the mixture.
Chill to Firm Up: Transfer the mixture to a covered container and refrigerate for at least 3 hours, or up to overnight. This step is crucial for making it easier to handle.
Prepare for Dipping: Once firmly chilled, line a baking sheet with parchment paper.
Form the Candy Balls: Using a 1-tablespoon scoop, drop the chilled mixture onto the parchment paper, rolling each piece into a ball. Return to the refrigerator while you prepare the chocolate.
Melt the Chocolate: In a microwave-safe bowl, combine semi-sweet chocolate chips and vegetable oil. Heat in 20-second increments, stirring after each interval until completely melted and smooth. Allow to cool slightly for about 2-2½ minutes.
Dip Each Ball: Using a fork, dip each candy ball into the melted chocolate, coating it fully. Let excess chocolate drip off before placing it back on the parchment.
Garnish: For an extra touch of flair, sprinkle the dipped candies with optional coconut flakes before the chocolate sets.
Let Candy Set: Allow the chocolate coating to set—this usually takes about 30 minutes at room temperature or about 10 minutes in the fridge.
Store Leftovers: Place the finished candies in an airtight container in the refrigerator. Enjoy them over the next few weeks (if they last that long!).
Expert Tips & Tricks
Choosing the Right Chocolate: Remember, the quality of your chocolate makes a huge difference. Always choose chocolate chips meant for melting.
Room Temperature Ingredients: Keeping butter and eggs at room temperature will help in blending and achieving a smooth consistency.
Make-ahead Magic: These candies can be made well in advance, allowing you to prep for gatherings without the last-minute rush.
Room Temperature or Refrigerated: Martha Washington Candy is delicious served cold but can also be served at room temperature.
Troubleshooting Dipping: If your chocolate is thickening too quickly for dipping, you can re-melt it in the microwave for a few seconds, stirring frequently.
Storage Tip: These candies last longer when kept in an airtight container; you can keep them fresh in the refrigerator for up to 3 weeks.
Serving Suggestions
Martha Washington Candy is a delightful treat on its own, but you can elevate your presentation by serving it alongside a warm cup of coffee or hot cocoa. For special occasions, consider placing them in decorative boxes or on a beautiful dessert platter to impress your guests. They also make for great additions to cookie trays during the holiday season, paired with classic cookies like snickerdoodles or ginger snaps.
Variations & Substitutions
- Nut-Free Option: If you’re allergic to nuts or prefer to skip them, simply omit the pecans or replace them with sunflower seeds for crunch.
- Flavor Twists: Consider adding a swirl of peppermint extract for a refreshing winter treat, or use almond extract for a twist on the classic.
- Seasonal Specials: For festive occasions, add crushed candy canes around the holidays, or dried fruits like cranberries for a summery version.
Nutrition & Storage Info
- Prep Time: 20 minutes
- Cook Time: 0 minutes (chill time varies)
- Total Time: 3 hours + optional overnight chill
- Yield: Approximately 36 candies
- Estimated Calories per Serving: 120 calories
- Storage Instructions: Keep in an airtight container; refrigerated candies will stay fresh for about 2-3 weeks, while they can also be frozen for longer storage (up to 3 months).
FAQ Section
Can I use dark chocolate instead of semi-sweet?
Absolutely! Dark chocolate will add a richer flavor to your Martha Washington Candy.What if I can’t find sweetened condensed milk?
While it’s crucial for the recipe, you can make a homemade version using evaporated milk and sugar.Is it necessary to refrigerate the mixture?
Yes, chilling the mixture helps it firm up and makes shaping the candy much easier.Can I use other fillings?
Definitely! Try experimenting with different nuts, dried fruits, or even flavored extracts to customize your candies.How do I store any leftovers?
Keep them in an airtight container in the refrigerator, and they should stay fresh for a couple of weeks.Can I coat these in white chocolate?
Yes, white chocolate is a fantastic alternative and pairs beautifully with the flavors in the candies.Are there any vegan substitutions?
Yes, you can use vegan butter and coconut cream instead of sweetened condensed milk for a completely vegan version.What’s the best way to dip without making a mess?
Using a fork to lift the candy balls in and out of the chocolate helps minimize mess. Just let the excess chocolate drip off.Can I use fresh cherries instead of maraschino cherries?
While fresh cherries could work, maraschinos provide a sweeter and more concentrated flavor.How long can I keep these candies?
Stored properly in the refrigerator, they can last around 2-3 weeks, or freeze them for longer storage.
Conclusion
The experience of creating homemade Martha Washington Candy is as delightful as the confections themselves. With their creamy, nutty, chocolate-coated bliss, these treats bring a dash of nostalgia and a sprinkle of joy to your gatherings. I hope you feel inspired to make a batch for yourself—and to share with loved ones, of course!
I’d love to hear how your Martha Washington Candy turns out! Feel free to drop your thoughts, tweaks, or even your own stories in the comments below. And while you’re here, don’t forget to check out my other sweet delights on the blog, like my decadent chocolate truffles and One Pan Spanish Chicken and Rice.

Martha Washington Candy
Ingredients
Method
- In the bowl of a stand mixer with the paddle attachment, add softened butter and confectioners’ sugar. Mix on low speed until well combined—about 1-2 minutes.
- With the mixer stopped, add sweetened condensed milk, shredded coconut, chopped pecans, and vanilla extract. Mix until all ingredients are well incorporated—another 1-2 minutes.
- Gently fold in the chopped maraschino cherries, distributing them evenly throughout the mixture.
- Transfer the mixture to a covered container and refrigerate for at least 3 hours, or up to overnight to firm up.
- Once the mixture is firm, line a baking sheet with parchment paper.
- Using a 1-tablespoon scoop, drop the chilled mixture onto the parchment paper, rolling each piece into a ball. Return to the refrigerator while preparing the chocolate.
- In a microwave-safe bowl, combine semi-sweet chocolate chips and vegetable oil. Heat in 20-second increments, stirring after each interval until completely melted and smooth. Allow to cool slightly for about 2-2½ minutes.
- Using a fork, dip each candy ball into the melted chocolate, coating it fully. Let excess chocolate drip off before placing it back on parchment.
- For an optional touch of flair, sprinkle dipped candies with coconut flakes before the chocolate sets.
- Allow the chocolate coating to set—this usually takes about 30 minutes at room temperature or about 10 minutes in the fridge.