Create the Ultimate Holiday Cheese Board: Your Guide to a Festive Delight
Ah, the holiday season! A time of joy, laughter, and, of course, incredible food. I remember my childhood holidays, gathering around the table with family and friends, the air filled with delicious aromas and cheerful chatter. One of the highlights was always the Holiday Cheese Board—an exquisite medley of flavors and textures that captured the essence of celebration. As a lifelong cheese lover, I’ve crafted this vibrant display time and again, each one better than the last.
What makes this Holiday Cheese Board truly special is its ability to spark joy and connection. Unlike store-bought versions, my recipe allows you to customize it to your heart’s content, incorporating local cheeses, seasonal fruits, and even homemade jams. It’s not just a treat for the taste buds; it’s a feast for the eyes and a comforting reminder of those cherished holiday memories.
In this blog post, I’ll guide you through creating your perfect Holiday Cheese Board, detailing specific ingredient choices, inspiring presentation tips, and those little chef secrets that make all the difference. Get ready to impress your guests and enjoy every delightful bite!
What Are Holiday Cheese Boards?
Originating from the art of charcuterie, the Holiday Cheese Board is more than just a platter of cheese; it’s an enchanting celebration of various earthy flavors and textures. Typically, these boards include a mix of soft and hard cheeses, cured meats, fruits, nuts, and accompaniments like jams or spreads.
Taste-wise, they offer a delightful contrast; creamy brie alongside sharp blue cheese, savory salami next to sweet grapes—it’s a beautiful journey in every bite! The unique aspect of the Holiday Cheese Board lies in its adaptability; whether it’s the holidays, birthdays, or a casual get-together, you can curate it to suit any occasion, making it perfect for festive gatherings or cozy family dinners.
Why You’ll Love This Recipe
Customization Galore: Unlike pre-made cheese boards, this allows you to choose your favorite ingredients. Tweak it for personal preference or seasonal availability—throw in a spicy cheese or some seasonal fruits!
Cost-Effective: You can save money by creating your grand cheese board with ingredients from local markets or grocery stores. A little creativity goes a long way in making it look extravagant without breaking the bank.
A Showstopper: Trust me; when you bring this masterpiece to the table, all eyes will be on it. It’s a beautiful centerpiece that will have everyone reaching for their phones to snap a picture!
Quick Assembly: Once you gather your ingredients, assembling the board is a breeze—it typically takes about 30-40 minutes. You’ll have more time to mingle and enjoy the party rather than slaving away in the kitchen.
Family Bonding: Making this together can be a fun activity for any family or group of friends, creating memories as you craft each element of the board.
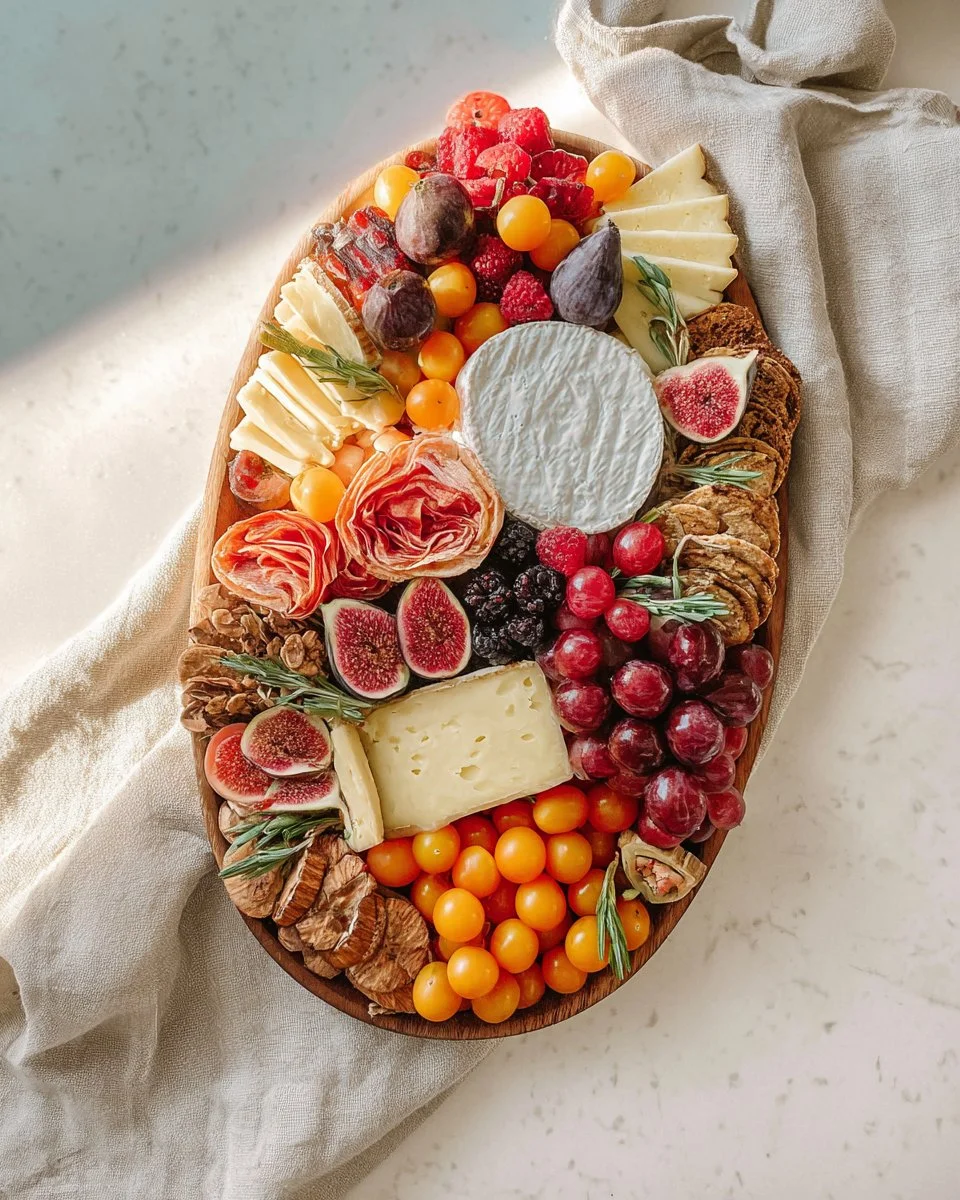
Ingredients
{image_template}
- 20 slices genoa salami: Look for high-quality, thinly sliced salami; it adds a robust flavor and attractive presentation.
- 1 wheel pineapple cream cheese: This unique cheese provides a sweet, fruity contrast; feel free to substitute with a flavored cream cheese if desired.
- 1 blue cheese triangle: Choose a well-aged cheese for a more intense flavor profile.
- 1/2 small wheel of extra creamy brie cheese: The creaminess of brie balances the intensity of the blue cheese.
- 1 cup havarti, cubed: This mild cheese brings a buttery flavor to the board.
- 1 cup cheddar, cubed: Sharp or mild, depending on your preference, it adds a delightful texture.
- Any crisps or crackers: Be adventurous! Choose a mix of textures—think rosemary crisps or classic water crackers.
- Green grapes plus red grapes: Add fresh fruit for sweetness and a striking color pop.
- Any jam (e.g., fig jam): A sweet jam pairs beautifully with cheese; apricot or raspberry are also fantastic options.
- Olives of choice: Pitted Kalamata or green olives for a briny flavor.
- Few figs, cut in half: Fresh figs are a seasonal treat; they add sweetness and beauty.
- 1 pack golden berries: These provide a unique flavor burst and a splash of color.
- Pomegranate seeds: They add a juicy crunch and vibrant appearance.
- Grapefruit slices: For a citrusy tang that brightens the flavors.
- Hazelnuts (or any nuts): Toasted nuts add that extra crunch.
- Sprigs of rosemary: For presentation, it brings a festive touch and fragrant aroma.
Step-by-Step Instructions
To create your Holiday Cheese Board masterpiece, follow these simple steps:
Start with the Base: Take a large wooden board or a platter as your base. It should be clean and ready to shine!
Craft the Salami Rose: Place a glass in the center. Arrange the salami slices around the glass, overlapping them slightly, and flip it over. Gently pull the salami out to form a rose shape and then place it aside.
Cheese Placement: Add the pineapple cream cheese at the bottom of the board. Position the blue cheese right across from the cream cheese. Cut the brie into triangles and place them on either side of the salami rose.
Add the Cubes: Cube the cheddar and havarti, and place them diagonally opposite each other on the board.
Include the Crisps: Nestle the crisps or crackers between the cheese and salami to fill any gaps.
Fill in the Gaps: Now, it’s time to get creative! Add grapes opposite each other, scatter olives in between the cheese, and arrange figs on the top to enhance visual appeal.
Finishing Touches: Sprinkle golden berries, pomegranate seeds, and grapefruit slices around the board. Finally, accentuate with hazelnuts for that added crunch and sprigs of rosemary for a festive fragrance.
Serve & Enjoy: Allow your cheese board to sit at room temperature for about 30 minutes before serving. This way, the cheeses are perfectly creamy and enjoyable.
Expert Tips & Tricks
Quality Ingredients: Always choose fresh, high-quality ingredients for the best flavor. Local markets often have specialty cheeses that are worth exploring.
Make Ahead: You can prep many items, like cubing the cheese and washing the grapes, a few hours in advance. Just assemble shortly before serving!
Storage Recommendations: If there are ever any leftovers, store uneaten cheese in an airtight container in the fridge. Crackers can go stale; just keep them separate.
Seasonal Additions: In winter, try adding roasted chestnuts or candied nuts; in summer, fresh berries can refresh your board beautifully.
Different Textures: Incorporate cheese dips or spreads for extra dimensions.
Serving Suggestions
This Holiday Cheese Board is fabulous on its own, but here are a few ideas to elevate the experience:
Serve with Wine: Pair it with a crisp white wine or a light red depending on your cheese selection for a delightful balance.
Presentation Idea: Use garnishes like edible flowers or a sprinkle of edible glitter for an extra wow factor.
Ideal Occasions: This board is a fantastic surprise for holiday parties, family get-togethers, or even as a delightful pre-dinner appetizer.
Variations & Substitutions
Flavor Combinations: Consider exploring different cheese styles—go all in with a Mediterranean theme featuring feta and roasted red pepper spread.
Dietary Adaptations: For vegan options, try substituting vegan cheese and cured meats. Many brands offer excellent dairy-free cheese alternatives.
Seasonal Variations: Use seasonal fruits and herbs! For fall, consider figs and apple slices. Spring can call for fresh strawberries and basil!
Nutrition & Storage Info
- Prep Time: 30 minutes
- Total Time: 40 minutes
- Yield: 8-10 servings
- Estimated Calories per Serving: Approximately 300 calories (varies based on specific ingredients used).
Storage Instructions:
- Cheese is best stored in the fridge; expect it to last about 3-5 days after assembly if stored correctly.
- Keep crackers at room temperature to preserve crispness.
FAQ Section
- Can I prepare my Holiday Cheese Board the night before?
- What’s the best way to store leftover cheese?
- How do I choose the right cheese for my board?
- Can I include vegetables?
- What type of crackers work best?
- How do I arrange the ingredients aesthetically?
- What are the best beverages to serve with the board?
- Can I make a smaller version of this board?
- Are there any cheese alternatives for lactose-intolerant guests?
- What are the most popular cheese combinations?

Conclusion
Creating your Holiday Cheese Board is not just about assembling delicious ingredients; it’s about crafting a visual delight that brings people together and adds joy to any gathering. This unique recipe not only allows for creativity but also channels those warm, delicious holiday memories. I encourage you to get started, explore flavors, and make it your own! I’d love to hear how yours turns out—leave comments below and check out some of my other festive recipes that might inspire your next culinary adventure! Happy cheese boarding!

Holiday Cheese Board
Ingredients
Method
- Start with a large wooden board or platter as your base.
- Craft a Salami Rose by placing a glass in the center and arranging salami slices around it, then flipping it over and pulling the salami out to form a rose.
- Add the pineapple cream cheese at the bottom of the board, with blue cheese positioned across from it.
- Cut the brie into triangles and place them on either side of the salami rose.
- Cube the cheddar and havarti, placing them diagonally opposite each other.
- Nestle crisps or crackers between the cheese and salami.
- Fill gaps with grapes, olives, and figs to enhance visual appeal.
- Sprinkle golden berries, pomegranate seeds, and grapefruit slices around the board.
- Finish with hazelnuts for added crunch and sprigs of rosemary.
- Allow your cheese board to sit at room temperature for about 30 minutes before serving.