Delightful Easter Bunny Coconut Tails: A Sweet Spring Treat for the Family
Easter has always been a time of joy, laughter, and delicious food in my family. I vividly remember the excitement as a child, eagerly anticipating the annual Easter egg hunt. But what truly made the holiday special were the sweet treats my mom would whip up in the kitchen, especially her signature Easter Bunny Coconut Tails. I can’t help but smile as I think about those fluffy, creamy bites, almost like tiny clouds of happiness that melt in your mouth.
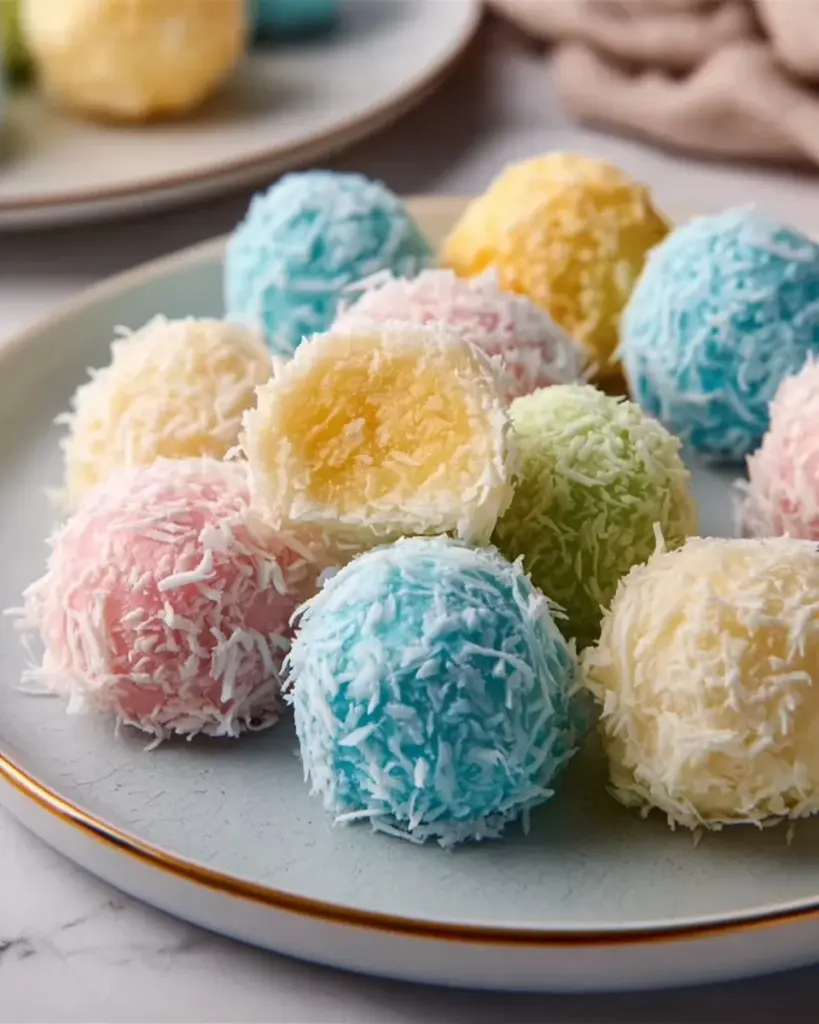
These Easter Bunny Coconut Tails are more than just a seasonal treat; they’re little parcels of nostalgia that bring the family together. Unlike store-bought confections, these homemade delights are filled with love and made from simple ingredients that you might have on hand. The combination of shredded coconut, sweetened condensed milk, and smooth white chocolate creates a delectable contrast of textures—chewy, creamy, and sweet—all rolled into one delightful package.
In this blog post, I’ll guide you through the step-by-step process to recreate these irresistible coconut tails at home, ensuring that you make sweet memories to savor with your loved ones. By the end, you’ll not only know how to make these delicious bites but also understand why they hold a special place in the hearts of many families.
What Are Easter Bunny Coconut Tails?
Easter Bunny Coconut Tails are charming bite-sized treats that symbolize the joy of spring and the whimsy of the Easter season. Originating from the delightful traditions of Easter baking, these confections bring together the tropical flavor of shredded coconut with the rich sweetness of white chocolate.
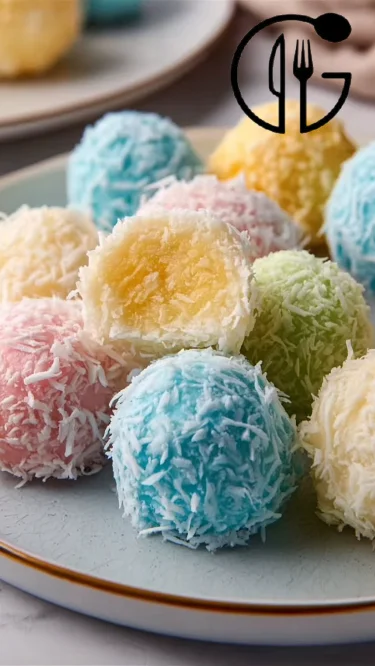
Picture this: each fluffy tail bursts with the soft, chewy texture of coconut and a smooth, creamy center, enveloped in a velvety coat of white chocolate. They’re not just any dessert; they resemble adorable bunny tails, dressed up for a gardener’s party, complete with edible eyes and sprinkles that add a fun splash of color.
These delightful treats are perfect for Easter celebrations, spring gatherings, or simply as a sweet pick-me-up. Whether you’re crafting them for an Easter brunch or indulging in an afternoon snack, these coconut tails are a fantastic way to bring a little cheer into your day.
Why You’ll Love This Recipe
Simple Ingredients: One of the best things about these Coconut Tails is that you only need six simple ingredients. You won’t find any weird preservatives or additives—just pure, wholesome goodness.
Cost-Effective: Making these Easter Bunny Coconut Tails at home is not only fun but also budget-friendly. Store-bought versions often come with a hefty price tag, but creating them yourself means more sweet treats for less.
Customization: The great thing about this recipe is its flexibility. Want to swap out white chocolate for dark chocolate? Go for it! Prefer adding a dash of almond extract instead of vanilla? Absolutely! You can personalize these shimmery bites to match your family’s favorite flavors.
Easy to Make: Even if you’re a novice in the kitchen, this recipe is incredibly simple and requires minimal time and effort. In just over an hour, you can create a beautiful batch of these treats that will impress anyone.
Memorable Family Connection: As someone who values the sentimental side of cooking, this recipe allows you to share quality time with your loved ones. Whether you’re making the tails alongside your children or reminiscing while preparing them, these treats will spark joy and laughter.
Ingredients Section
Here’s what you’ll need to bring these delightful Easter Bunny Coconut Tails to life:
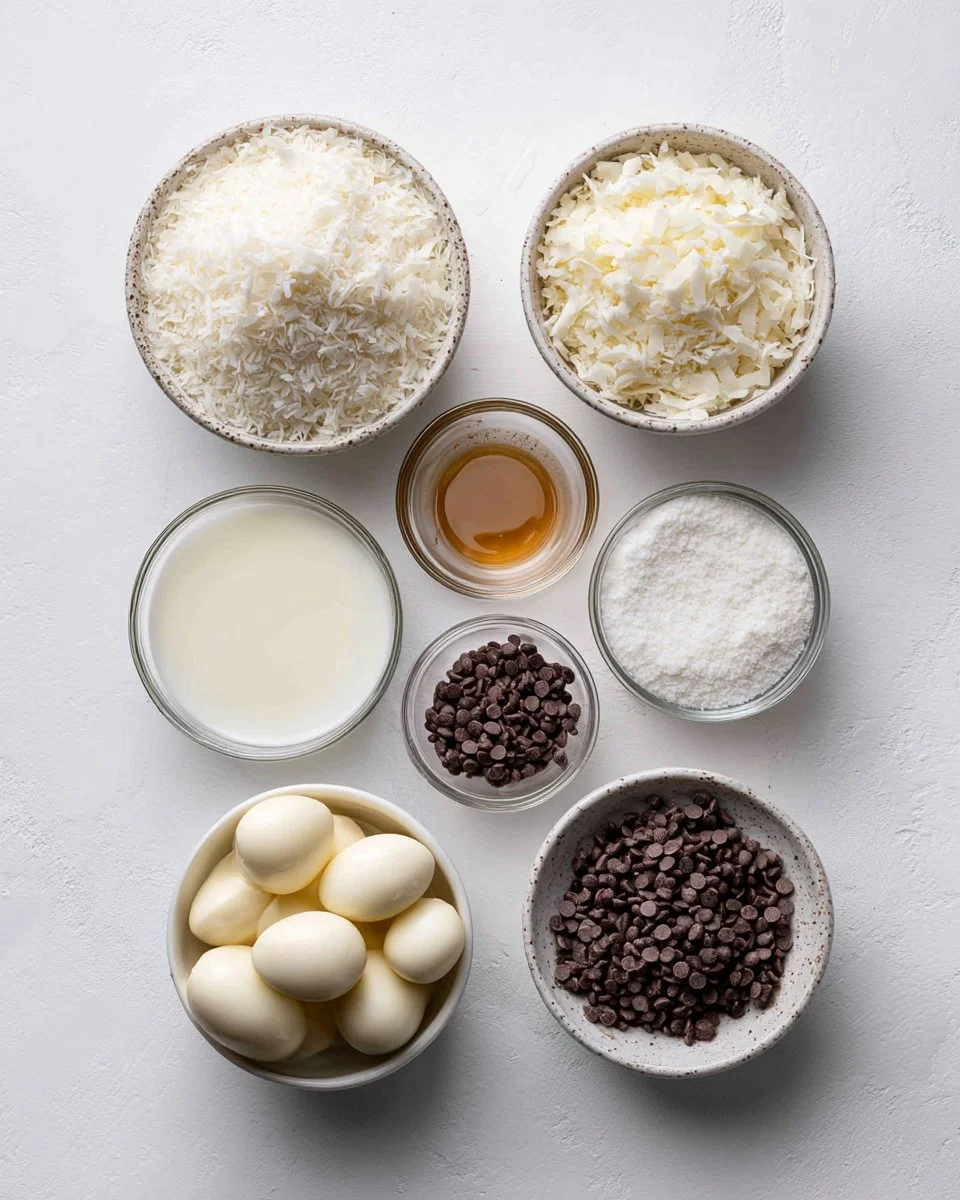
- 2 cups shredded coconut: Opt for sweetened shredded coconut if you prefer a sweeter treat, or go for unsweetened for a subtly tropical flavor.
- 1 cup sweetened condensed milk: This ingredient creates the gooey, creamy binding for your coconut mixture.
- 1 teaspoon vanilla extract: Choose pure vanilla extract for the best flavor—don’t settle for imitation!
- 1 cup white chocolate chips: I love using Ghirardelli or Guittard for their smooth melting properties; both make for a rich coating.
- Edible eyes: You can find these in craft stores or cake decorating shops; they add personality to each bunny tail!
- Chocolate sprinkles: Use them to give each tail a whimsical, festive look.
Preparation notes: Ensure that your sweetened condensed milk is at room temperature for easy mixing, and your chocolate chips are smooth for dipping.
Step-by-Step Instructions
To make your Easter Bunny Coconut Tails, follow these step-by-step instructions:
Mix the Coconut Base: In a large bowl, combine the shredded coconut, sweetened condensed milk, and vanilla extract. Mix until everything is well combined—think of it as a sticky, heavenly mess you can’t wait to dive into!
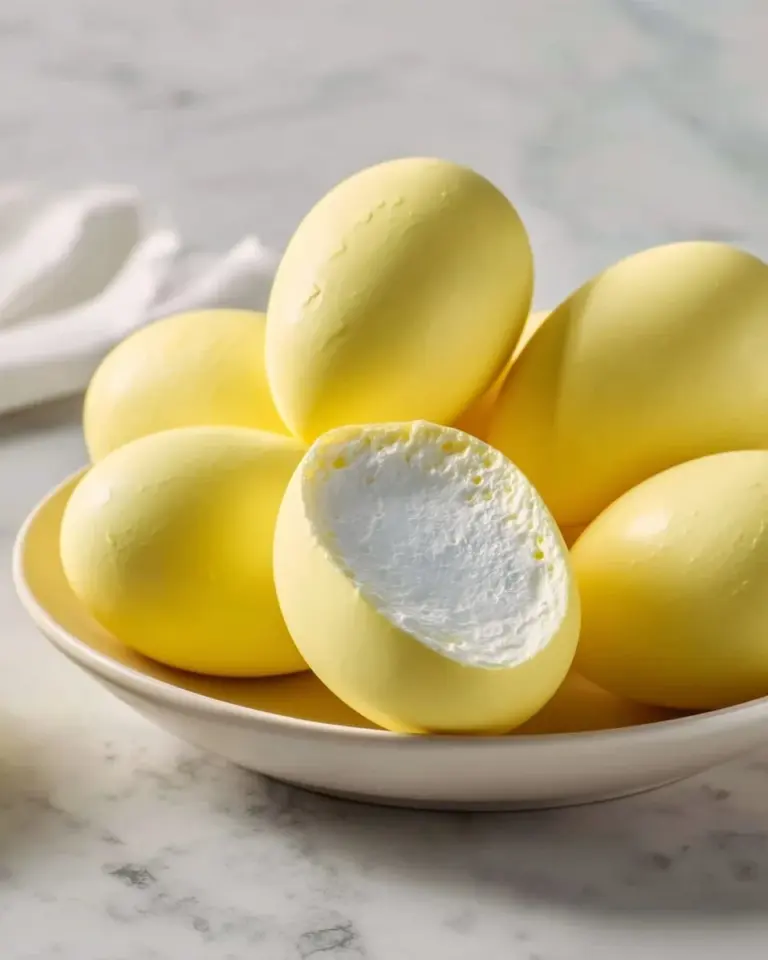
Shape the Tails: Using your hands, form the mixture into small balls, about 1 inch in diameter. You’ll notice they resemble little lumps of joy!
Chill the Coconut Balls: Place the shaped balls in the refrigerator for at least 30 minutes. This step is essential to firm them up, so be patient—you’ll thank yourself later.
Melt the Chocolate: While the coconut balls chill, melt the white chocolate chips in a microwave-safe bowl. Heat them in 30-second intervals, stirring in between until they’re completely smooth and velvety.
Dip the Coconut Balls: Once the coconut balls are chilled, take them out and dip each ball into the melted chocolate, making sure they’re fully coated. Use a fork to help lift them out and let any excess chocolate drip off.
Set Them Up: Place the coated balls on a parchment-lined baking sheet. This prevents sticking and makes cleanup a breeze.
Decorate with Eyes and Sprinkles: While the chocolate is still wet, add edible eyes and sprinkle chocolate sprinkles to each tail to give them character.
Let Set Completely: Allow the chocolate to set completely at room temperature. Patience is key here, but it will be worth it when you get to enjoy these scrumptious treats!
Chef’s Tip: Keep an eye on your chocolate while melting—it can turn from silky smooth to clumpy in seconds if overheated!

Expert Tips & Tricks
Storage Recommendations: Store your Easter Bunny Coconut Tails in an airtight container in the fridge for up to one week to keep them fresh and tasty.
Make-Ahead Instructions: You can prepare the coconut balls ahead of time and freeze them before dipping in chocolate. Just let them chill for about 20 minutes before melting the chocolate and coating them.
Troubleshooting: If your chocolate is too thick, add a teaspoon of vegetable oil to smooth it out. If you find the mixture too sticky, consider pressing in a little extra coconut to balance it out.
Visual Cues: Watch for color changes in the chocolate to know when it’s ready. It should be glossy and shiny before you dip!
Serving Suggestions
Your Easter Bunny Coconut Tails will steal the show in any dessert spread! I love serving them alongside vibrant fruit platters, fluffy mini cupcakes, or a selection of festive Easter cookies. For an extra touch, arrange them on a cute serving dish surrounded by fresh flowers or decorative grass for that spring vibe.
These treats work perfectly for Easter brunch or springtime picnics, and they’ll surely be an adorable addition to any celebration.
Variations & Substitutions
Different Flavor Combinations: Why not experiment with different flavors? Try adding a hint of orange zest for a citrus twist or swirl in some almond extract for a nutty flavor.
Dietary Restriction Adaptations: For a gluten-free option, make sure to check that your chocolate and sprinkles are certified gluten-free.
Seasonal Variations: As the seasons change, so can your Coconut Tails! Consider using pastel-colored chocolaate coatings for spring or adding festive sprinkles for different holidays.
Nutrition & Storage Info
- Prep Time: 15 minutes
- Chill Time: 30 minutes
- Total Time: 1 hour
- Yield: Approximately 15-20 servings
- Estimated Calories per Serving: 150 calories
Storage Instructions: Keep your Easter Bunny Coconut Tails covered tightly in an airtight container. They can be stored at room temperature for a couple of days or in the fridge for up to a week. For long-term storage, freeze them for up to three months.
FAQ Section
Can I use unsweetened coconut?
Absolutely! Unsweetened coconut can give you a subtler coconut flavor; just be mindful to adjust the sweetness accordingly with more condensed milk or a sprinkle of sugar.What if the chocolate isn’t melting smoothly?
Make sure to stir frequently while melting and try reducing the microwave power. If needed, add a drop of oil to smooth it out.Can I use dark chocolate instead of white chocolate?
Yes! Dark chocolate works wonderfully and will add a deeper richness to your Coconut Tails.How do I make these vegan?
You can substitute the sweetened condensed milk with a coconut cream or a homemade vegan alternative and use dairy-free chocolate chips.How long do they last?
When stored properly, they can last about a week in the fridge. For freezing, they can be enjoyed for up to three months.Are they suitable for kids?
Definitely! Kids love these fun treats, and they’re easy to make together as a family activity.What’s the best way to decorate them?
Get creative! Beyond chocolate sprinkles, you could use edible glitter, rainbow sprinkles, or even small candy pieces to add personality.What if I don’t have edible eyes?
No worries! You can skip them or use tiny chocolate chips or pieces of fruit instead.Can I add nuts?
Yes, feel free to fold in finely chopped nuts for an added crunch—love almond or macadamia!Can I make them larger?
Of course! Just note that larger balls will need a bit more chilling time.
Conclusion
These Easter Bunny Coconut Tails hold a special place not only in my heart but also in the hearts of everyone who gets to enjoy them. They encapsulate the joy and sweetness of family traditions while being extremely easy to recreate in your own kitchen. I wholeheartedly encourage you to give them a try and create your own sweet memories that can be shared at every gathering.
I would love to hear about your experiences making these delightful treats, so feel free to drop a comment below! And if you’re in the mood for more tasty recipes, be sure to check out other seasonal delights on my blog. Happy baking, and may your Easter be filled with joy and coconutty goodness!
Easter Bunny Coconut Tails
Ingredients
Method
- In a large bowl, combine the shredded coconut, sweetened condensed milk, and vanilla extract. Mix until well combined.
- Shape the mixture into small balls, about 1 inch in diameter.
- Chill the balls in the refrigerator for at least 30 minutes to firm them up.
- While the coconut balls chill, melt the white chocolate chips in a microwave-safe bowl in 30-second intervals, stirring until smooth.
- Dip each chilled coconut ball into the melted chocolate, ensuring they are fully coated, and allow excess chocolate to drip off.
- Place the coated balls on a parchment-lined baking sheet.
- While the chocolate is still wet, add edible eyes and sprinkle chocolate sprinkles on each tail.
- Let the chocolate set completely at room temperature before serving.