Sweeten Your Cookies with Irresistible Cookie Frosting: The Ultimate Recipe Guide
Ah, Cookie Frosting! Just the thought of it conjures up warm memories of baking marathons with my family on long winter weekends. As a child, I always looked forward to that magical moment—when the smell of freshly baked cookies wafted through our home, and my mom would call me over to help in the decorating process. The best part? Glazing those cookies with vibrant, sugary frosting. Each swirl and dollop of frosting brought a unique personality to each cookie, making them a canvas of creativity.
What makes my Cookie Frosting recipe stand out from the sea of other recipes? It’s not just the perfect balance of sweet, creamy goodness; it’s also the ease of preparation and the way it becomes a family bonding experience. With just a few simple ingredients, you’ll learn to whip up a frosting that’s not only beautiful but tastefully nostalgic. Today, I’ll show you how to make this delightful frosting from scratch, ensuring your cookies turn out show-stopping and heartwarming, just as they should be.
By the end of this post, you will not only have a fabulous frosting recipe, but you’ll also learn tricks transforming your cookie decorating game from ordinary to extraordinary!
What Are Cookie Frosting?
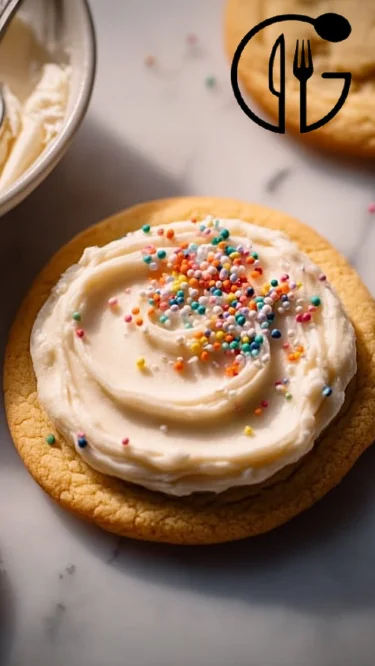
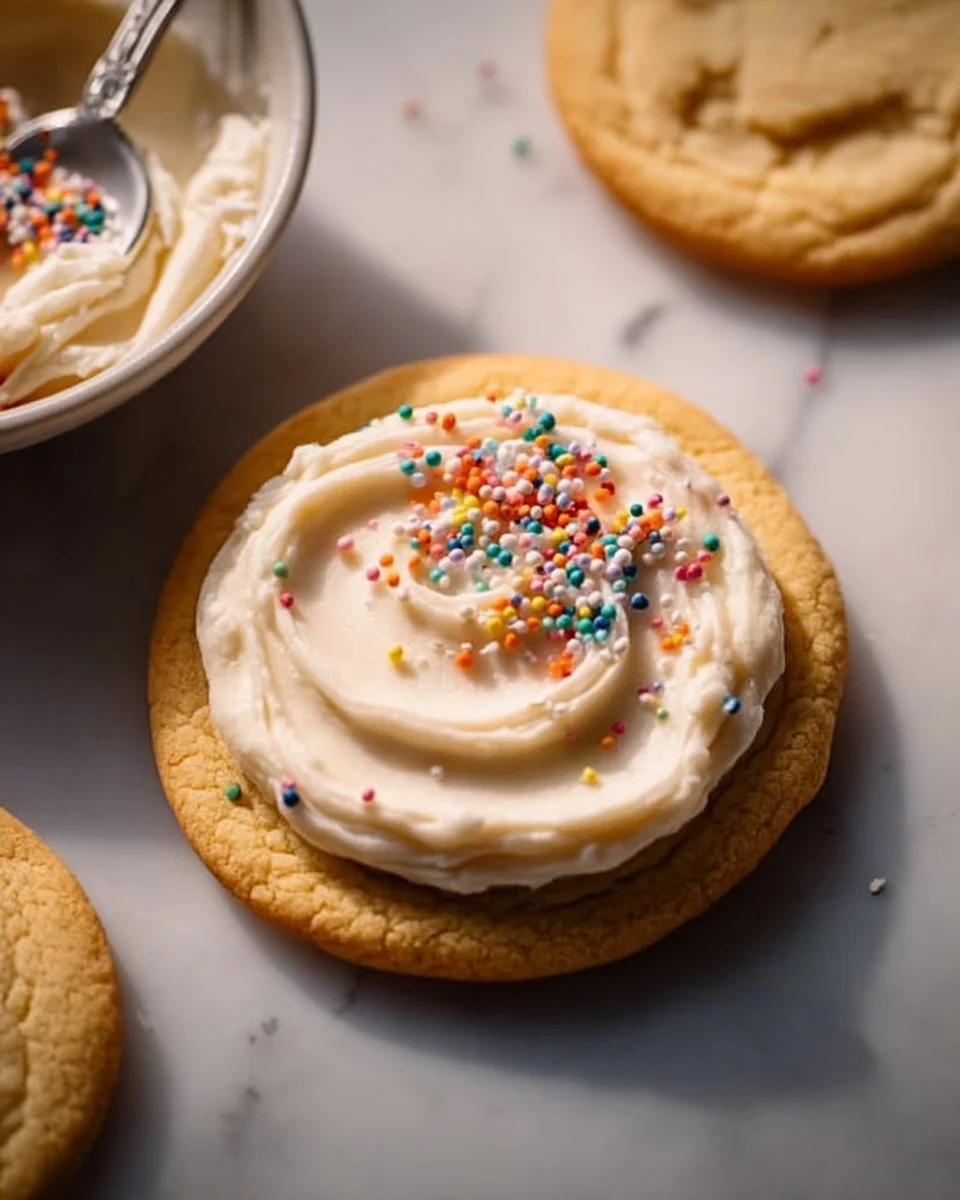
Cookie Frosting is a sweet, spreadable topping that often serves as the finishing touch for cookies. Originating centuries ago in kitchens where cookies were cherished, frosting has evolved into a vital part of holiday baking and special occasions. Made primarily from powdered sugar, cream, and flavorings, this frosting brings a velvety texture and a delightful sweetness that perfectly complements the crunch of cookies.
The taste is an explosion of sugary bliss—think of the first bite of a cookie decked out in a rainbow of colors and flavors. The smoothness of the frosting contrasts beautifully with the texture of the cookies, leading to that iconic mouthfeel we all crave.
You’ll want to whip up Cookie Frosting for birthdays, holidays, or just a bit of fun on a Tuesday afternoon. It’s versatile enough for any celebration or everyday sweet treat!
Why You’ll Love This Recipe
Simple Ingredients: You probably have most of these staples at home already. No need for fancy equipment or hard-to-find items!
Cost-Effective: Making Cookie Frosting at home is not only fun but budget-friendly. You’re saving lots of cash compared to high-end bakery frostings.
Customization at Your Fingertips: Want to jazz it up? Swap vanilla for almond extract, or add a zest of lemon for a refreshing twist. The world of flavor is yours to explore!
Easy & Quick: This recipe takes just 10 minutes from mixing to spreading. You can create beautiful, professional-looking cookies even if you’re short on time.
Family Fun: Not only does this frosting enhance your cookies, but it also doubles as a way to bond with your family or friends in the kitchen. Trust me; you’ll cherish those moments just as much as the delicious results.
When compared to store-bought versions, this homemade frosting is fresher, tastier, and filled with love—something you simply can’t buy. Whether you want cookies for a festive gathering or a casual snack, you’ll find this recipe an absolute gem!
Ingredients Section
To prepare your Cookie Frosting, gather the following ingredients:
2 cups powdered sugar: Use fine quality powdered sugar for smooth consistency. Brands like Domino or C&H work beautifully!
2 tablespoons milk: Whole milk gives a rich flavor; feel free to swap with almond or oat milk for a dairy-free version.
1 teaspoon vanilla extract: Look for pure vanilla extract for the best flavor; it elevates the frosting like nothing else!
1 tablespoon corn syrup: This keeps your frosting glossy and prevents it from hardening too much.
Food coloring (optional): Gel food coloring is recommended for vibrant colors with minimal liquid.
Prep Notes: Ensure your milk is at room temperature so it combines smoothly with the powdered sugar.
Step-by-Step Instructions
Mix the base ingredients: In a medium bowl, combine the 2 cups powdered sugar, 2 tablespoons milk, 1 teaspoon vanilla extract, and 1 tablespoon corn syrup. Use a whisk or a hand mixer to combine them until smooth and creamy. This should take about 2-3 minutes.
Chef’s Tip: If the mixture is too thick, gradually mix in a little more milk, one teaspoon at a time, until you’ve reached your desired consistency.
Divide for colors: If you want to add colors (which you do, trust me!), divide the frosting into separate bowls. Add a few drops of food coloring to each and stir until you achieve your favorite hues.
Get creative: Use the frosting immediately for piping, flooding, or spreading on your cookies. If you’re aiming for a neat finish, a piping bag will give you control for intricate designs.
Visual Cue: You’ll know it’s ready when it holds stiff peaks but still flows smoothly.
Set it up: Allow your decorated cookies to sit for about 30 minutes or until the frosting is set before serving.
Common Mistakes to Avoid: Avoid working in a humid environment; excess moisture may affect the frosting’s texture.
Expert Tip: If you made extra Cookie Frosting, store it in an airtight container at room temperature for up to two days or refrigerated for up to one week.
Expert Tips & Tricks
To ensure your Cookie Frosting turns out perfectly every time, here are some pro tips:
Quality is Key: Invest in good-quality powdered sugar and vanilla extract; they make all the difference in flavor.
Timing Matters: Work quickly once your frosting is prepared, as it can dry out. If it starts to thicken, just add a teaspoon of milk to loosen it.
Make-ahead Option: You can prepare the frosting a day in advance. Just keep it tightly sealed, and stir before using.
Troubleshooting: If your frosting is too runny, slowly add more powdered sugar. If it’s too stiff, mix in a little more milk.
Flavors Galore: Don’t hesitate to experiment! Try adding different extracts or even a pinch of salt for a sweet-salty balance.
Storage: Keep any leftover frosting in the fridge and follow the same mixing process before using it again.
Serving Suggestions
What goes best with freshly decorated cookies? Perhaps a cozy cup of coffee, hot chocolate, or even a warm glass of milk to balance out the sweetness.
For presentation, consider stacking your cookies in a clear jar or putting them on a beautiful cake stand—guests will swoon at the sight! These cookies are perfect for festive gatherings, birthday parties, or even a simple family dessert.
Variations & Substitutions
Get creative by trying these flavor variations for your frosting:
Chocolate Cookie Frosting: Add 1/4 cup unsweetened cocoa powder to the powdered sugar for a rich chocolate flavor.
Lemon Zest Cookie Frosting: Mix in 1 teaspoon of freshly grated lemon zest for a zesty twist.
Nutty Alternative: Substitute almond extract for a fun almond-flavored frosting.
Dairy-free Swap: Use coconut cream instead of milk for a delicious coconut-flavored frosting.
Adjusting for dietary restrictions? Opt for gluten-free powdered sugar and dairy-free milk alternatives to ensure everyone can indulge!
Nutrition & Storage Info
- Prep time: 10 minutes
- Total time: 10 minutes
- Yield: Approximately 2 cups of frosting (sufficient for 24 cookies)
- Calories: Estimated 80 calories per serving (based on 1 tablespoon)
- Storage: Store at room temperature for up to 2 days or in the fridge for up to 1 week. Frosting can also be frozen in an airtight container for up to 3 months.
FAQ Section
Can I use granulated sugar instead of powdered sugar?
- No, granulated sugar does not dissolve properly for frosting and can create a gritty texture.
How can I make my frosting thicker?
- Simply add more powdered sugar little by little until you reach the desired consistency.
Can I refrigerate the frosting overnight?
- Yes, just ensure it’s in an airtight container, and bring it back to room temperature before use.
What if my frosting is too sweet?
- Balance the sweetness by adding a pinch of salt; it enhances flavor without overpowering.
Is this recipe easy for kids?
- Absolutely! It’s a fun way for kids to express creativity. Just supervise them with any tools or decorations.
Can I use this frosting for other desserts?
- Definitely! It’s great for cakes, brownies, and even as a filling for pastries!
How can I achieve different colors?
- Mix food coloring into the frosting until the desired shade is reached. Gel food coloring is especially vibrant!
What’s the best way to pipe the frosting?
- Use a piping bag fitted with your favorite tip for precise designs.
Can I add flavor extracts?
- Yes! Experiment with different extracts like almond, coconut, or mint for unique flavors.
How long will the frosting last in the fridge?
- It will last up to one week, but it’s best to use it fresh for optimal flavor and texture.
Conclusion
This Cookie Frosting recipe is not just about creating a beautiful finish for your cookies; it’s about bringing family and friends together, creating memories, and filling your home with sweet aromas that linger in your heart. I encourage you to try this delightful recipe and make it your own—turquoise unicorn cookies for a birthday, pastel shades for Easter, or classic white for holiday cookies—the possibilities are endless!
Please share your experiences and any modifications you made in the comments; I’d love to hear your feedback! And don’t forget to check out other sweet treats featured on my blog to keep those ovens warm and the creativity flowing!