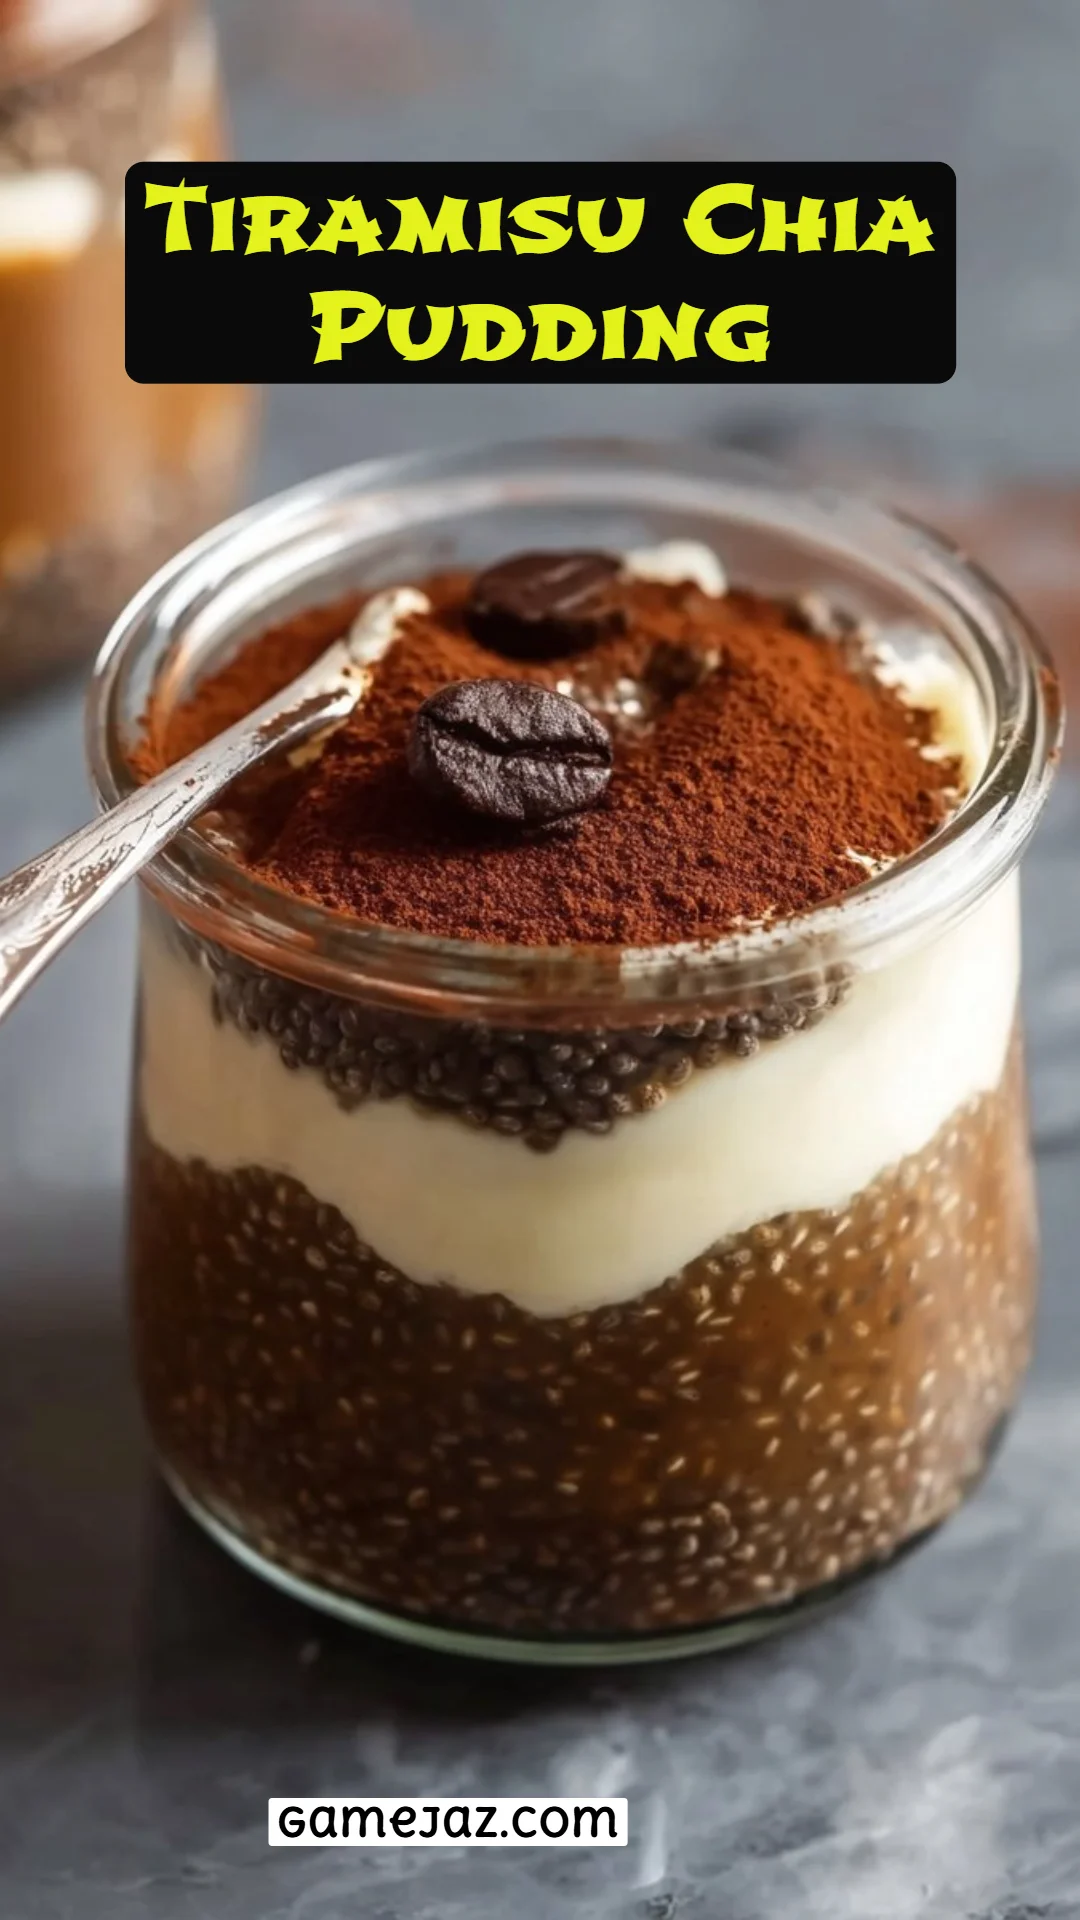
Irresistible Tiramisu Chia Pudding: A Chocolatey Dream Come True!
Imagine indulging in that classic dessert you love, full of rich espresso and creamy layers, but with a wholesome twist. Welcome to the world of Tiramisu Chia Pudding! As someone who grew up enjoying family dinners where Tiramisu was always the star of the show, I can tell you that nothing beats that perfect combination of coffee and chocolate. However, being a health-conscious foodie, I wanted to recreate that experience in a guilt-free way!
This chia pudding is not just an assertive replica of your favorite dessert; it’s a nourishing embrace in a bowl. What sets it apart is the delightful texture of the chia seeds, which mimic the creaminess of traditional Tiramisu, while providing a nutritional boost. Plus, with its easy preparation, you can whip it up in no time and let the fridge do the rest!
Throughout this article, I’ll guide you through every step of making Tiramisu Chia Pudding, sharing tips, tricks, and a sprinkle of love from my kitchen to yours. Whether you’re looking for a healthy dessert or a fulfilling breakfast option, this recipe promises to make your taste buds dance while evoking fond memories. Are you ready to get started? Let’s go!
What Are Tiramisu Chia Pudding?
The origin of Tiramisu can be traced back to Italy, a divine combination of coffee-soaked ladyfingers and mascarpone cream that brings pure joy with every bite. Now, imagine that beloved dessert transformed into a creamy, nutrient-packed chia pudding! This creative twist retains the signature flavors of espresso and chocolate, but replaces heavy cream with nourishing ingredients, making it a wholesome option for any time of day.
The taste is divine—think rich, deep coffee notes harmonizing with sweet maple syrup and a touch of cocoa. The texture? It’s a delightful blend of creamy cashew topping, layered with the satisfying crunch of chia seeds. Perfect for breakfast, dessert or a post-workout snack, this Tiramisu Chia Pudding is both comforting and energizing.
Why You’ll Love This Recipe
Here are a few reasons why this Tiramisu Chia Pudding is bound to steal your heart:
Simplicity: With just a few wholesome ingredients, this easy recipe doesn’t require fancy techniques. If you can whisk and blend, you’re golden!
Nutritional Benefits: Unlike traditional Tiramisu, this version is packed with omega-3 fatty acids from chia seeds, protein from cashews, and healthy fats from coconut cream. It’s a delight that won’t weigh you down.
Cost-Effective: Making this at home is far more economical than purchasing fancy desserts from a café. You’ll be pleasantly surprised by how little it costs to create something so indulgently tasty!
Endless Customizations: Whether you want it sweeter, creamier, or with different flavor notes, this recipe welcomes your creativity. Substitute ingredients based on your pantry or dietary needs, like switching almond milk for oat milk or maple syrup for honey.
Perfect Make-Ahead Treat: You can whip up this pudding in advance and store it in the fridge for up to a week—ideal for meal prepping or simply enjoying a sweet treat whenever cravings hit.
So get ready to dive into the world of Tiramisu Chia Pudding and enjoy every delectable layer!
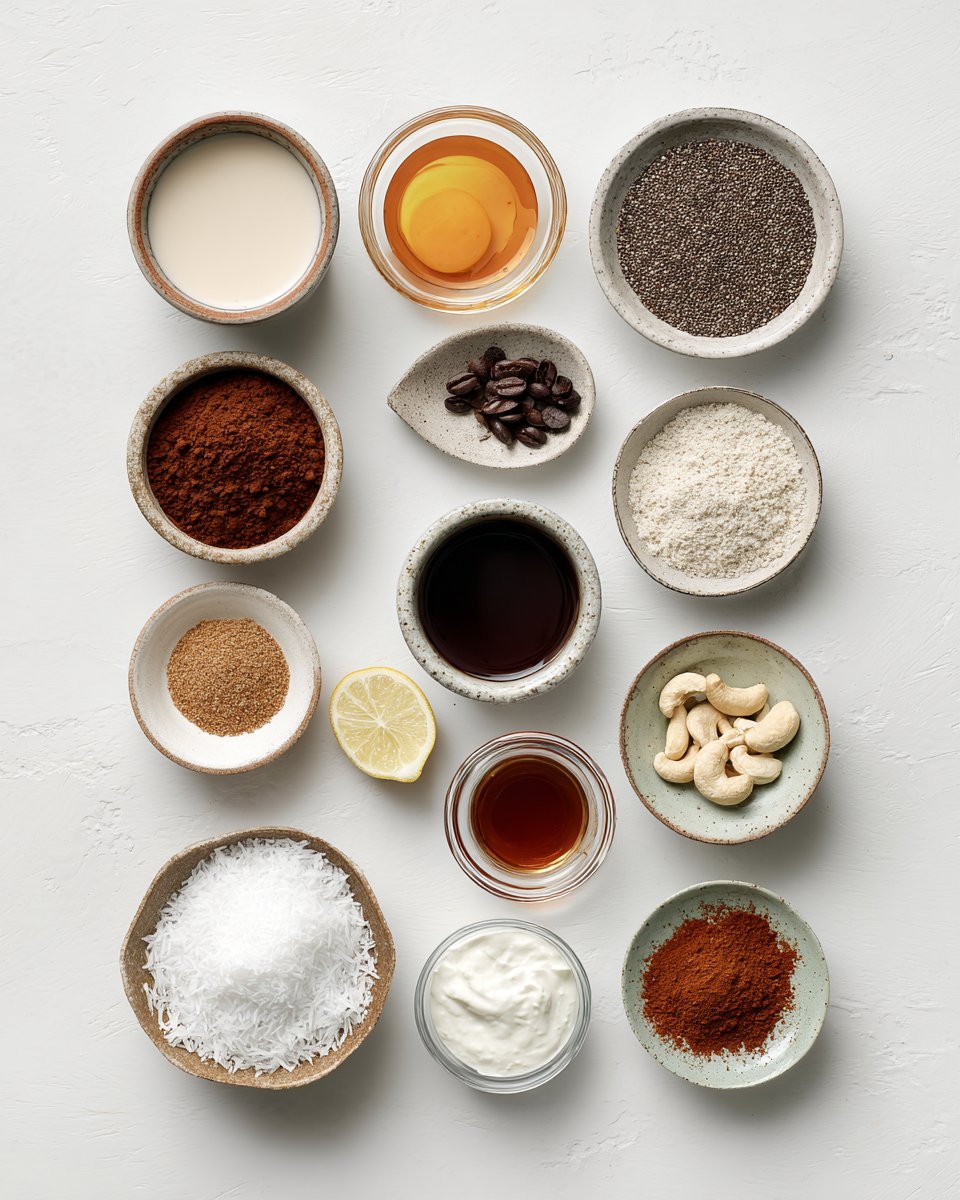
Ingredients
For the Coffee Chia Base:
- 1 cup unsweetened almond milk (or any plant-based milk)
- 2 tablespoons strong brewed espresso (I recommend brewing a fresh pot for the best flavor)
- 1 tablespoon cocoa powder (unsweetened)
- 2 tablespoons maple syrup (pure maple syrup enhances the flavor)
- 1/2 teaspoon vanilla extract (use a good quality extract for depth)
- 1/4 cup chia seeds (find whole chia seeds for optimal texture)
For the Dark Espresso Layer:
- 1/4 cup additional strong brewed espresso
- 1 tablespoon maple syrup
- 1/2 teaspoon cocoa powder
For the Creamy Topping:
- 1/2 cup raw cashews, soaked in water for 30 minutes and drained
- 1/4 cup coconut cream (the cream from full-fat coconut milk)
- 2 tablespoons maple syrup
- 1 teaspoon lemon juice (fresh is best)
- 1/2 teaspoon vanilla extract
- Pinch of salt
For Dusting and Garnish:
- Unsweetened cocoa powder (for that classic finish)
- Coffee bean (optional, for a touch of elegance)
Notes on Ingredient Quality/Substitutions:
- For the almond milk, try to choose organic brands to skip any additives.
- If you’re sensitive to caffeine, you can opt for decaf espresso.
- The cashews can be replaced with soaked silken tofu for a nut-free version.
Prep Notes: Soak cashews prior to making the pudding for a silky smooth topping. Room temperature ingredients yield a more blended flavor.
Step-by-Step Instructions
1. Make the Coffee Chia Base:
- In a medium-sized mixing bowl, whisk together the almond milk, 2 tablespoons of brewed espresso, cocoa powder, maple syrup, and vanilla extract until fully combined.
- Stir in the chia seeds and let sit for about 5 minutes until they begin to absorb the liquid.
- Refrigerate for at least 2 hours or up to overnight until thickened.
2. Prepare the Dark Espresso Layer:
- In a small mixing bowl, combine the remaining 1/4 cup of brewed espresso, 1 tablespoon of maple syrup, and 1/2 teaspoon of cocoa powder. Mix until smooth.
- Allow to cool completely before using (seriously, it’s worth the wait!).
3. Blend the Creamy Topping:
- In a high-speed blender, combine the soaked cashews, coconut cream, maple syrup, lemon juice, vanilla extract, and a pinch of salt.
- Blend until completely smooth and fluffy— this will take about 1-2 minutes. Scrape down the sides as needed.
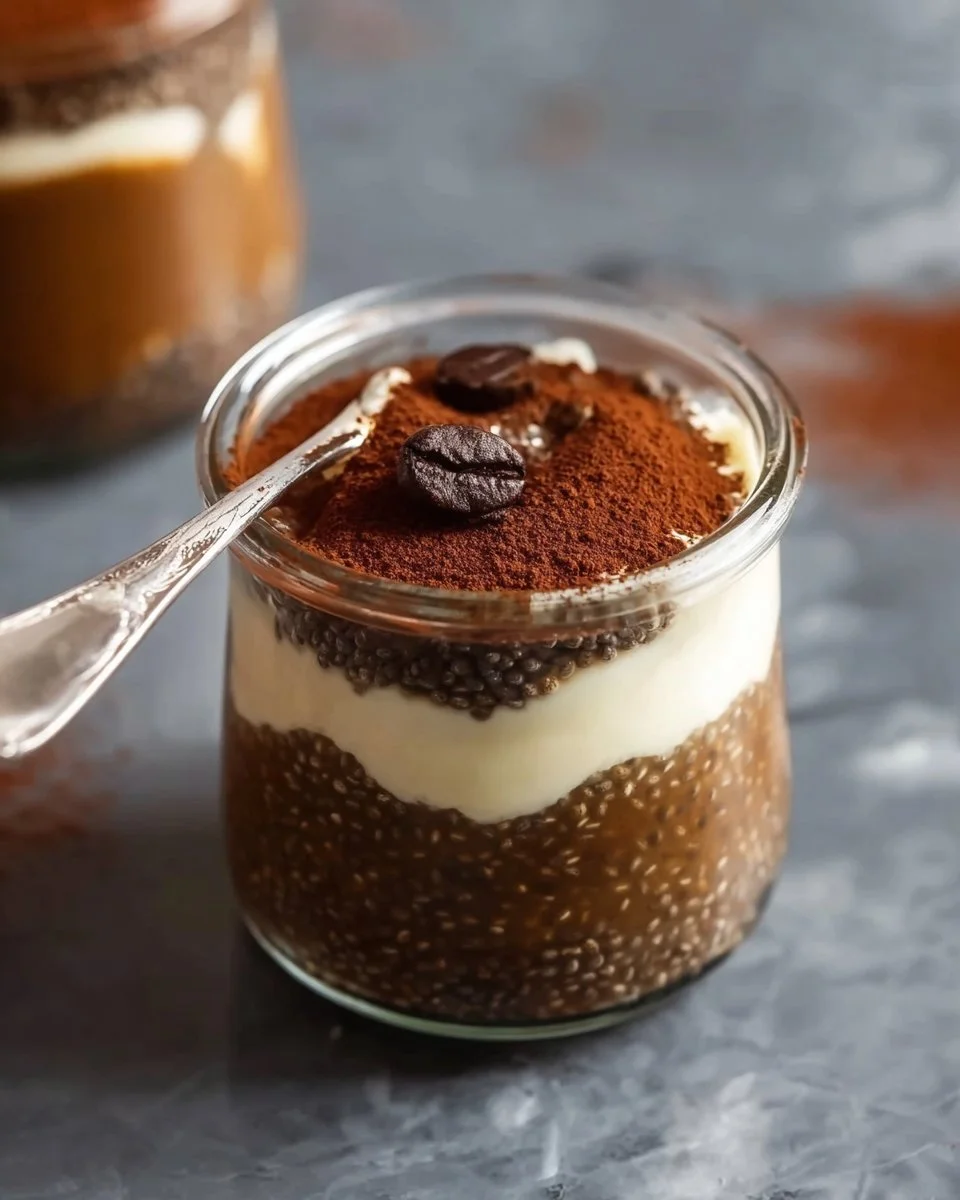
4. Assemble the Layers:
- In your serving glasses (or bowls), spoon in the chia pudding to create a generous base layer.
- Add the dark espresso layer on top, smoothing it out.
- Top with the creamy cashew mixture and sprinkle unsweetened cocoa powder.
- For a touch of elegance, add a coffee bean as a garnish, if desired.
Chef’s Tips:
- Serve immediately or chill for 30 minutes to let the flavors meld!
- Common mistake: Skipping the chilling time will result in a runny pudding.
Expert Tips & Tricks
- Storage Recommendations: The Tiramisu Chia Pudding can be stored in airtight containers in the refrigerator for up to 5 days. The layers might meld together but will still be delicious!
- Make-Ahead Instructions: Prepare the chia base and espresso layer ahead of time; assemble the pudding just before serving.
- Troubleshooting: If the pudding isn’t thick enough, give it a little more time in the fridge. Chia seeds need time to absorb the liquid fully.
Serving Suggestions
Consider this delightful dessert or breakfast paired with fresh berries, toasted nuts, or a sprinkle of cinnamon. Serve it at a brunch gathering or make it a romantic evening treat to impress your loved ones. For a visually appealing presentation, layer the pudding in clear glasses to showcase all those beautiful colors!
Variations & Substitutions
Feeling adventurous? Try these variations:
- Chocolate Hazelnut Version: Blend in a tablespoon of nutella for a hazelnut twist.
- Berry Chia Pudding: Swirl in some mashed strawberries or raspberries for a fruity freshness.
- Pumpkin Spice: Add a tablespoon of pumpkin puree and pumpkin spice for a seasonal twist.
Dietary Adaptations:
- Nut-Free: Substitute cashew topping with whipped coconut cream, and adjust sweetness to taste.
- Gluten-Free: Ensure the cocoa used is certified gluten-free.
Nutrition & Storage Info
- Prep Time: 15 minutes
- Cook Time: None
- Total Time: 2 hours (includes chilling)
- Yield: Serves 4
- Estimated Calories: Approximately 220 calories per serving
Storage Instructions:
- Room Temperature: Not recommended; store in the fridge.
- Fridge: Up to 5 days, covered.
- Freezer: Not advisable as texture may change upon thawing.
FAQ Section
Can I use other sweeteners instead of maple syrup?
Absolutely! Honey, agave nectar, or stevia can work, but adjust the amount to taste.What if my chia pudding isn’t thickening?
Make sure to refrigerate long enough, or add a bit more chia seeds and let it sit longer.Is the espresso necessary?
Not at all! You can replace it with strong brewed tea or skip it for a chocolate-only version.Can I make this recipe vegan?
Yes, the entire recipe is already vegan-friendly!Can I use instant coffee instead of brewed espresso?
Yes! Mix 1 tablespoon of instant coffee with 2 tablespoons of hot water as a substitute.How do I make this less sweet?
Feel free to reduce the amount of maple syrup as per your taste preference.What if I don’t have cashews?
Try using soaked sunflower seeds or skip that step entirely and stick with coconut cream.Can I use flavored milk?
Yes, flavored almond milk could add an interesting twist, but keep in mind it will alter the final taste.How can I store leftovers?
Store in an airtight container in the refrigerator for up to a week.Can I use other nuts for the topping?
Certainly! Pecans or hazelnuts would also work beautifully.
Conclusion
This Tiramisu Chia Pudding is more than just a dessert; it’s a nostalgic nod to my childhood, a healthy indulgence, and a canvas for your culinary creativity. I encourage you to try it and share your experiences—I’d love to hear how you customize it! And don’t forget to explore other delightful recipes on my blog that cater to all your sweet cravings! Happy cooking!
Tiramisu Chia Pudding
Ingredients
Method
- In a medium-sized mixing bowl, whisk together the almond milk, 2 tablespoons of brewed espresso, cocoa powder, maple syrup, and vanilla extract until fully combined.
- Stir in the chia seeds and let sit for about 5 minutes until they begin to absorb the liquid.
- Refrigerate for at least 2 hours or up to overnight until thickened.
- In a small mixing bowl, combine the remaining 1/4 cup of brewed espresso, 1 tablespoon of maple syrup, and 1/2 teaspoon of cocoa powder. Mix until smooth.
- Allow to cool completely before using.
- In a high-speed blender, combine the soaked cashews, coconut cream, maple syrup, lemon juice, vanilla extract, and a pinch of salt.
- Blend until completely smooth and fluffy—this will take about 1-2 minutes. Scrape down the sides as needed.
- In your serving glasses (or bowls), spoon in the chia pudding to create a generous base layer.
- Add the dark espresso layer on top, smoothing it out.
- Top with the creamy cashew mixture and sprinkle unsweetened cocoa powder.
- For a touch of elegance, add a coffee bean as a garnish, if desired.