Irresistibly Romantic Calendar Cake: A Celebration of Love in Every Bite
There’s something indescribably magical about baking that pulls at my heartstrings. I vividly remember the first time I made a cake for my partner’s birthday—a surprise that turned into a beautiful disaster. In my nervous excitement, I had mistakenly added twice the amount of baking powder! The result? An oddly shaped, fluffy delight that left us both in fits of laughter. That cake wasn’t perfect, but it became a sweet memory that marked the beginning of my obsession with creating beautiful baked goods—like the stunning Romantic Calendar Cake.
This cake is more than just a treat; it’s an experience that warms your heart and home. With vibrant colors, decadent flavors, and an enchanting aesthetic, it brings families together and creates unforgettable moments. Unlike store-bought cakes that can often be bland and artificial, my version of the Romantic Calendar Cake is made from high-quality ingredients that speak to your heart.
In the coming paragraphs, prepare to dive into the world of baking where I’ll share step-by-step instructions, expert tips, and heartfelt memories. Grab your apron and let’s make a cake that’ll not only taste amazing but also feel like a warm embrace.
What Are Romantic Calendar Cakes?
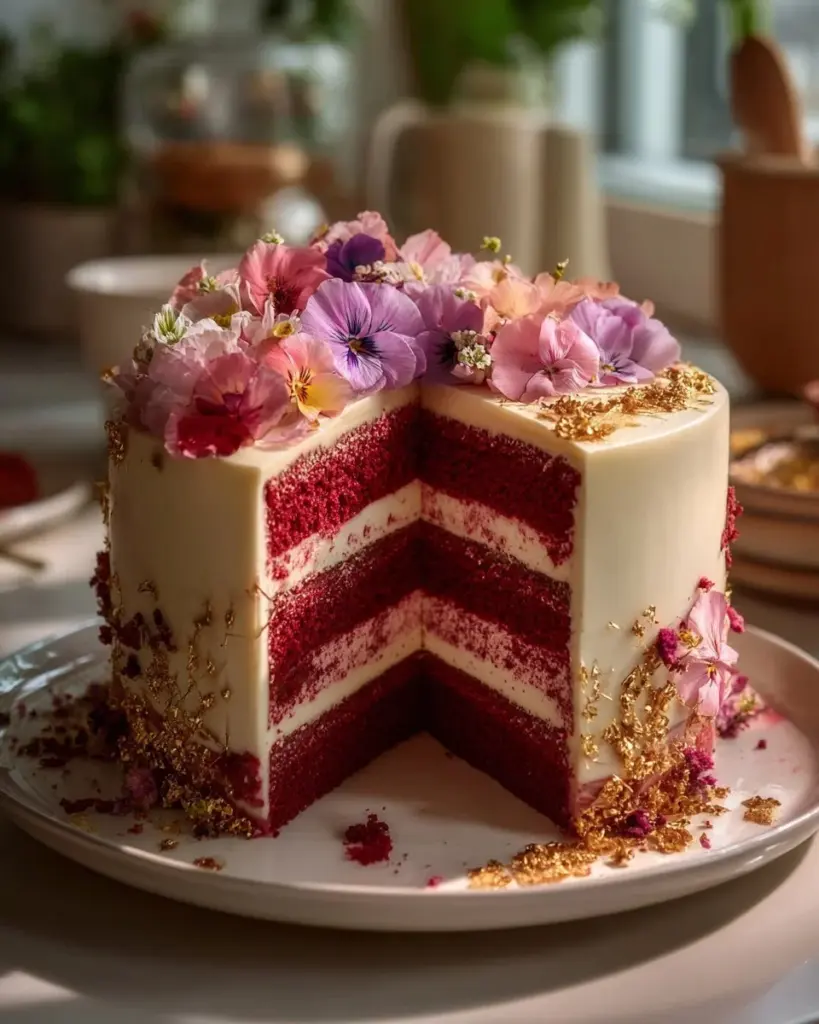
The Romantic Calendar Cake has its roots in celebrations that honor love—think anniversaries, weddings, or even just a fancy date night at home. This cake is often characterized by its layered structure, vibrant colors, and the delicate sweetness that pairs beautifully with fondant decorations.
Imagine biting into a slice that offers a tender crumb, a rich buttery flavor, and the floral essence from the edible decorations that dance on your palate. What makes them truly unique is how they can be tailored to personal tastes, from the sweet and sultry notes of chocolate to the refreshing zest of lemon; the possibilities are endless!
These cakes are not just for special occasions; they also serve as an excuse to gather family and friends, celebrating life’s little moments together. Whether it’s Valentine’s Day or just a Tuesday night, every slice brings joy, laughter, and a sprinkle of love.
Why You’ll Love This Recipe
- Homemade Goodness: Nothing compares to the satisfaction of baking from scratch. Unlike store-bought cakes filled with preservatives, this Romantic Calendar Cake is crafted using wholesome ingredients you trust. You can really taste the difference!
- Cost-Effective Indulgence: Baking at home is often lighter on your wallet compared to overpriced bakery cakes. Plus, you get to indulge in as many samples as you want while you bake!
- Customization Galore: This recipe is flexible! Want to add a twist? Just swap in your favorite flavors or colors. Create a luxurious chocolate layer or a citrus zest that hits the spot—make it truly yours!
- Perfect for Everyone: Whether you’re a seasoned baker or a newbie, this cake is approachable. With simple steps and forgiving techniques, it’ll elevate your confidence in the kitchen.
- Memorable Presentation: The visual appeal of this cake is off the charts! With its splendid fondant layer and edible flowers, it’s bound to steal the show—perfect for impressing guests or making loved ones feel cherished.
{image_template}
Ingredients
To create your own Romantic Calendar Cake, you’ll need the following ingredients:
- 2 cups all-purpose flour
- 1 and 1/2 cups sugar (Use organic if possible for a richer flavor)
- 1 cup unsalted butter (Ensure it’s at room temperature for easy creaming)
- 4 large eggs
- 1 cup milk (Whole milk gives a richer taste)
- 2 tsp vanilla extract (Use pure vanilla for the best flavor)
- 1 and 1/2 tsp baking powder
- 1/2 tsp salt
- Red food coloring (For that gorgeous pop of color!)
- Fondant for decoration (Get a quality brand that is easy to mold)
- Edible flowers (Such as pansies or violets for a stunning finish)
Ingredient Notes
- Quality Matters: Always opt for the best quality butter and vanilla extract. A good vanilla can elevate your cake flavors dramatically.
- Room Temperature Butter: For perfect creaming, allow your butter to sit out for about 1 hour so it becomes soft but not melted.

Step-by-Step Instructions
- Preheat the Oven: Set your oven to 350°F (175°C) so it’s hot and ready to go.
- Prepare the Pans: Grease and flour two 9-inch round cake pans. This helps prevent sticking and ensures clean removal.
- Cream Together: In a large mixing bowl, cream 1 cup of unsalted butter and 1 and 1/2 cups of sugar together until fluffy and light in color. This usually takes about 4-5 minutes. You’ll know it’s ready when the mixture appears pale and has a light, airy texture.
- Incorporate Eggs: Add in 4 large eggs, one at a time, mixing thoroughly after each addition. This helps to incorporate air for a fluffy cake.
- Mix in the Milk and Vanilla: Stir in 1 cup of milk and 2 tsp of vanilla extract, blending until well combined.
- Combine Dry Ingredients: In another bowl, whisk together 2 cups of flour, 1 and 1/2 tsp baking powder, and 1/2 tsp salt. Gently fold the dry ingredients into the wet mixture until just combined. Avoid over-mixing to keep your cake tender.
- Add Color: Divide the batter in half. Color one half with red food coloring until you achieve your desired hue.
- Pour into Pans: Pour the uncolored batter into one prepared cake pan, followed by the red batter into the other.
- Bake: Bake for 25-30 minutes, or until a toothpick inserted into the center comes out clean. Your kitchen will smell heavenly during this time!
- Cooling Time: Once done, let the cakes cool in the pans for about 10 minutes before transferring them to a wire rack to cool completely.
- Layer and Decorate: Once cooled, layer the cakes with frosting of your choice, place them on top of each other, and cover with fondant. Finally, adorn with edible flowers for that romantic finish.
Chef’s Tips
- Visual Cues: The cakes should spring back when gently touched on top.
- Avoiding Common Mistakes: Make sure not to overbake, as this can result in a dry cake.
- Pro Techniques: If you’re feeling fancy, try using a cake leveler to even out any dome on your cakes for a more polished look!
Expert Tips & Tricks
- Storage Recommendations: Store leftover cake in an airtight container at room temperature for up to 3 days, or in the refrigerator for 5 days.
- Make-Ahead Instructions: You can bake the cake layers up to 2 days in advance. Wrap them tightly in plastic wrap once cooled and refrigerate.
- Common Issues: If your cake falls, it may be due to overbeating the batter or suddenly opening the oven door.
- Frosting Success: For a smooth finish, ensure your frosting is at the same temperature as your cake— warm frosting on a cold cake can crack.
- Experimenting more: Feel free to play around with different flavor extracts like almond or even orange zest for a unique twist.
Serving Suggestions
This Romantic Calendar Cake goes beautifully with a side of freshly whipped cream and some seasonal fruits—think strawberries or raspberries in summer. For presentation, consider a rustic wooden cake stand or a simple white plate garnished with sprigs of mint.
Ideal for anniversaries, engagements, or simply a sweet treat for date night, this cake creates an enchanting centerpiece for any occasion!
Variations & Substitutions
- Flavor Combinations: Swap the vanilla for chocolate or add lemon zest for a refreshing zing.
- Dietary Adaptations: For a gluten-free version, substitute all-purpose flour with a gluten-free blend. Use dairy-free butter and almond milk for a vegan approach.
- Seasonal Variations: Incorporate spices like cinnamon or pumpkin puree in the fall, or use purple and gold hues for a festive holiday look.
Nutrition & Storage Info
- Prep Time: 30 minutes
- Cook Time: 30 minutes
- Total Time: 1 hour
- Yield: Serves 10-12 slices
- Estimated Calories: Approximately 320 calories per slice
Storage Instructions
- Room Temperature: Best consumed within 3 days at room temperature.
- Refrigerator: Lasts up to 5 days; wrap well to retain moisture.
- Freezer: Can be frozen for up to 3 months; slice and wrap pieces individually for convenience.
FAQ Section
- Can I substitute the eggs in the recipe?
- If you’re looking for an egg substitute, try using 1/4 cup of applesauce or a flax egg (1 tablespoon of ground flaxseed mixed with 2.5 tablespoons of water) for each egg.
- How do I get a smooth finish on the fondant?
- Make sure your cake layers are completely cooled before applying fondant. Apply a thin layer of frosting as a base to help the fondant stick and create a smooth finish.
- Can I use a different color for the food coloring?
- Absolutely! Feel free to use any food coloring to match your occasion—pastels for spring or deeper tones for a more classic look.
- What if my cake is dry?
- Dry cakes often result from overbaking. Make sure to check with a toothpick and keep a close eye on the oven, as oven temperatures can vary.
- How long can I keep this cake in the fridge?
- The cake is best consumed fresh but can last about five days in the refrigerator when adequately wrapped.
- Can I add nuts to the cake batter?
- Yes! Toasted walnuts or pecans can enhance the flavor and texture of your cake, adding a delightful crunch.
- What type of frosting pairs best with this cake?
- Cream cheese frosting, vanilla buttercream, or ganache work wonderfully. Their flavors complement the cake without overwhelming it.
- Is it okay to leave the cake at room temperature for a party?
- Yes, it can stay out for about 2-3 hours tops. If it’s a warm day, be cautious as the fondant can melt.
- Can I make this cake layered with different flavors?
- Definitely! Feel free to split the batter into different bowls and flavor them separately before layering.
- Will this recipe work in a cupcake form?
- Yes! Simply reduce the baking time to about 18-20 minutes and check with a toothpick for doneness.
Conclusion
The Romantic Calendar Cake is more than just a dessert; it’s a heartfelt creation filled with memories, love, and excitement. I hope you find as much joy in making it as I have, with each layer representing sweetness, laughter, and bonding moments. I’d love to hear how your cake turns out! Please share your thoughts, feedback, or any variations you tried.
Don’t forget to check out my other related recipes for more delightful adventures in baking. Happy baking!
{image_template}
Romantic Calendar Cake
Ingredients
Method
- Preheat the Oven: Set your oven to 350°F (175°C) so it’s hot and ready to go.
- Prepare the Pans: Grease and flour two 9-inch round cake pans.
- Cream Together: In a large mixing bowl, cream 1 cup of unsalted butter and 1 and 1/2 cups of sugar together until fluffy and light in color (about 4-5 minutes).
- Incorporate Eggs: Add in 4 large eggs, one at a time, mixing thoroughly after each addition.
- Mix in the Milk and Vanilla: Stir in 1 cup of milk and 2 tsp of vanilla extract, blending until well combined.
- Combine Dry Ingredients: In another bowl, whisk together 2 cups of flour, 1 and 1/2 tsp baking powder, and 1/2 tsp salt. Gently fold the dry ingredients into the wet mixture until just combined.
- Add Color: Divide the batter in half. Color one half with red food coloring until you achieve your desired hue.
- Pour into Pans: Pour the uncolored batter into one prepared cake pan, followed by the red batter into the other.
- Bake: Bake for 25-30 minutes, or until a toothpick inserted into the center comes out clean.
- Cooling Time: Once done, let the cakes cool in the pans for about 10 minutes before transferring them to a wire rack to cool completely.
- Layer and Decorate: Once cooled, layer the cakes with frosting of your choice, place them on top of each other, and cover with fondant. Finally, adorn with edible flowers for that romantic finish.