Discover the Joy of Italian Easter Bread: A Sweet Tradition Reimagined
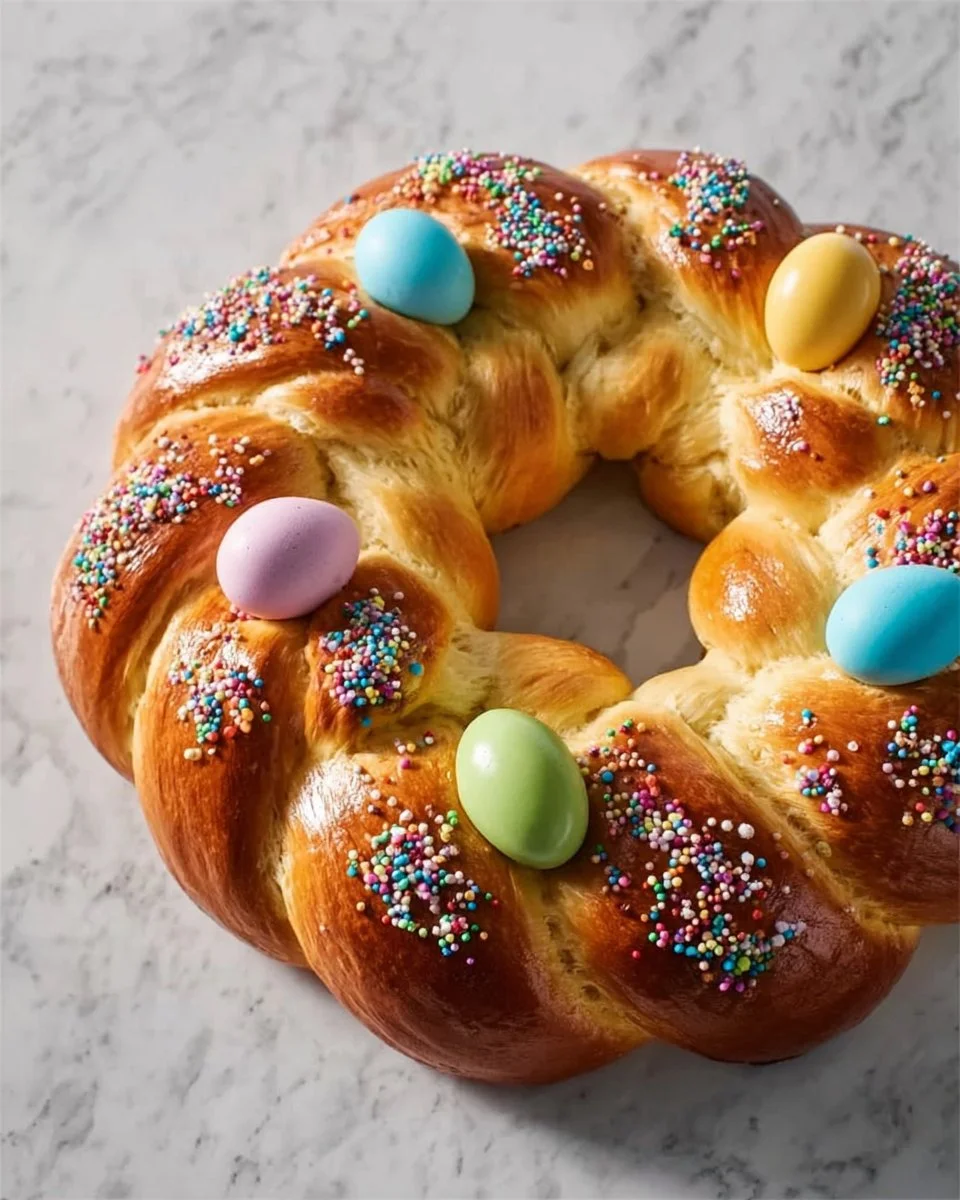
Growing up, Easter was always a vibrant celebration filled with laughter, family feasts, and, of course, that unforgettable aroma of baking bread wafting through the house. Each year, my Nonna would grace our home with her treasured Italian Easter Bread, a symbol of renewal and love that brought everyone together. Shaped into a beautiful braided wreath and adorned with colorful, dyed eggs, this bread was more than just a treat; it was a delicious reminder of our cultural heritage.
What makes Italian Easter Bread so special? It’s that perfect combination of sweet, fluffy texture, and buttery flavor, awakening memories of grand family gatherings. After experimenting with dozens of recipes, I can confidently say this version is the best—infused with rich vanilla, a hint of citrus zest, and topped with festive sprinkles, each bite is a hug in bread form.
In this post, I’ll guide you through the steps to create your own Italian Easter Bread, sharing both tips and tricks I’ve gathered over the years. Whether you’re gearing up for the holiday or simply craving an indulgent bread experience, I promise you’ll end up with a showstopper that brings warmth to your table and joy to your heart!
What is Italian Easter Bread?
Italian Easter Bread, known as "Pane di Pasqua," has roots that trace back centuries, reflecting the rich traditions of Italy. Typically enjoyed during the Easter feast, this sweet, braided bread is often braided with dyed raw eggs nestled within, symbolizing rebirth and the arrival of spring.
When you take a bite of this bread, you’re greeted with a crispy outside that gives way to a soft, pillow-like interior. The flavors dance gracefully between the sweetness of sugar and the subtle warmth of spices. Unique in its braided form and festive decor, Italian Easter Bread is not just nourishment; it’s a centerpiece of celebration, perfect for gatherings filled with hope and joy.
Traditionally made for Easter, this bread is also delightful enough to enjoy any time of the year. Its rich history and stunning presentation make it a timeless recipe that deserves a place in your kitchen.
Why You’ll Love This Recipe
You might be wondering why you should put in the effort to make Italian Easter Bread at home, especially with so many store-bought options available. Here’s why this recipe hits the sweet spot:
Unmatched Freshness: There’s nothing quite like the aroma of freshly baked bread filling your kitchen. This recipe allows you to experience the joy of baking straight from the oven, rather than settling for a mass-produced version.
Cost-Effective: Most of the ingredients are staples found in your pantry, making this a budget-friendly option. You’ll save money while crafting a homemade delicacy that’s sure to impress.
Customization Zone: Feel free to express your creativity! You can tailor the flavors by adding spices or dried fruits, and the glaze can be adjusted to match your preference. Want a lemon glaze for added zing? Go for it!
Family Bonding: Baking bread can be a beautiful bonding experience. Get your kids involved in shaping the bread and decorating it with colorful sprinkles—turning it into a fun family activity!
Awe-Inspiring Presentation: Let’s be honest; your friends and family will be wowed when they see this stunning bread coming out of your oven. It’s a showstopper that brings a little magic to any gathering.
Whether you’re a seasoned baker or just starting on your journey in the kitchen, this Italian Easter Bread recipe is easy to master and offers a rewarding cooking experience.

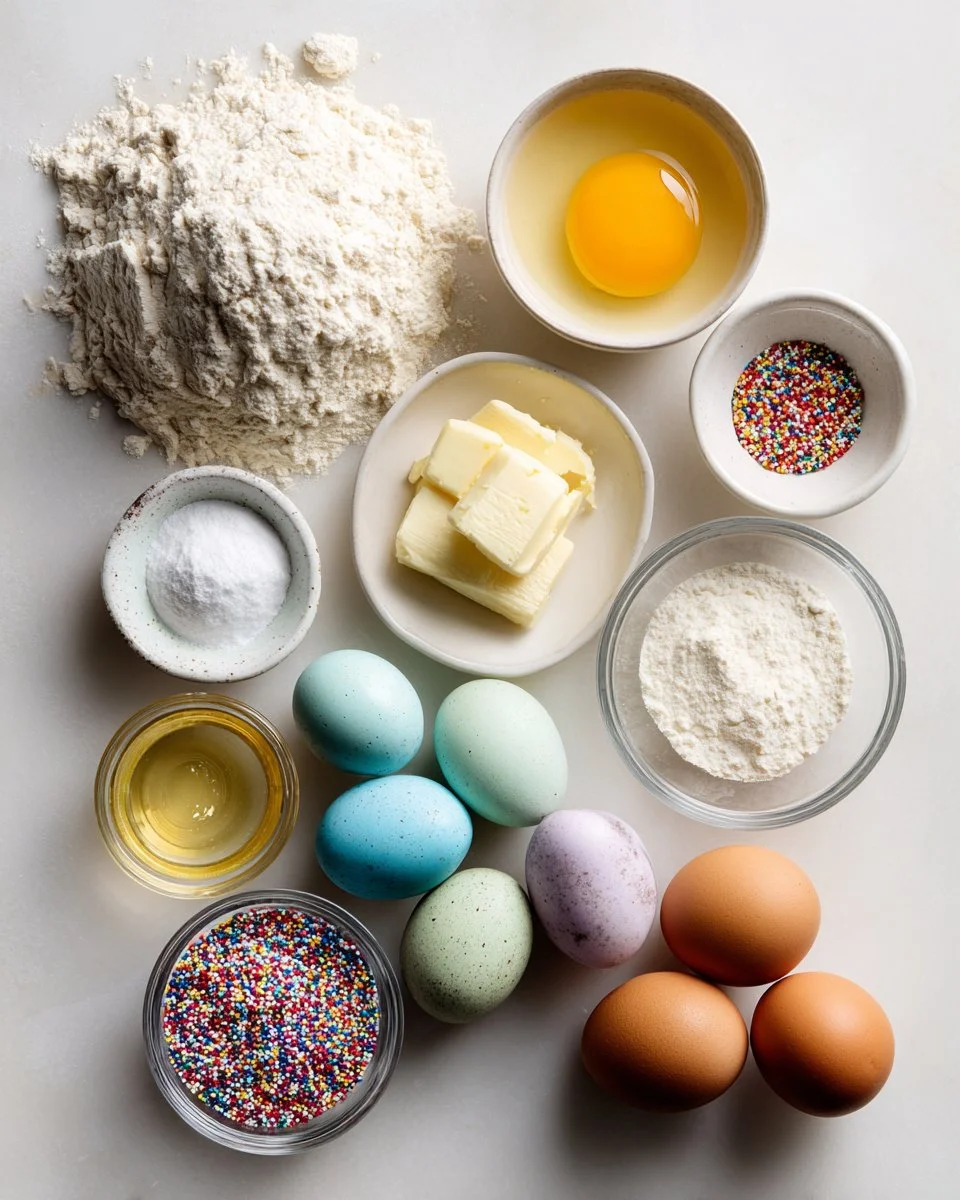
Ingredients
To create this delightful Italian Easter Bread, gather the following ingredients:
- 4 cups all-purpose flour (plus extra for kneading)
- 1 packet (2 1/4 tsp) active dry yeast
- 1/2 cup whole milk, warmed to 110 degrees F
- 1/4 cup granulated sugar
- 1/4 cup unsalted butter, melted and cooled slightly
- 3 large eggs, room temperature
- 1/2 tsp salt
- 1 tsp pure vanilla extract
- Zest of 1 lemon or 1 orange (optional but recommended for flavor)
- 6 dyed raw eggs (traditionally included, can be omitted)
- 1 egg + 1 tbsp water, for egg wash
- Colored sprinkles (nonpareils or confetti style) for decoration
Notes on Ingredients:
- Quality Matters: Use high-quality ingredients, especially butter and vanilla extract, to enhance the flavor of your bread.
- Room Temperature Butter: Ensure your butter is melted and cooled—an essential step for the right dough consistency.
- Eggs: Having eggs at room temperature helps the batter combine better, contributing to the fluffy texture.
Step-by-Step Instructions
Activate the yeast: In a small bowl, stir the yeast and 1 teaspoon of the sugar into the warm milk. Let it sit for 5 to 10 minutes until foamy. This is a vital step, as it wakes up the yeast and ensures your bread rises beautifully.
Make the dough: In a large mixing bowl, combine the flour, remaining sugar, and salt. In another bowl, whisk together the eggs, melted butter, vanilla extract, and zest. Pour both mixtures into the dry ingredients. Stir until a shaggy dough forms, then knead for 8 to 10 minutes until smooth and elastic. The dough should feel soft and tacky but not sticky.
Chef’s Tip: Adding a little extra flour during kneading can help if the dough feels too sticky.
First rise: Place the dough in a greased bowl, cover with plastic wrap, and let it rise in a warm spot for 1 1/2 to 2 hours or until doubled in size. You can create a warm environment by turning your oven on for just a minute, turning it off, and placing the covered bowl inside.
Shape the dough: Once risen, punch down the dough to release any air pockets. Divide it into 2 or 3 portions and roll each into long ropes. Braid the ropes together, then shape it into a circular wreath, placing the dyed eggs inside the braid.
Second rise: Transfer the braided dough to a parchment-lined baking sheet, cover it, and let it rise for another 30 to 45 minutes until it’s puffed up a bit more.
Bake: Preheat your oven to 350°F (175°C). Brush the dough with a mixture of 1 egg and 1 tablespoon of water for a golden shine, sprinkle with nonpareils, and bake for 25 to 30 minutes until golden brown. You’ll know it’s ready when a light tap on the bottom sounds hollow. Let cool on a wire rack before serving.
Common Mistake: Avoid opening the oven door too often while baking or it can lead to uneven baking!
Expert Tips & Tricks
Storage Recommendations: Keep your Italian Easter Bread in an airtight container at room temperature for up to three days. For longer storage, you can wrap it tightly in plastic wrap and freeze it for up to a month.
Make-Ahead Instructions: You can make the dough a day ahead. After kneading, let it rise, and instead of doing the second rise, punch it down and refrigerate overnight. Let it come to room temperature before shaping.
Troubleshooting: If your bread doesn’t rise properly, check your yeast’s expiration date or ensure your warm milk is not too hot, which can kill the yeast.
Professional Tip: For an extra touch, you can brush the top with a simple icing made from powdered sugar and milk once the bread has cooled.
Revive Stale Bread: If you find leftover bread becoming stale, you can refresh it by wrapping it in foil and placing it in a warm oven for 10 minutes.
Serving Suggestions
Italian Easter Bread is perfect on its own but can be elevated with a few additions. Serve it alongside a fresh fruit platter or a selection of cheeses for a delightful breakfast or brunch spread. For presentation, place it on a rustic wooden board, highlighting the colorful eggs nestled in the braid. This bread shines during Easter gatherings but can also be used as a sweet treat content for celebratory occasions or family get-togethers.
Variations & Substitutions
- Fruit-Filled Twist: Incorporate dried fruits like cranberries or raisins for added sweetness.
- Nut Options: Add slivered almonds for a crunchy texture.
- Gluten-Free Version: Substitute traditional flour with a gluten-free all-purpose blend.
- Flavor Favorites: Experiment with different zests (like orange) or spices (like nutmeg) to find your family’s favorite combination.
Nutrition & Storage Info
- Prep Time: 30 minutes
- Cook Time: 30 minutes
- Total Time: 3 hours (including rise time)
- Yield: About 12 servings
- Estimated Calories per Serving: 180 calories
- Storage: Store at room temperature for 3 days, or in the fridge for up to a week, or freeze for up to a month.
FAQ Section
Can I use bread flour instead of all-purpose flour?
Yes! Bread flour will give a chewier texture but may require more water.What can I substitute for eggs?
You can use a flaxseed meal or apple sauce for egg substitution, although the texture will vary.Are the dyed eggs safe to eat after baking?
Yes, as long as they were clean and safe to begin with. Cooked eggs can be eaten afterward.Can I skip the dyed eggs?
Absolutely! The bread is delicious even without the eggs, but they do add a traditional touch.How do I ensure even baking?
Always make sure to preheat your oven and place the baking sheet in the center rack.What’s the best way to reheat leftovers?
Wrap the bread in foil and warm it in a 350°F oven for 10 minutes.How are the sprinkles best applied?
Apply them right after egg washing before baking to ensure they stick.How can I make it more festive?
Try adding colored icing or edible glitter for a special touch.Can I make mini Italian Easter Breads?
Yes! Divide the dough into smaller portions and braid them for cute, single-serving breads.How long does it take to rise?
The first rise usually takes 1 ½ to 2 hours, and the second rise takes about 30 to 45 minutes.
Conclusion
Now that you have the keys to creating a beautiful Italian Easter Bread, I hope you’ll dive into this sweet, fulfilling experience. Not only will you delight your taste buds, but you’ll also create meaningful memories with family and friends. Don’t forget to leave a comment about how your bread turned out or if you made any delightful variations!
For more delicious recipes that celebrate tradition, check out my blog for other favorites like Homemade Pizza from Scratch or Traditional Italian Biscotti. Happy baking!