Decadent Homemade Bounty Bars: Irresistible Chocolate Coconut Delights!
I still remember the first time I bit into a Bounty Bar. It was a slice of coconut heaven tucked inside rich chocolate, drawing me in instantly. Fast forward to today, and I can say that nothing compares to the magic of Homemade Bounty Bars (Chocolate Coconut Bars). Every time I whip up a batch in my kitchen, I’m instantly transported back to those sun-soaked afternoons spent with my family, indulging in these delightful treats.
What makes my recipe special is the use of wholesome ingredients—no preservatives or mystery additives, just pure joy wrapped in chocolate and coconut! Unlike the store-bought versions that often leave you feeling guilty, these bars are packed with genuine flavors and love. They encapsulate nostalgia and comfort, making them perfect for sharing or simply treating yourself.
In this blog post, you’re not just going to learn how to make these bars; you’ll unlock a delightful experience crafted with care. Get ready to treat yourself to the ultimate homemade snack!
What Are Homemade Bounty Bars (Chocolate Coconut Bars)?
The origin of Bounty Bars dates back to the early 1950s, originating in the UK as a treat bursting with coconut and enveloped in rich chocolate. These bars are a delightful combination of texture and flavor—think chewy, luscious coconut filling that perfectly contrasts with the smooth, decadent chocolate coating.
What truly makes Homemade Bounty Bars unique is the way you can tailor the sweetness and coconut flavor to your liking. Whether you crave a raw coconut taste or a richer chocolate experience, the options are all at your fingertips! Plus, these bars are perfect for any occasion, be it a party, potluck, or just a cozy evening treat after a long day.
Why You’ll Love This Recipe
1. All-Natural Ingredients
Say goodbye to mystery ingredients and hello to pure coconut bliss! This easy recipe uses all-natural elements that you’ll feel great about enjoying and sharing.
2. Cost-Effective
Why splurge on pricey chocolates when you can make these delicious treats at home? With just a few simple ingredients, you can enjoy a batch of homemade bars for a fraction of the cost.
3. Customizable to Fit Your Cravings
Want to try a twist? You can easily modify the recipe! Add nuts for crunch, a pinch of sea salt for contrast, or a hint of almond extract for something uniquely yours!
4. Simple to Make
This recipe is straightforward and beginner-friendly! You’ll be surprised at how easy it is to create gourmet bars that impress your friends and family.
5. Perfect for Sharing
Whether it’s a family gathering or a cozy movie night, these Homemade Bounty Bars are sure to be a hit! Sharing memories while sharing delicious treats makes every moment sweeter.
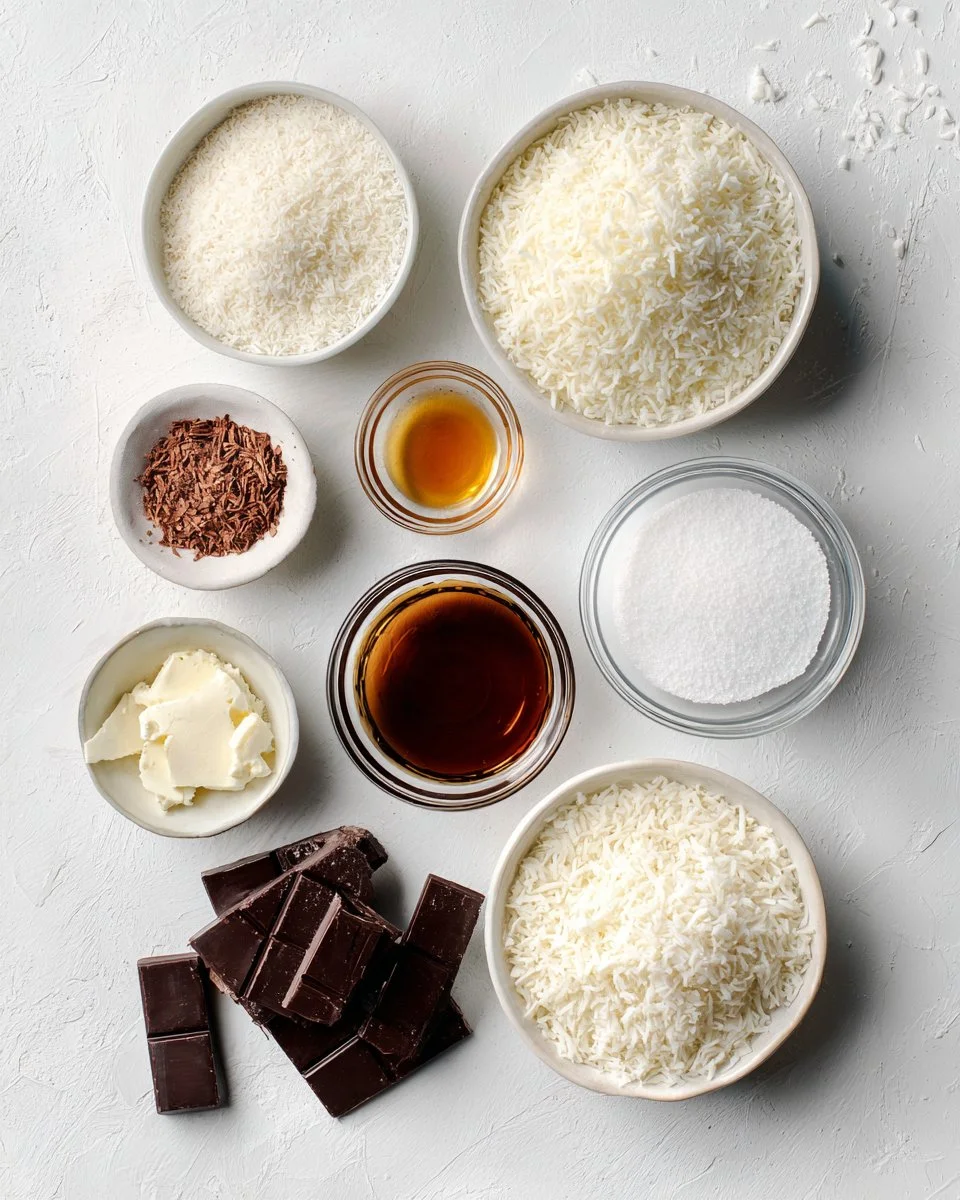
Ingredients
{image_template}
Here’s what you’ll need for your Homemade Bounty Bars (Chocolate Coconut Bars):
- 160 grams (2 cups) unsweetened shredded coconut: Ensure it’s unsweetened to keep the bars balanced.
- 100 grams (1/2 cup) coconut butter, softened: A rich base loaded with coconut goodness. Look for brands like Artisana.
- 80 grams (1/4 cup) honey or brown rice syrup (if vegan): Sweetens your bars—you choose the sweetness level.
- 60 grams (1/4 cup) coconut oil, softened: Adds moisture; make sure it’s at room temperature.
- 1 teaspoon vanilla extract or 1/2 teaspoon vanilla powder: For depth of flavor, I recommend using pure vanilla extract.
- Up to 2 tablespoons water (if necessary): To help the mixture come together.
- 150 grams (3/4 cup) dark chocolate: Choose a high-quality chocolate—70% cocoa is my favorite for the perfect balance of sweet and bitter.
- 1 tablespoon coconut oil: For melting with the chocolate to achieve a smooth coating.
Prep Notes: Don’t forget to let your coconut butter and oil soften to ensure that everything blends perfectly. Also, if coconut butter is too thick, consider warming it slightly!
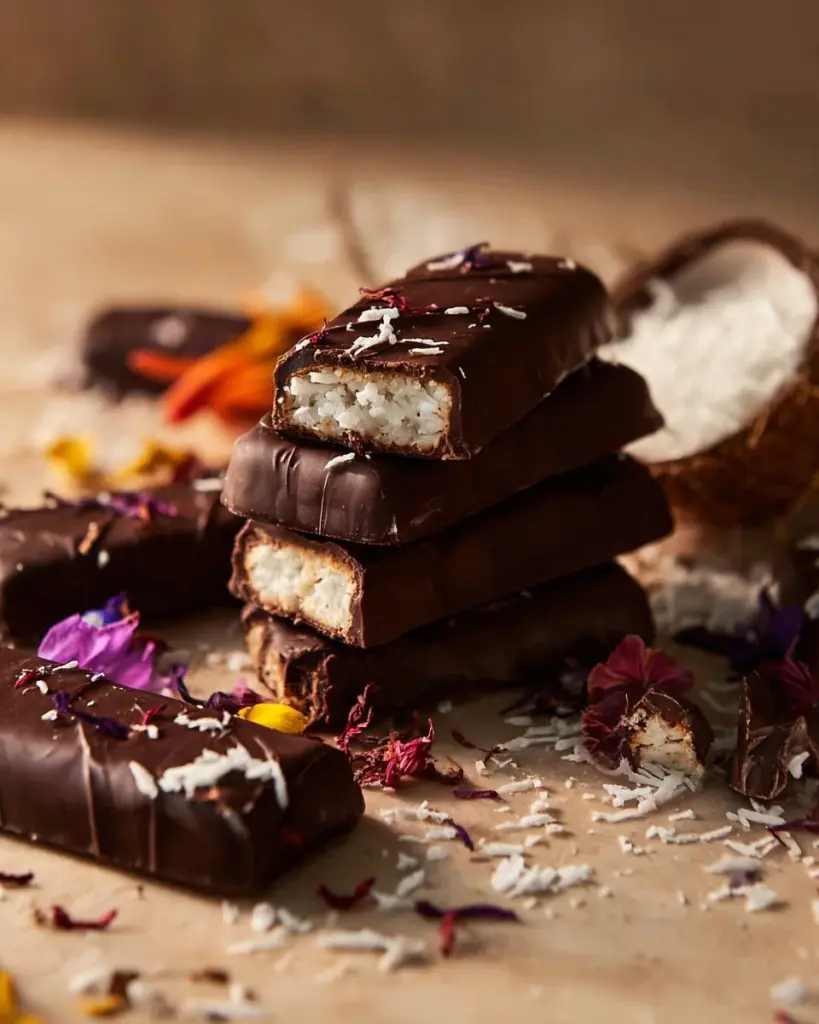
Step-by-Step Instructions
Mix Ingredients: In a large bowl, mix the shredded coconut, softened coconut butter, honey, softened coconut oil, and vanilla. If the mixture isn’t holding together, add a tablespoon or two of water until it holds its shape well when pressed. You’ll want a sticky mixture!
Prepare the Tin: Line a square (20cm or 8-inch) tin with parchment paper. This will prevent sticking and make it easy to lift out the bars later. Press the coconut mixture evenly into the lined tin as a base.
Chill the Mixture: Pop the tin in the freezer for at least 20 minutes, or refrigerate it for a couple of hours. For the best results, aim to freeze it fully until firm. Once ready, cut into approximately ten bars.
Melt the Chocolate: Gently melt the dark chocolate and remaining coconut oil over low heat or using a double boiler to avoid burning. Stir until smooth and glossy.
Dip the Bars: Take each frozen bar and dip it into the chocolate mixture. Use a fork to flip it over and ensure even coating. Allow excess chocolate to drip off, and place the coated bars on parchment paper or a cooling rack.
Set & Store: Let the chocolate harden at room temperature for a second dip, if desired, or top with coconut flakes, nuts, or sea salt. Store the bars in a sealed container in the refrigerator for up to a week or freeze for up to a month.
Expert Tips & Tricks
Here are some tips to ensure your Homemade Bounty Bars turn out perfectly every time:
- Ingredient Quality Matters: Using high-quality chocolate and coconut products really elevates the flavor!
- Chilling is Crucial: Don’t skip the chilling step; it helps the mixture firm up and enhances the texture.
- Add Texture: For an extra crunch, fold chopped nuts into the coconut filling or sprinkle them on top before the chocolate hardens.
- Storage Tips: Keep your bars in a sealed container to prevent them from absorbing any odors in the fridge. They can also stay fresher in the freezer for longer!
- Make-Ahead: Feel free to make them ahead of time and store them for guests or surprise snack cravings.
- Troubleshooting: If your bars are too soft, they may have been under-processed. Just give them a bit more time to chill!
Serving Suggestions
These delightful Homemade Bounty Bars can be enjoyed in countless ways! Serve them alongside a scoop of vanilla ice cream for an indulgent dessert or pair them with a cup of rich coffee for a perfect afternoon pick-me-up. Friends coming over? Arrange them on a beautiful platter with an assortment of other homemade treats for a delightful dessert table that will impress everyone.
Variations & Substitutions
Different Flavor Combinations:
- Mint Chocolate Bounty Bars: Add a few drops of peppermint extract to the filling for a refreshing twist.
- Almond Joy Bounty Bars: Mix in chopped almonds or top the bars with slivered almonds before dipping in chocolate.
Dietary Adaptations:
- For a nut-free version, substitute almond butter with sunflower seed butter.
- To make the bars sugar-free, you can use a sugar-free syrup or a suitable sugar alternative.
Seasonal Variations:
- In the summer, think about adding fresh citrus zest for brightness.
Nutrition & Storage Info
- Prep Time: 15 minutes
- Chill Time: 20 minutes
- Total Time: 35 minutes (not including freezing time)
- Yield: Approximately 10 bars
- Estimated Calories: About 150 calories per bar
- Storage Instructions: Best stored in a sealed container in the fridge for up to a week or in the freezer for up to a month.
FAQ Section
Can I use sweetened coconut?
- Yes, but your bars will be sweeter, so adjust the honey accordingly!
What type of chocolate should I use?
- Opt for a high-quality dark chocolate with at least 70% cacao for a rich, satisfying flavor.
Can I use a different sweetener?
- Absolutely! Maple syrup or agave syrup works well.
How do I know when the bars are ready to dip?
- If the bars are firm to the touch and have set in the freezer, they’re ready for the chocolate bath!
Can I add protein powder?
- Yes! Just make sure to balance it out with more coconut oil or almond milk to maintain the right consistency.
Are these bars kid-friendly?
- Definitely! Kids will love the sweet, chewy coconut center and rich chocolate coating.
Are Homemade Bounty Bars gluten-free?
- Yes! All the ingredients are naturally gluten-free, making these bars a perfect treat for anyone avoiding gluten.
How do I prevent the chocolate from cracking?
- Ensure the chocolate is melted slowly and evenly, and allow the bars to come to room temperature before dipping.
What can I pair these bars with?
- Enjoy them with coffee, tea, or a smoothie for a delightful snack combo!
How long do these bars last?
- They can last up to a week in the fridge and a month in the freezer.

Conclusion
These Homemade Bounty Bars are not just another treat; they’re a delightful way to share some love and nostalgia. I encourage you to try making them and experience the joy they bring to each bite. Please let me know how they turn out for you! I would love to hear your feedback and any variations you decided to try. If you enjoyed this recipe, consider checking out more delicious treats on my blog—your next favorite recipe could be just a click away!
Homemade Bounty Bars
Ingredients
Method
- In a large bowl, mix the shredded coconut, softened coconut butter, honey, softened coconut oil, and vanilla. If the mixture isn’t holding together, add a tablespoon or two of water until it holds its shape well when pressed.
- Line a square (20cm or 8-inch) tin with parchment paper. Press the coconut mixture evenly into the lined tin as a base.
- Pop the tin in the freezer for at least 20 minutes, or refrigerate it for a couple of hours until firm, then cut into approximately ten bars.
- Gently melt the dark chocolate and remaining coconut oil over low heat or using a double boiler until smooth and glossy.
- Dip each frozen bar into the chocolate mixture, flipping to ensure an even coating. Allow excess chocolate to drip off and place the coated bars on parchment paper or a cooling rack.
- Let the chocolate harden at room temperature for a second dip, if desired, or top with coconut flakes, nuts, or sea salt. Store the bars in a sealed container in the refrigerator for up to a week or freeze for up to a month.