There’s something magical about the first bite of a crispy garlic chive dumpling, the little pockets of flavor that remind me of my childhood, swirling around my grandmother’s kitchen. She always believed that food was a love language, and these dumplings were her favorite phrase. Made with fresh garlic chives and a hint of savory goodness, they were the epitome of comfort food—a phenomenon that makes you feel warm and happy inside.
What sets my Crispy Garlic Chive Dumplings apart from those you might find at a local restaurant? For one, it’s the love and care put into each step. Each ingredient is chosen with intention, ensuring that every dumpling comes out bursting with flavor and a perfect crispy texture. Trust me; once you try these, you won’t want to reach for the frozen versions ever again!
In this post, you’ll discover the secrets to making these delightful dumplings, from sourcing the freshest ingredients to mastering the ideal cooking techniques. Get ready to roll up your sleeves and bring a bit of home into your kitchen, because we’re about to embark on a flavorful adventure that’s sure to awaken nostalgic memories and create new ones.
What Are Crispy Garlic Chive Dumplings?
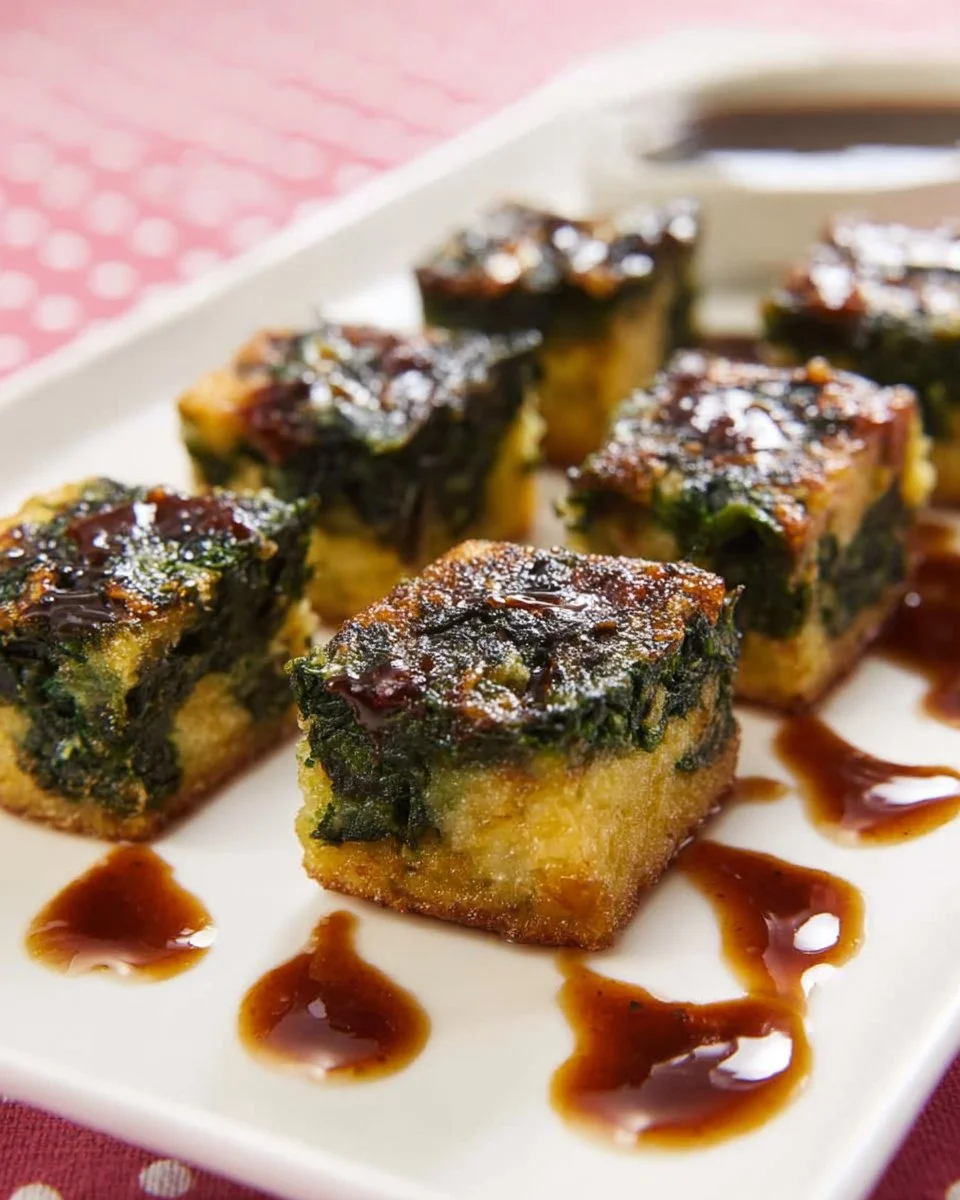
Crispy garlic chive dumplings are a beloved dish originating from regions where garlic chives are abundant, particularly in Asian cuisine. They’re known for their delightful contrast between a soft, chewy interior and a crispy, golden-brown exterior. Imagine biting into a perfectly cooked dumpling, the gentle garlic flavor mingling with the sweet earthiness of chives—a harmonious experience for your taste buds!
What makes them truly unique is their simplicity and versatility. Using rice flour and tapioca starch as the base, this dumpling recipe is both gluten-free and adaptable to various dietary preferences. Whether you’re looking to impress at a dinner party or searching for a cozy meal to share with family, these dumplings are the perfect choice—easy to make and bursting with flavor. They can be served as an appetizer, a side dish, or the star of the show during a cozy family gathering.
Why You’ll Love This Recipe
There are countless reasons to love my Crispy Garlic Chive Dumplings, but here are a few that stand out:
Cost-Effective: Creating these dumplings at home is significantly cheaper than ordering takeout or dining out. With just a handful of affordable ingredients, you can whip up a delicious batch that the whole family will love.
Customization: Want to switch things up? Feel free to experiment with additional fillings like mushrooms or even shrimp! You can make these dumplings your own, adjusting the flavors to suit your taste.
Healthier Choice: When you control the ingredients, you know exactly what goes into your crispy dumplings. Say goodbye to preservatives and hello to fresh, wholesome ingredients!
Easy to Make: If you’re new to cooking, don’t fret! This recipe is straightforward and forgiving. With each batch, you’ll become more confident in your kitchen skills.
Perfect for Meal Prep: These dumplings freeze beautifully, making them an excellent option for meal prepping. You can enjoy them anytime—just pop them in the steamer or fry them straight from the freezer!
Get ready to dive into the world of dumpling-making and create something delicious that’s sure to impress!
Ingredients Section
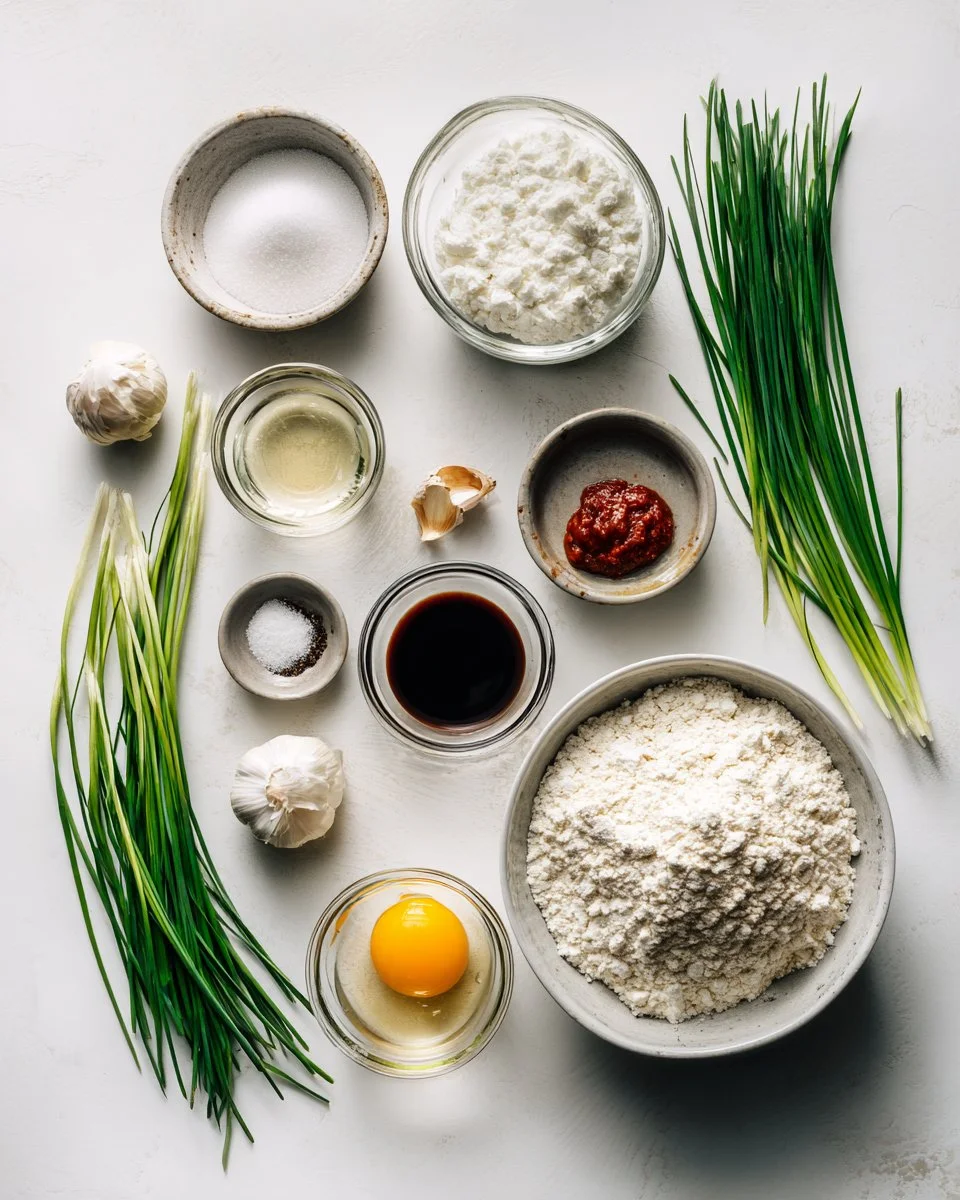
Here’s what you’ll need to bring these delightful dumplings to life:
- 230 g (½ pound) garlic chives, chopped
- 2 tsp sugar
- ½ Tbsp soy sauce
- ½ tsp salt
- ¼ tsp baking soda (optional, adds a bit of fluffiness)
- 2 tsp neutral oil (like canola or sunflower)
- 1 clove garlic, finely grated or minced
- ¼ tsp white pepper
- 100 g rice flour
- 100 g tapioca starch
- 1 cup (240 ml) water
- For dipping sauce:
- 1 Tbsp sugar
- 1 Tbsp water
- 1 Tbsp vinegar
- 1 ½ Tbsp sweet soy sauce
- 1 Tbsp soy sauce
- 2-3 tsp sambal oelek or minced Thai chilies (adjust to taste)
Ingredient Notes:
- Freshness Matters: Always buy fresh garlic chives to ensure the best flavor profile. Look for vibrant greens with no wilted ends.
- Substitution Alert: If you can’t find garlic chives, green onions can work as an alternative, though the flavor will differ slightly.
- Brands to Consider: For soy sauce, I recommend Kikkoman for reliability and quality.
Make sure everything is ready to go—room temperature ingredients work best, so if you have butter for frying, let it soften first!
Step-by-Step Instructions
Let’s get cooking! Follow these detailed steps to whip up your Crispy Garlic Chive Dumplings:
Prepare the Chives: Cut about 1.5 inches off the bottom of the garlic chives and discard. Wash and dry them well. Cut the chives into small pieces (about 1-inch long) and place in a mixing bowl.
Mix the Seasonings: Add the salt, sugar, soy sauce, baking soda, white pepper, neutral oil, and minced garlic to the chives. Mix well, allowing the flavors to meld. Let sit for at least 20 minutes for extra zing.
Make the Dipping Sauce: In a small bowl, combine the vinegar, water, and sugar until dissolved. Then, add the sweet soy sauce, regular soy sauce, and sambal oelek. Taste and adjust the heat as needed—this sauce is the perfect match for your dumplings!
Prepare the Batter: In a pot, combine the water, rice flour, and tapioca starch over low heat. Stir constantly until the mixture thickens (about 5-7 minutes). Once thickened, remove it from heat and fold in the chive mixture gently.
Grease the Pan: Grease a 7-inch round cake pan (or a steamer tray) and line the bottom with parchment paper. Pour the dumpling batter into the prepared pan, smoothing the top with a spatula.
Steam It Up: Preheat a steamer with boiling water. Place the pan in the steamer and steam the dumplings for 15-20 minutes until cooked through. You’ll know they are ready when they look firm and slightly translucent.
Cool and Cut: Allow the steamed dumplings to cool for a few minutes before slicing them into bite-sized pieces.
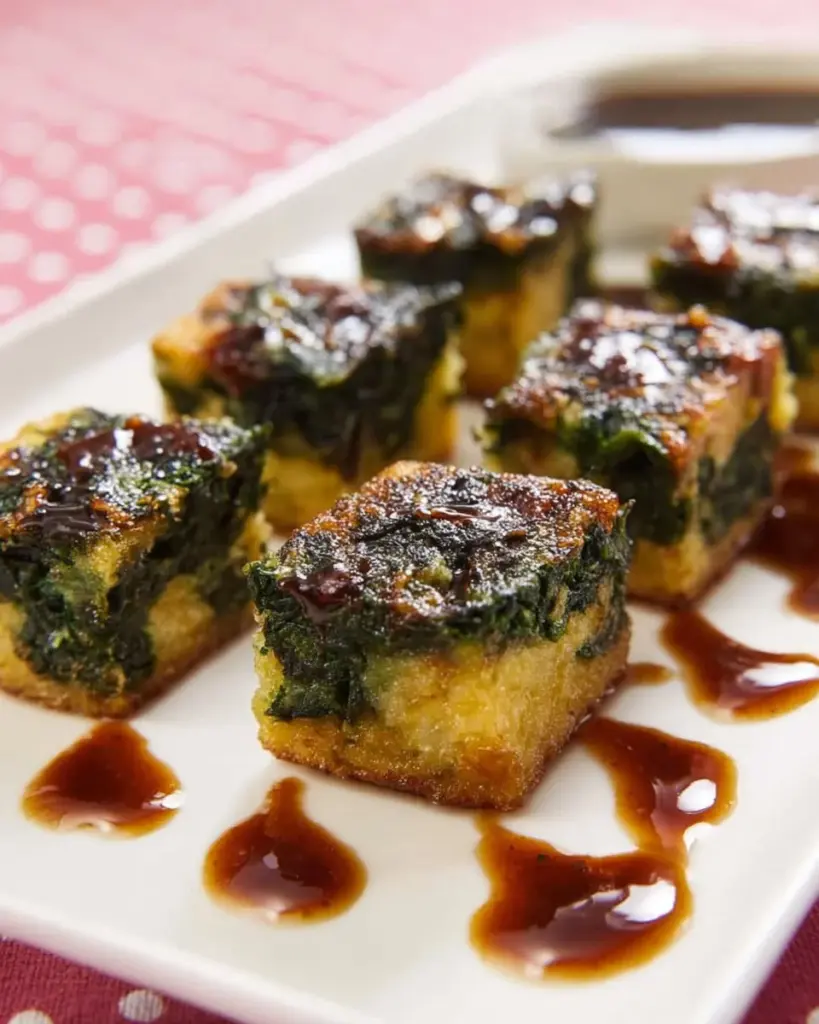
Fry to Perfection: In a non-stick pan, heat a bit of oil over medium heat. Fry the dumpling slices in batches until they are golden brown and crispy on both sides.
Serve Hot: Serve the crispy dumplings hot with your delicious homemade dipping sauce. Enjoy the crunch!

Expert Tips & Tricks
To ensure your dumplings are a hit:
- Don’t Rush the Resting: Letting the chives marinate enhances their flavor, so be patient during this step!
- Steam First, Then Fry: Steaming before frying helps cook the dumplings through without burning the outside.
- Keep It Crispy: When frying, ensure not to overcrowd the pan. This helps maintain that crunchy texture.
- Storing Leftovers: If you have any leftovers (unlikely!), store them in the refrigerator for up to 3 days. Reheat in a hot pan with oil to regain the crispiness.
- Make Ahead: Prep the dumplings and freeze them before frying for an easy meal on busy nights. They can be cooked directly from frozen—just steam longer.
Serving Suggestions
These dumplings are a versatile delight! Perfect to serve with a side of stir-fried vegetables or a simple soup for a comforting meal. Lay them on a beautiful platter for a stunning presentation, garnished with fresh chilies or sesame seeds. They make an elegant appetizer for gatherings, where each crispy bite transcends flavors, sparking joy among your guests.
Variations & Substitutions
Feeling creative? Here are some fun variations to try:
- Flavor Combinations: Add finely diced mushrooms or shrimp for a burst of umami or use spinach for a green twist.
- Dietary Restrictions: This recipe is gluten-free by using rice flour and tapioca starch, making it suitable for gluten-sensitive diners. Adjust the filling based on additional dietary needs.
- Seasonal Favorites: In the fall, replace chives with chopped pumpkin leaves or ramps in the spring for a seasonal twist.
Nutrition & Storage Info
- Prep Time: 25 minutes
- Cook Time: 30 minutes
- Total Time: 55 minutes
- Yield: About 4 servings
- Estimated Calories: 250 calories per serving
- Storage Instructions: Store at room temperature for up to 2 hours, in the fridge for up to 3 days, or freeze for up to 3 months. Reheat in a non-stick pan for best results.
FAQ Section
Can I freeze these dumplings?
Absolutely! Steam them first, then freeze. You can cook straight from the freezer; just add a few more minutes to the steaming time.What if I can’t find garlic chives?
Green onions are a great substitute, though they will result in a slightly different flavor.Can I make these vegan?
Yes! This recipe is completely vegan as it uses plant-based ingredients.Why do you use baking soda?
Baking soda adds a bit of fluffiness to the dumpling, making them lighter. It’s optional but can enhance texture.What is sambal oelek?
Sambal oelek is an Indonesian chili paste made from crushed raw chili peppers, vinegar, and salt. You can replace it with any hot sauce!How do I ensure they stay crispy?
Fry them freshly cooked and do not stack them. Serve immediately after frying for the best texture.What type of oil is best for frying?
A neutral oil like canola or vegetable oil works best due to its high smoking point.How can I ensure even cooking?
Ensure even thickness in your batter when you pour it into the pan. If using a steamer, check the water level so it stays boiling.Can I make the dipping sauce ahead of time?
Yes! You can make it a day in advance and store it in the refrigerator. Just give it a quick stir before serving.What’s a good wine pairing?
A light white wine like a Sauvignon Blanc complements the dumplings beautifully!
Conclusion
My Crispy Garlic Chive Dumplings are not just a recipe; they’re a way to bring warmth and joy into your home. Each bite is reminiscent of family gatherings, laughter echoing through the kitchen, and the joy of sharing good food with loved ones. I encourage you to give this recipe a try and craft your own delicious dumpling memories. Remember to share your thoughts or any tweaks you make in the comments below! For more delightful recipes like this one, stay tuned to the blog—there’s always something delicious waiting for you.
Tahini Banana Bread with Sunflower Seeds
Happy cooking!
Crispy Garlic Chive Dumplings
Ingredients
Method
- Cut about 1.5 inches off the bottom of the garlic chives and discard. Wash and dry them well. Cut the chives into small pieces (about 1-inch long) and place them in a mixing bowl.
- Add the salt, sugar, soy sauce, baking soda, white pepper, neutral oil, and minced garlic to the chives. Mix well and let sit for at least 20 minutes to meld flavors.
- In a small bowl, combine vinegar, water, and sugar until dissolved. Then, add sweet soy sauce, regular soy sauce, and sambal oelek. Taste and adjust heat if needed.
- In a pot, combine the water, rice flour, and tapioca starch over low heat. Stir constantly until the mixture thickens (about 5-7 minutes).
- Once thickened, remove it from heat and fold in the chive mixture gently.
- Grease a 7-inch round cake pan (or a steamer tray) and line the bottom with parchment paper. Pour the dumpling batter into the prepared pan.
- Preheat a steamer with boiling water. Place the pan in the steamer and steam the dumplings for 15-20 minutes until cooked through.
- Allow the steamed dumplings to cool for a few minutes before slicing them into bite-sized pieces.
- In a non-stick pan, heat a bit of oil over medium heat. Fry the dumpling slices in batches until they are golden brown and crispy on both sides.
- Serve hot with the delicious homemade dipping sauce.