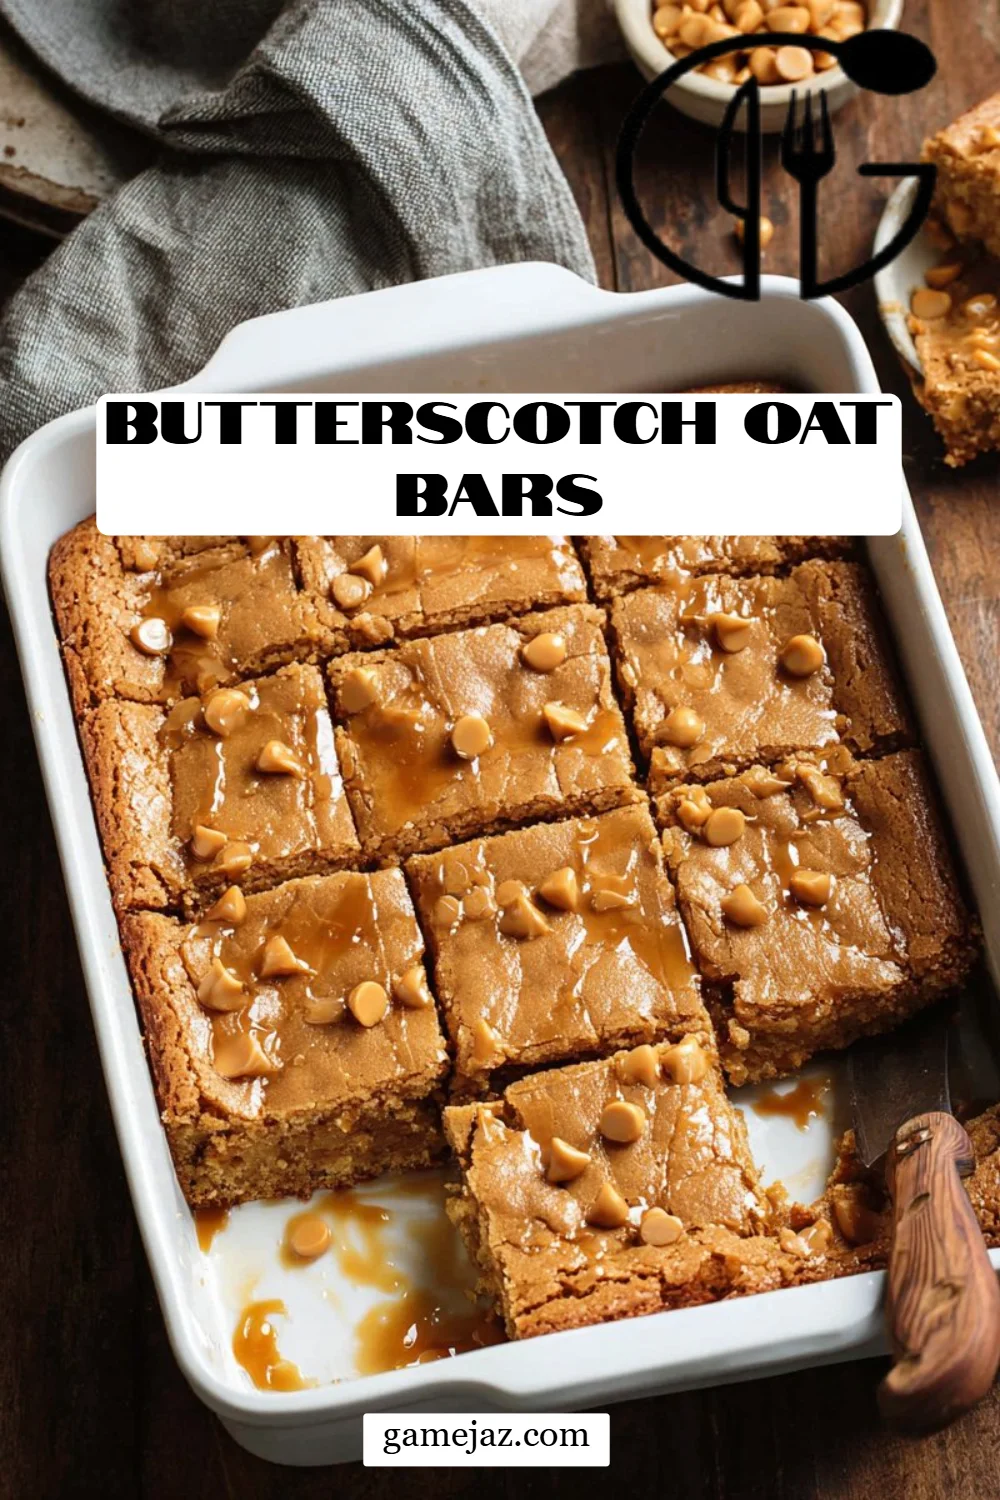
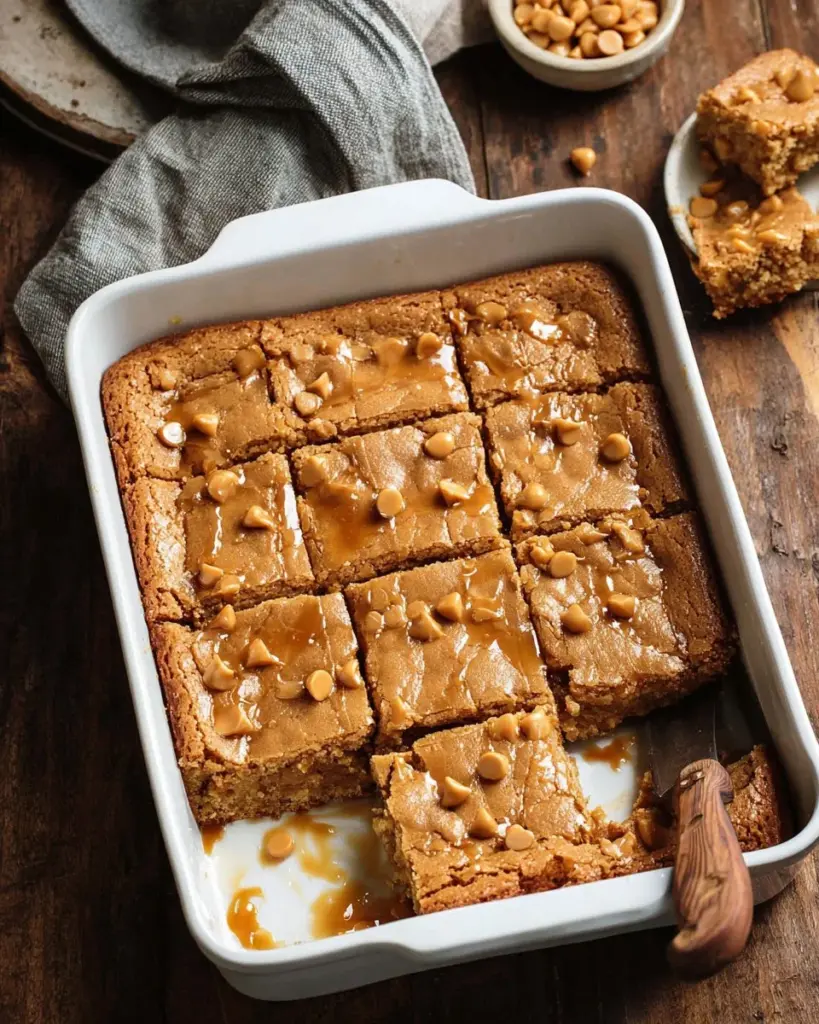
Have you ever had a moment where a single bite of something transports you back to your childhood? For me, that moment is embodied in a simple yet irresistible treat: Butterscotch Oat Bars. Growing up, my kitchen was filled with the sweet aroma of baking treats, and my favorite afternoons were spent stirring and tasting recipes that my mother usually made. These bars, brimming with rich butterscotch flavor and hearty oats, became my go-to comfort food.
What makes these Butterscotch Oat Bars special isn’t just their deliciousness; it’s the nostalgia they carry. Unlike many store-bought snacks, this recipe bridges the gap between quick indulgence and homemade love. Each bar is oozing with gooey butterscotch chips, boasting a perfect chewy texture balanced with a hint of crispiness on the edges. They’re not just a sweet treat; they’re a comforting hug in bar form.
In this recipe, I’ll share the secrets to creating these delectable bars that have become a staple in my family—and why they’ll become your new favorite too. Get ready to learn how to whip up a batch of these Butterscotch Oat Bars, perfect for sharing with loved ones, or maybe just for enjoying all by yourself (I won’t judge!).
What Are Butterscotch Oat Bars?
Butterscotch Oat Bars are a delightful treat that perfectly blend the sweetness of butterscotch with the heartiness of oats. Originating from classic dessert bars, these treats have evolved to capture hearts with their chewy texture and rich flavor profile. The charm lies in their simplicity—easy to make and even easier to devour.
The taste is a perfect harmony of sweet and savory, while the texture is an enchanting combination of chewy oats and melty butterscotch chips. Each bite feels indulgent without being overly heavy, making them a suitable dessert for any occasion. They shine at potlucks, family gatherings, and even as a little pick-me-up during hectic days.
Whether you enjoy them fresh out of the oven or at room temperature, Butterscotch Oat Bars promise satisfaction every time you reach for one. So when you’re craving something warm, sweet, and nostalgic, remember these are the bars you want to bake!
Why You’ll Love This Recipe
1. Homemade Goodness
Nothing compares to the taste of freshly baked Butterscotch Oat Bars straight from your kitchen. The warmth envelops your taste buds, and the rich aroma fills your home, creating a welcoming atmosphere that store-bought snacks simply can’t match.
2. Cost-Effective
Making these bars at home is not only gratifying but also super economical. When you break down the cost of ingredients compared to buying pre-packaged snacks, you’ll see substantial savings. Plus, you can make a larger batch that lasts longer!
3. Customization Options
Feel free to make these bars your own! You can add nuts, dried fruits, or even chocolate chips; the possibilities are endless. If you want to make them gluten-free, substitute the all-purpose flour with almond or coconut flour.
4. Easy Preparation
With just a handful of common pantry staples, this easy recipe simplifies baking. Even novice bakers can create stunning results! The total time investment is minimal—about 15 minutes of prep and 30 minutes of baking—and your family will think you’re an incredible baker.
5. Perfect for Any Occasion
These Butterscotch Oat Bars are a versatile dessert. Whether you’re looking for a sweet treat for a picnic, a cozy dessert to share at a family gathering, or a delightful reward for yourself after a long day, these bars fit the bill perfectly.
Ingredients
To make these incredible Butterscotch Oat Bars, you will need:
- 1 1/2 cups all-purpose flour: For structure. Feel free to substitute with a gluten-free blend if needed.
- 2 cups old-fashioned oats: Gives that chewy texture. Avoid quick oats as they won’t yield the same result.
- 1/2 teaspoon baking soda: Adds lift to your bars.
- 1/2 teaspoon baking powder: Works alongside the baking soda for a fluffy texture.
- 1/2 teaspoon kosher salt: Balances the sweetness.
- 1/2 cup unsalted butter, room temperature: I recommend using a high-quality butter like Kerrygold for extra creaminess.
- 1 cup light brown sugar, packed: This gives that deep butterscotch flavor.
- 2 large eggs, room temperature: Bring eggs to room temperature for better mixing.
- 1 tablespoon molasses: Adds a touch of depth; this ingredient is key!
- 1 teaspoon vanilla extract: Always use pure vanilla extract for the best flavor.
- 2 cups butterscotch chips, divided: The star of the show! I love using Guittard or Nestlé’s for a delicious melt.
- Butterscotch sauce for topping (optional): Drizzle over the bars for an indulgent finish.
Preparation note: Ensure your butter and eggs are at room temperature for easier blending and a smoother consistency.
Step-by-Step Instructions
1. Preheat
Preheat your oven to 350°F (175°C) and spray a 9×13-inch baking dish with baking spray, ensuring the bars won’t stick.
2. Mix Dry Ingredients
In a large mixing bowl, stir together the flour, oats, baking soda, baking powder, and salt. Set aside.
3. Cream Butter and Sugar
In the bowl of a stand mixer fitted with a paddle attachment, combine the room-temperature butter and brown sugar. Beat on low speed until smooth and creamy, usually about 2-3 minutes.
4. Add Eggs and Flavorings
Add the eggs, molasses, and vanilla extract to the mixing bowl, mixing until fully incorporated. You should see a beautiful golden mixture!
5. Combine Wet and Dry Ingredients
Slowly add the dry ingredients to the wet mixture. Mix gently until everything is just combined. Avoid overmixing to maintain a perfect texture!
6. Add Butterscotch Chips
Stir in 1 1/2 cups of butterscotch chips until evenly distributed throughout the batter.
7. Press and Sprinkle
Transfer the mixture into your prepared baking dish, pressing it evenly into the corners. Sprinkle the remaining 1/2 cup of butterscotch chips on top for that extra melty goodness!
8. Bake
Bake for 25-30 minutes, or until the edges are golden brown and a toothpick inserted comes out with a few moist crumbs. Keep an eye on it during the last few minutes!
9. Cool and Serve
Allow the bars to cool in the pan for about 15 minutes before drizzling with butterscotch sauce if desired. Cut into squares, serve, and enjoy!

Expert Tips & Tricks
Room Temperature Ingredients: This can’t be stressed enough—ensure that your butter and eggs are at room temperature for an even mix, contributing to that perfect texture.
Storage: Store your cooled Butterscotch Oat Bars in an airtight container at room temperature for up to 5 days. For longer storage, you can freeze them for up to 3 months.
Make-ahead Instructions: Feel free to prepare the dry ingredients a day in advance. Just combine and keep them in an airtight container until you’re ready to mix!
Troubleshoot Common Issues: If your bars turn out too dry, check your oven’s accuracy. And if they crumble when cutting, they might need more cooling time. Take a breath—you’ve got this!
Texture Tips: If you prefer chewier bars, bake for a bit less time. If you like crispy edges, add an extra minute or two to the baking time.
Elevate Your Bars: For an impressive presentation, cut them into signature shapes or drizzle additional butterscotch sauce over the top just before serving.
Serving Suggestions
These Butterscotch Oat Bars are delightful on their own, but here are a few serving suggestions to take them up a notch:
- Pair them with a cold glass of milk or a warm cup of coffee for a perfect afternoon snack.
- Serve warm with a scoop of vanilla ice cream on top for a dessert that’s sure to impress.
- Present them on a beautiful platter, drizzled with butterscotch sauce, for gatherings or special occasions.
Variations & Substitutions
Feel free to explore your creativity with Butterscotch Oat Bars! Here are some fun variations:
- Nutty Addition: Toss in a cup of chopped walnuts or pecans for added crunch.
- Fruity Twist: Add 1 cup of dried cranberries or sliced bananas for a fruity flavor kick.
- Seasonal Variations: In the fall, consider incorporating pumpkin spice or chocolate chips during the same process for a seasonal treat.
- Dietary Adaptations: For a vegan version, substitute eggs with flax eggs (1 tbsp flaxseed meal + 2.5 tbsp water = 1 egg) and use plant-based butter.
Nutrition & Storage Info
- Prep time: 15 minutes
- Cook time: 25-30 minutes
- Total time: 40-45 minutes
- Yield: 24 servings (depending on how large you cut them)
- Estimated calories per serving: Approximately 200 calories
- Storage: Keep in an airtight container at room temperature for up to 5 days, or freeze them for up to 3 months. Just layer parchment paper between bars before freezing to prevent sticking.
FAQ SECTION
Can I substitute the butterscotch chips?
- Absolutely! You can use chocolate chips, peanut butter chips, or even a mix of your favorites.
Can I make these bars gluten-free?
- Yes, just use a gluten-free all-purpose flour blend with xanthan gum for best results.
How can I make these bars chewy instead of crunchy?
- Bake for a shorter time. These bars should be set but soft in the center for a chewier texture.
Can I add fresh fruits?
- You can add fresh fruits like banana or apple slices, just be cautious of the added moisture, which could affect the texture.
What do I do if my bars are too crumbly?
- This can happen if there’s not enough moisture or if they were overbaked. If you bake them again, make sure to add a touch more butter or an extra egg.
Is there a difference between old-fashioned oats and quick oats?
- Yes, old-fashioned oats provide a chewier texture while quick oats tend to become mushy in baking. Always use old-fashioned for this recipe!
Can I double this recipe?
- Yes! Just use a larger baking dish (about 11×15 inches) and adjust the baking time slightly as needed.
Why are my bars not holding together?
- If they didn’t hold together, they might not have baked long enough, or you might want to ensure you’ve packed your brown sugar correctly.
Can I add spices for flavor?
- Yes! A teaspoon of cinnamon or a pinch of nutmeg can elevate the flavor profile beautifully.
How should I cut these bars?
- Use a sharp, non-serrated knife, and if they’re too warm, allow them to cool completely to avoid crumbling.
Conclusion
Now that you’ve got the scoop on these irresistibly delicious Butterscotch Oat Bars, it’s time to gather your ingredients and bring this comforting recipe to life. With their rich flavors and chewy texture, they’re sure to become a favorite in your household, just like they have in mine.
I can’t wait for you to try this recipe! If you do, drop a comment and share your experience—your feedback means the world to me. And don’t forget to explore other delightful recipes on the blog.
Happy baking!
Butterscotch Oat Bars
Ingredients
Method
- Preheat your oven to 350°F (175°C) and spray a 9×13-inch baking dish with baking spray.
- In a large mixing bowl, stir together the flour, oats, baking soda, baking powder, and salt. Set aside.
- In a stand mixer, combine the room-temperature butter and brown sugar. Beat on low speed until smooth and creamy, about 2-3 minutes.
- Add the eggs, molasses, and vanilla extract to the mixing bowl and mix until fully incorporated.
- Slowly add the dry ingredients to the wet mixture. Mix gently until just combined.
- Stir in 1.5 cups of butterscotch chips until evenly distributed.
- Transfer the mixture into the prepared baking dish, pressing it evenly into the corners. Sprinkle the remaining 0.5 cup of butterscotch chips on top.
- Bake for 25-30 minutes, or until edges are golden brown and a toothpick inserted comes out with a few moist crumbs.
- Allow the bars to cool in the pan for about 15 minutes before drizzling with butterscotch sauce, if desired. Cut into squares and enjoy!