Growing up, there was nothing quite like walking into my grandmother’s kitchen and being greeted by the warm, inviting aroma of freshly baked goods. Among her myriad of treats, the Butterscotch Bars held a special place in my heart; they were pure magic in dessert form. Crunchy, chewy, and bursting with sweet butterscotch goodness, these bars have a way of transporting you back to cherished family moments, where laughter and love filled the air.
What makes my version of Butterscotch Bars stand out, you may wonder? It’s a delightful blend of creamy peanut butter, decadent butterscotch chips, and fluffy mini marshmallows that turn an ordinary dessert into a show-stopping treat. Unlike other recipes that tend to dry out or lose that essential gooeyness, my adaptation keeps it perfectly chewy and utterly satisfying.
Join me on a scrumptious journey as I share cherished memories, baking tips, and the secrets to creating these unforgettable bars that you and your loved ones will adore. Get ready, because by the end, you’ll have a spectacular recipe that will become a staple in your home and bring smiles to every gathering!
What Are Butterscotch Bars?
Butterscotch Bars have a delightful history that speaks to dessert lovers everywhere. Originating as a twist on classic blondies, these bars offer a sweet adventure with a rich butterscotch flavor and a texture that’s hard to resist. Combining the creaminess of peanut butter and the sweetness of butterscotch chips, these bars complement each other beautifully, resulting in a treat that’s chewy, sweet, and packed with flavor.
The flavor profile is uniquely delightful; the buttery, caramel-like notes of butterscotch blend seamlessly with the nutty richness of peanut butter, creating a taste explosion that’s sure to impress. The texture is a delightful contrast, with the smoothness of the peanut butter layer beneath the airy marshmallows and crispy rice cereal topping.
These bars are perfect for any occasion, whether you’re planning a cozy family gathering, whipping up a treat for a potluck, or simply satisfying your sweet tooth. With their easy-to-follow recipe and adaptable nature, Butterscotch Bars are sure to become your go-to dessert for both special occasions and casual indulgence.
Why You’ll Love This Recipe
Unmatched Flavor: This Butterscotch Bars recipe expertly balances the creaminess of peanut butter with the sweetness of butterscotch. It creates a heavenly flavor fusion that far surpasses store-bought alternatives.
Cost-Effective: Why spend a fortune on fancy desserts when you can make something equally delicious at home? This recipe is wallet-friendly, requiring only a handful of ingredients while producing a generous yield.
Customizable: Not only is this recipe a classic, but it’s also versatile! Feel free to experiment with ingredient substitutions, like swapping regular peanut butter for crunchy or swapping in dark chocolate chips for an unexpected twist.
Easy to Make: You don’t need to be a baking expert to pull this off! This recipe is straightforward and beginner-friendly, making it perfect for anyone looking to jump into baking without the intimidation factor.
Perfect for Meal Prep: Whip up a batch during your weekend and enjoy a sweet treat throughout the week. Butterscotch Bars are great for this as they last well and can easily be packed for snacks or lunchboxes.
So go ahead; this Butterscotch Bar recipe promises to elevate your dessert game and will surely leave your family and friends craving more!

Ingredients Section
Get ready to gather your ingredients and unleash your inner baker! Here’s what you’ll need to dive into this scrumptious Butterscotch Bars recipe:
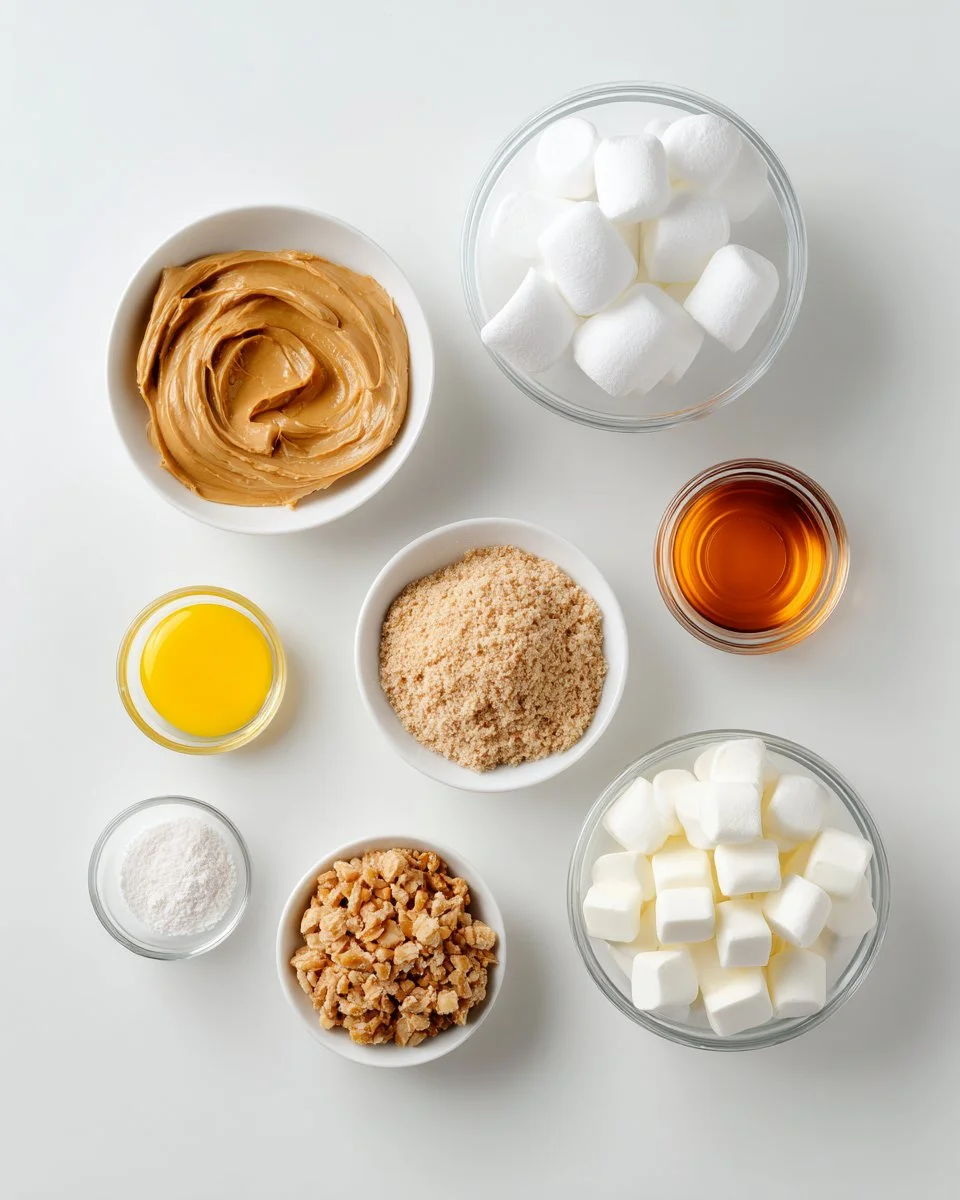
- 1 cup creamy peanut butter: I recommend using a high-quality brand to enhance flavor. Natural options, like Jif or Skippy, work wonders.
- 1 cup granulated sugar: This adds sweetness and helps create that perfect chewy texture.
- 1 large egg (room temperature): Using a room-temperature egg ensures better incorporation into your mixture.
- 1 package mini marshmallows (10 ounces): You want the mini kind for easy melting and distribution!
- 1 package butterscotch chips (11 ounces): These are the stars of the show! I love Ghirardelli or Nestlé for their rich flavor.
- 1/4 cup unsalted butter: Use fresh, high-quality butter for a rich taste.
- 2/3 cup light corn syrup: This helps bind everything together while adding a slight sweetness.
- 1 tablespoon vanilla extract: A splash for an extra layer of flavor is always a good idea!
- 5 cups crispy rice cereal, like Rice Krispies: This adds the perfect crunch.
Feel free to swap lower sugar options, use a vegan egg substitute, or even gluten-free cereal if you’re cooking for dietary restrictions.
Prep notes: Make sure your unsalted butter is at room temperature before you start for easy blending!
Step-by-Step Instructions
Let’s get our baking on! Follow these steps to create your delicious Butterscotch Bars:
Step 1: Preheat & Prepare
- Preheat your oven to 350 degrees F. This ensures that your bars bake evenly right from the start.
- Line a 9×13-inch baking dish with parchment paper, leaving an overhang on the sides. This will make it easy to lift the bars out once they’re baked.
Step 2: Mix the Peanut Butter Base
- In a medium bowl, mix 1 cup of creamy peanut butter, 1 cup of granulated sugar, and 1 large egg until well combined. This should take about 2 minutes of vigorous stirring. The mixture should be smooth and creamy.
Step 3: Bake the Peanut Butter Layer
- Spread the peanut butter mixture evenly in your lined baking dish.
- Bake in your preheated oven for 14-15 minutes. You want the center to be just set but not dry.
Step 4: Add Marshmallows
- Remove the dish from the oven and sprinkle 10 ounces of mini marshmallows over the top. It’s okay to let some of them touch the edges; they’ll puff up and create delightful pockets of gooeyness.
- Return to the oven and bake for an additional 7 minutes, or until the marshmallows are slightly puffy and golden.
Step 5: Make the Butterscotch Mixture
- In a large pot over medium heat, melt together 11 ounces of butterscotch chips, 1/4 cup of unsalted butter, 2/3 cup of light corn syrup, and 1 tablespoon of vanilla extract. Stir continuously until smooth—this should take about 5 minutes.
Chef’s Tip: Avoid overheating this mixture as it can become grainy if overheated!
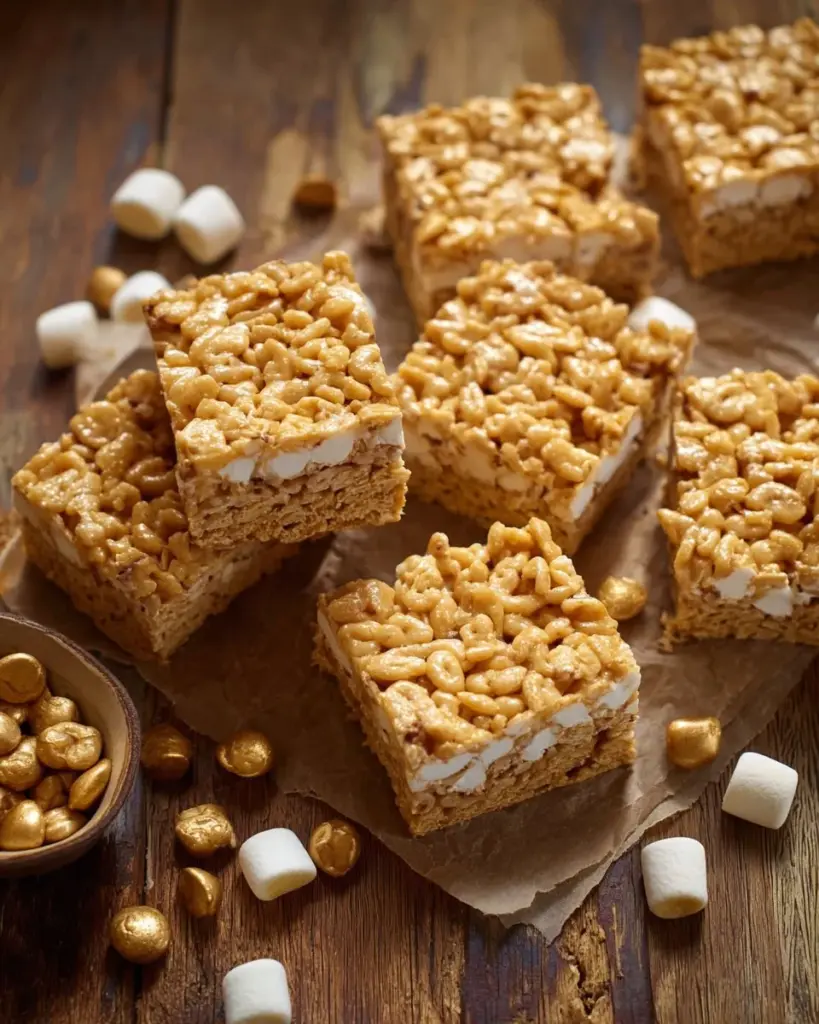
Step 6: Combine and Spread
- Once melted, remove the pot from heat and gently fold in 5 cups of crispy rice cereal.
- Spread the cereal mixture evenly over the marshmallow layer in your baking dish, ensuring all marshmallows are covered.
Step 7: Let Cool
- Allow the bars to cool completely (8-12 hours for optimal texture) before cutting. Patience is key here—trust me; the wait is worth it!
To serve, lift the bars out from the parchment paper, cut into squares, and enjoy!

Expert Tips & Tricks
Storage Recommendations: Once cut, store your Butterscotch Bars in an airtight container at room temperature for up to 1 week, or refrigerate for longer freshness.
Make-Ahead Instructions: You can easily make these bars a day ahead for gatherings, making them the perfect go-to dessert.
Troubleshooting Common Problems:
- Bars Too Sticky: If your bars come out too gooey, they may need longer to cool. Allow them to sit uncovered for several hours.
- Marshmallows Not Melting: Make sure your oven is appropriately preheated, and consider covering with foil to encourage melting.
Cutting Tips: For clean cuts, use a sharp knife and spray it with a bit of cooking spray beforehand.
Serving Suggestions: Serve these delightful bars with a scoop of vanilla ice cream or a drizzle of caramel sauce on top for an extra layer of indulgence.
Serving Suggestions
These Butterscotch Bars shine on their own, but pairing them with some delightful accompaniments can elevate your snack experience.
- Serve alongside a cup of freshly brewed coffee or sweetened tea for an afternoon treat.
- Presentation ideas: Dust the bars with powdered sugar for a touch of elegance or serve them in colorful cupcake liners for a festive look.
- Occasion recommendations: Perfect for birthday parties, potlucks, or just a cozy evening at home, these bars are a crowd-pleaser!
Variations & Substitutions
Feeling adventurous? Here are some fun ways to customize your Butterscotch Bars:
- Flavors: Add chocolate chips for added richness or sprinkle in some toasted nuts for a satisfying crunch.
- Dietary Restrictions: Use almond butter or sunflower seed butter as nut-free alternatives, and swap to dairy-free butterscotch chips for a vegan version.
- Seasonal: Try drizzling some pumpkin spice on top in the fall for a festive twist, or add a dash of peppermint extract around the holidays for a minty treat!
Nutrition & Storage Info
- Prep Time: 20 minutes
- Cook Time: 22 minutes
- Total Time: 42 minutes
- Yield: Approximately 24 bars
- Estimated Calories: 200 calories per serving
- Storage: Store at room temperature in an airtight container for up to 1 week. They’re also suitable for freezing—just wrap tightly and enjoy within 3 months.
FAQ Section
Can I substitute the peanut butter?
- Absolutely! Almond butter or sunflower seed butter can be used for nut allergies.
How can I make them gluten-free?
- Ensure that the crispy rice cereal is labeled gluten-free, and you’re good to go!
How do I know when my bars are done baking?
- The top should look slightly puffy and golden, but the center must still be soft.
Can I add nuts?
- Yes! Adding chopped pecans or walnuts would be a delectable addition—just sprinkle them in during the cereal mixing step.
Is there a way to make them less sweet?
- You can cut back on the sugar slightly, but be careful not to compromise the texture.
What can I use instead of corn syrup?
- Brown rice syrup or agave syrup may be a good substitute, though texture may vary slightly.
How long do they need to cool before cutting?
- For best results, allow them to cool for at least 8-12 hours.
Can I double the recipe?
- Yes! Just use a larger baking dish or bake in two separate dishes if needed.
What’s the best way to store leftovers?
- Keep them in an airtight container at room temperature or refrigerate for longer freshness.
Can I decorate them for a special occasion?
- Definitely! Try adding chocolate ganache on top or sprinkles for birthdays and celebrations.
Conclusion
These Butterscotch Bars are more than just a dessert; they are a delightful piece of my memories. They bridge the past with the present, creating delicious moments we share with family and friends. I encourage you to try making these bars, and I can’t wait to hear what you think!
If you love this recipe, don’t forget to check out my other beloved treats on the blog. Let’s make baking joyous together!
Happy baking!
Butterscotch Bars
Ingredients
Method
- Preheat your oven to 350 degrees F and line a 9×13-inch baking dish with parchment paper.
- In a medium bowl, mix creamy peanut butter, granulated sugar, and large egg until smooth and creamy, about 2 minutes.
- Spread the peanut butter mixture evenly in the lined baking dish and bake for 14-15 minutes.
- Sprinkle mini marshmallows over the baked peanut butter layer and return to the oven for an additional 7 minutes.
- In a large pot, melt butterscotch chips, unsalted butter, light corn syrup, and vanilla extract over medium heat, stirring until smooth—about 5 minutes.
- Gently fold in crispy rice cereal to the butterscotch mixture and spread it evenly over the marshmallow layer.
- Allow the bars to cool completely for 8-12 hours before cutting for optimal texture.