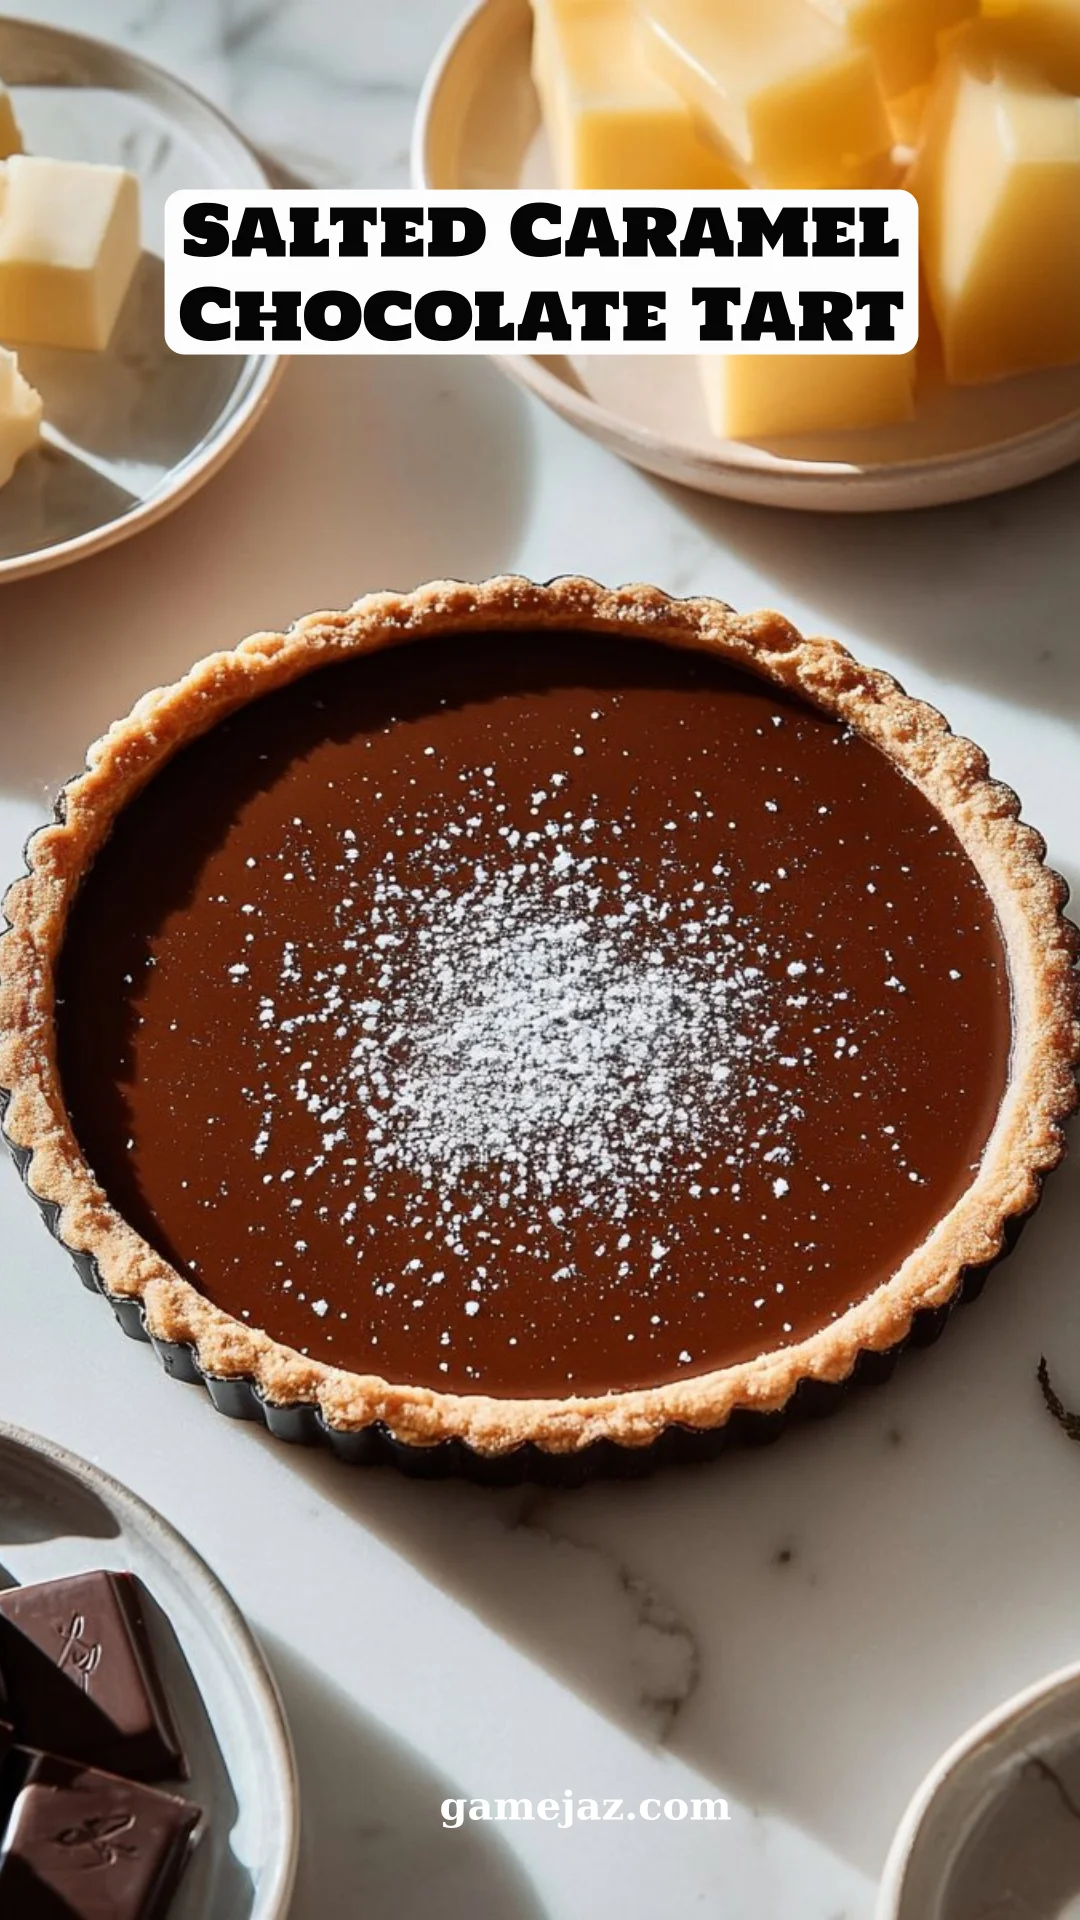
Luxurious Salted Caramel Chocolate Tart: The Decadent Delight You Must Try!
Do you remember that feeling when you walked into a bakery, and the rich aroma of chocolate mingled with the sweet scent of caramel enveloped you like a warm hug? That memory is etched in my mind and paved the way for the love affair I have with desserts, especially with my beloved Salted Caramel Chocolate Tart. The first time I made this recipe, I was chasing an elusive flavor that took me right back to that bakery, and boy, did I hit the jackpot!
What makes this tart truly special is its exquisite balance of flavors and textures—the smooth, luscious chocolate filling contrasted by a buttery, crumbly crust and the sweet, salted caramel that dances on your palate. Unlike other recipes that leave me wanting, this one is a symphony of indulgence, wrapped in memories of family gatherings where laughter mingled with the clinking of dessert forks.
As you dive into this recipe, expect to learn how to craft a tart that’s not just a treat but a warm embrace. Let’s embark on this culinary adventure together, and I promise by the end, you won’t just have a recipe—you’ll have a memory to cherish!
What Are Salted Caramel Chocolate Tarts?
The origins of the Salted Caramel Chocolate Tart may take you back to Europe, where the salted caramel trend took off. Initially hailed as a sophisticated twist to traditional caramel by infusing a pinch of sea salt, this dessert has established itself as a favorite among dessert enthusiasts and casual bakers alike.
Imagine slicing into a well-made tart, with a crisp, buttery crust giving way to a decadent layer of gooey salted caramel, followed by a rich chocolate ganache. Each bite offers a velvety smooth texture that contrasts intriguingly with the slight crunch of the crust and the delightful dance of sweet and salty flavors.
When to make them? Whether it’s a festive occasion, a dinner party, or just a cozy night in, this tart is perfect for sharing good times. It’s an invitation to create sweet memories with those you love the most!
Why You’ll Love This Recipe
Irresistible Flavor Combination: The blend of salted caramel and dark chocolate offers a harmonious contrast that’s hard to resist. Trust me; you’ll find yourself going back for seconds (or thirds!).
Superior to Store-Bought: While store-bought options may look appealing on the outside, they often lack the rich, homemade flavor you get with this tart. Plus, there’s a satisfaction in knowing exactly what’s in your dessert!
Cost-Effective: Making this Salted Caramel Chocolate Tart at home is not only cheaper than buying a high-end version from a bakery, but it also allows you to share it with loved ones without breaking the bank.
Customization Galore: Feel free to personalize it! You can swap out chocolates, add nuts, or even play with flavored salts for a unique twist.
You Can Do It!: Although it may seem daunting, this recipe is manageable for bakers of all skill levels. The time investment is worth every second, and you might surprise yourself with just how easily you can create something this decadent.
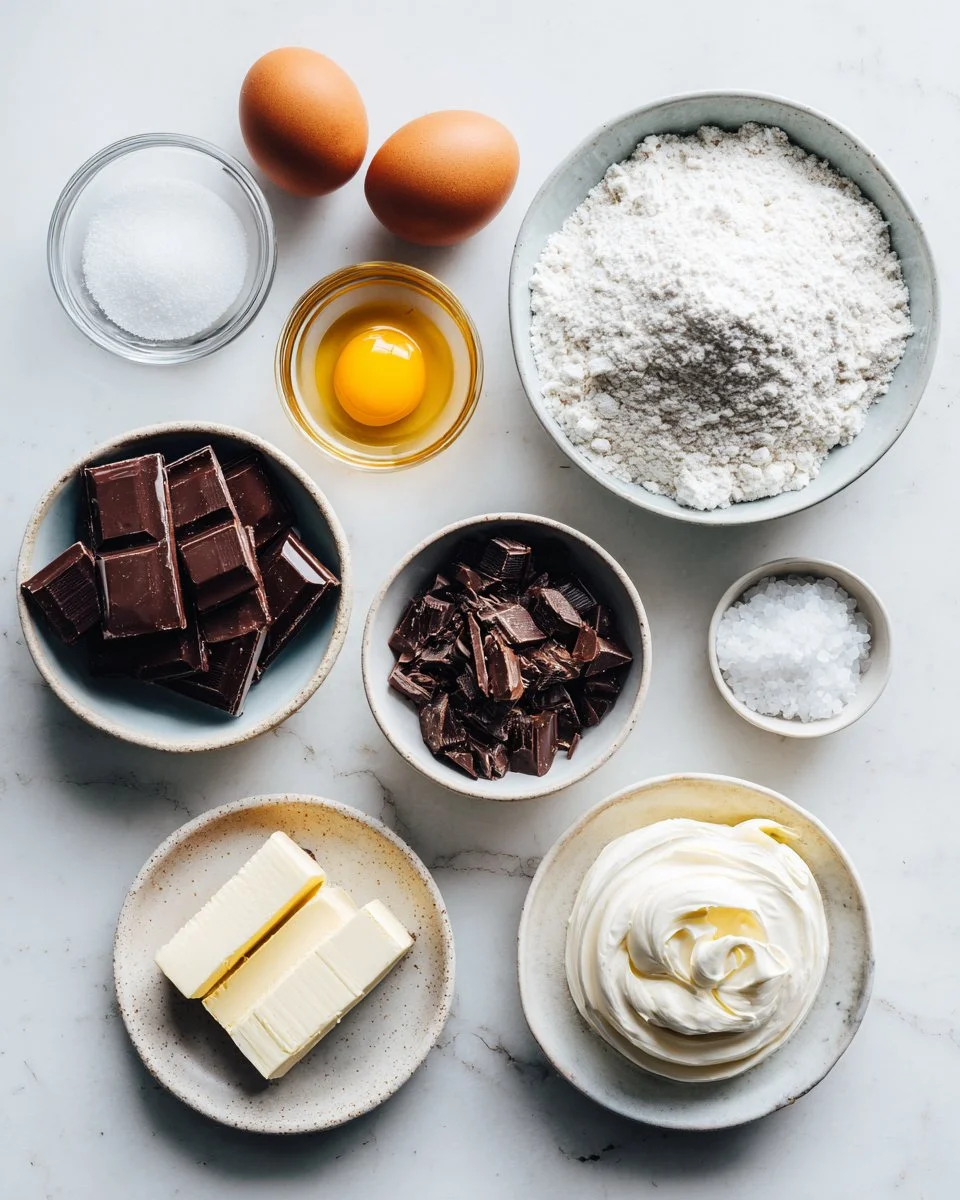
Ingredients Section
To create your sublime Salted Caramel Chocolate Tart, here’s what you’ll need:
Tart Crust:
- 1 1/2 cups all-purpose flour: For best results, always use unbleached all-purpose flour.
- 1/2 cup powdered sugar: Sifted is best to avoid lumps.
- 1/4 teaspoon salt: Enhances flavors without being overpowering.
- 3/4 cup unsalted butter: Cold and cut into small pieces; I recommend brands like Kerrygold for rich flavor.
- 1 large egg yolk: This enriches the dough.
- 1-2 tablespoons ice-cold water: Adjust as needed to bring the dough together.
Salted Caramel Layer:
- 1 cup granulated sugar: Keep an eye on it as it melts for the best caramel.
- 6 tablespoons unsalted butter: Use room temperature for smooth mixing.
- 1/2 cup heavy cream: Make sure it’s fresh for maximum creaminess.
- 1 teaspoon sea salt flakes: Don’t skimp; it’s the magic ingredient!
Chocolate Ganache:
- 7 ounces bittersweet chocolate, chopped: Go for a high-quality chocolate, such as Ghirardelli or Callebaut.
- 3/4 cup heavy cream, hot: Just below boiling; this makes the ganache silky.
- 2 tablespoons unsalted butter: Adds shine and richness to the ganache.
Prep Notes:
- Ensure your butter is cold when making the crust.
- Room temp for the butter in the ganache will make it easier to melt.
Step-by-Step Instructions
Preheat your oven to 375°F (190°C) and prepare a 9-inch tart pan with a removable bottom for easy release.
Make the Tart Crust:
- In a food processor, blend together the flour, powdered sugar, and salt until combined.
- Add the cold butter and pulse until the mixture resembles coarse crumbs, about 15 seconds.
- Add the egg yolk and 1 tablespoon of ice water. Pulse until the dough comes together, adding more ice water if needed, about 1-2 tablespoons more.
Shape the Crust:
- Press the dough into the tart pan evenly, ensuring the sides are nice and tall. Prick the bottom with a fork to prevent bubbling.
- Chill in the fridge for 30 minutes to firm up.
Bake the Crust:
- Bake the crust for 20-25 minutes or until golden brown. It should be firm to the touch but not overly dark. Let it cool.
Prepare the Salted Caramel:
- In a saucepan, heat the granulated sugar over medium heat. Stir occasionally until it melts and turns amber in color.
- Once melted, add the butter and stir until completely melted and combined.
- Slowly pour in the heavy cream while stirring constantly. The mixture will bubble vigorously, so mind your fingers! Boil for 1 minute, then remove from heat and stir in the sea salt flakes. Set aside to cool slightly.
Pour the Caramel into the cooled crust, spreading it evenly. Let it set for about 10 minutes.
Prepare the Chocolate Ganache:
- Place the chopped chocolate in a heatproof bowl.
- Heat the 3/4 cup of heavy cream until steaming but not boiling. Pour it over the chocolate and let it sit for 2 minutes.
- Stir the chocolate mixture until smooth and shiny, then add the butter and continue to stir until melted and incorporated.
Assemble the Tart:
- Pour the chocolate ganache over the caramel layer, spreading it out evenly. Chill the tart in the fridge for at least 2 hours to set.
Serve:
- Before serving, sprinkle additional sea salt flakes on top for a finishing touch. Slice generously and enjoy with ice cream or a glass of milk!
Chef’s Tips:
- Timing is Everything: Make sure each layer is completely cooled before adding the next.
- Texture Check: The ganache should be glossy—don’t rush the melting stage!
Expert Tips & Tricks
Use Quality Ingredients: The better your chocolate, butter, and vanilla, the better the end result.
Storage Recommendations: If you happen to have leftovers (a huge if!), store the tart covered in the fridge for up to 5 days.
Make-Ahead Instructions: The salted caramel can be made a day in advance and stored in the fridge. Just reheat gently to pour into the crust.
Troubleshooting Common Problems: If your caramel crystallizes, don’t fret! You can add a splash of water and reheat it over low heat to smooth it out.
Flavor Enhancements: A splash of espresso powder in the ganache can elevate the chocolate flavor without making it taste like coffee!
Notes on Storing:
- Let the tart cool completely before refrigerating; this prevents excess moisture from affecting the texture.
Serving Suggestions
This Salted Caramel Chocolate Tart is splendid on its own, but why not elevate your experience? Serve it with a scoop of velvety vanilla ice cream or a dollop of whipped cream. Pair it with a rich cup of coffee or dessert wine for those evenings when you want to indulge a little more. Presentation is key—dust with cocoa powder or finely grated chocolate shavings for that café-style look!
Variations & Substitutions
Flavor Combinations: Experiment with flavored chocolate, like orange or espresso-infused varieties.
Dietary Adaptations: You can make this gluten-free by substituting the flour with a gluten-free blend. For dairy-free options, use coconut cream in place of heavy cream and dairy-free chocolate.
Seasonal Variations: Incorporate spices like cinnamon or nutmeg during the fall, or add a touch of peppermint extract around the holidays for a festive flair!
Nutrition & Storage Info
- Prep Time: 30 mins | Cook Time: 1 hour | Total Time: 1 hour 30 mins (plus chilling)
- Yield: 10 servings
- Estimated Calories: Approximately 320 calories per slice
- Storage Instructions: Store at room temp for 2 days or refrigerated for up to a week. Freezing is not recommended, as it can affect the texture.
FAQ Section
Can I make the tart crust ahead of time?
Yes! You can prepare it and store it in the fridge for 1-2 days before baking.What if my caramel is too thick?
Simply reheat it gently with a little cream or water until it reaches your desired consistency.What’s the best way to cut the tart?
For clean slices, use a sharp knife dipped in hot water and wiped clean between cuts.Can I use milk chocolate instead?
Absolutely! Just adjust the salt to balance out the sweetness, as milk chocolate tends to be sweeter than bittersweet.How should I serve this tart?
It’s delightful on its own, but pairing it with ice cream or fresh berries elevates it to a whole new level!Is it necessary to use sea salt flakes?
While it’s not mandatory, sea salt flakes add a wonderful texture and pop of flavor that enhances the overall experience.Can I freeze the leftover tart?
It’s not recommended, as the texture may change. Best enjoyed fresh!Can I add nuts to this tart?
Yes! Chopped pecans or hazelnuts can add awesome crunch and flavor.What if I don’t have a tart pan?
You can use a pie dish, but keep an eye on the baking time as it may vary.Can I use dark chocolate instead of bittersweet?
Of course! Just ensure it’s not too bitter; adjust the sweetness in the caramel as needed.

Conclusion
This Salted Caramel Chocolate Tart isn’t merely a dessert; it’s an experience, a memory, and a delightful moment to share with loved ones. I can’t wait for you to try this recipe and witness how it brings joy to your table. If you give it a go, please drop a comment and let me know your experience!
And don’t forget to explore more related recipes on the blog for more divine treats. Happy baking, my friends! 🍰✨

Salted Caramel Chocolate Tart
Ingredients
Method
- Preheat your oven to 375°F (190°C) and prepare a 9-inch tart pan with a removable bottom for easy release.
- In a food processor, blend the flour, powdered sugar, and salt until combined.
- Add the cold butter and pulse until the mixture resembles coarse crumbs, about 15 seconds.
- Add the egg yolk and 1 tablespoon of ice water. Pulse until the dough comes together, adding more ice water if needed.
- Press the dough into the tart pan evenly, ensuring the sides are nice and tall. Prick the bottom with a fork to prevent bubbling.
- Chill in the fridge for 30 minutes to firm up.
- Bake the crust for 20-25 minutes or until golden brown. Let it cool.
- In a saucepan, heat the granulated sugar over medium heat. Stir occasionally until it melts and turns amber in color.
- Add the butter and stir until completely melted and combined.
- Slowly pour in the heavy cream while stirring constantly. Boil for 1 minute, then remove from heat and stir in the sea salt flakes. Set aside to cool slightly.
- Pour the caramel into the cooled crust, spreading it evenly. Let it set for about 10 minutes.
- Place the chopped chocolate in a heatproof bowl.
- Heat the heavy cream until steaming but not boiling. Pour it over the chocolate and let it sit for 2 minutes.
- Stir the chocolate mixture until smooth and shiny, then add the butter and continue to stir until melted and incorporated.
- Pour the chocolate ganache over the caramel layer, spreading it out evenly.
- Chill the tart in the fridge for at least 2 hours to set.
- Before serving, sprinkle additional sea salt flakes on top for a finishing touch. Slice generously and enjoy with ice cream or a glass of milk!