Irresistibly Creamy Roasted Garlic Asiago Cheese Ball: A Perfect Party Pleaser!
Ah, the joy of gathering around a table laden with delicious treats! I still remember the first time I whipped up a Roasted Garlic Asiago Cheese Ball for my family. It was a chilly Friday evening, and I had invited my closest friends over for a cozy get-together. With the aroma of roasted garlic wafting through the house, I realized I was creating not just a snack but a delightful memory.
This recipe isn’t just about the flavors—though trust me, the creamy, cheesy goodness and that irresistible hint of roasted garlic will have you swooning. No, this Roasted Garlic Asiago Cheese Ball also carries with it the warmth of connection and laughter shared over bites of deliciousness. It’s better than anything you could find at the store, starting with fresh ingredients like an entire head of roasted garlic, rich Asiago cheese, and paired perfectly with crunchy crackers or fresh veggie sticks.
I promise this recipe will become a staple for your gatherings, impressing friends and family alike. So, let’s dive in and elevate your next get-together with this easy yet gourmet delight!
What Are Roasted Garlic Asiago Cheese Balls?
Originating from the heart of Italian cuisine, cheese balls have become a beloved appetizer around the world, but the Roasted Garlic Asiago Cheese Ball holds a special place in my heart. The taste is a heavenly blend of creamy, nutty Asiago mingled with the sweet and savory notes of roasted garlic.
The unique combination of textures—ultra-creamy from the cream cheese and punctuated by the delightfully crunchy exterior—makes each bite a mini celebration. Whether it’s a holiday party, game day, or just a cozy evening in, these cheese balls are the perfect delights to keep your guests coming back for more. Plus, they’re versatile enough for any occasion—simply shape them differently, and you’ve got a whole new vibe to your gathering!
Why You’ll Love This Recipe
- Flavor Explosion: The combination of roasted garlic and Asiago cheese offers a depth of flavor that’s hard to beat. Unlike store-bought versions that might rely on fillers, this cheese ball is a pure celebration of quality ingredients.
- Cost-Effective Hosting: If you’ve ever looked at the price tag of artisanal cheese spreads or gourmet appetizers in the store, you’ll appreciate how you can replicate that upscale flavor at home without breaking the bank.
- Customizable: You can tweak this recipe to fit your tastes! Want to add heat? Toss in some crushed red pepper flakes. Prefer a brighter flavor? Mix in some shredded lemon zest or herbs. The choice is yours.
- Easy & Fun to Make: It may sound fancy, but making a Roasted Garlic Asiago Cheese Ball is simple and fun! Even if you’re a kitchen novice, you’ll find that this recipe is straightforward and rewarding.
- Make-Ahead Convenience: You can easily make this cheese ball a day in advance and store it in the fridge, allowing the flavors to marry even better. This way, when your guests arrive, you can focus on enjoying their company instead of fussing about in the kitchen.
Whether you’re entertaining guests or just want a delicious snack for yourself, this Roasted Garlic Asiago Cheese Ball will not disappoint!
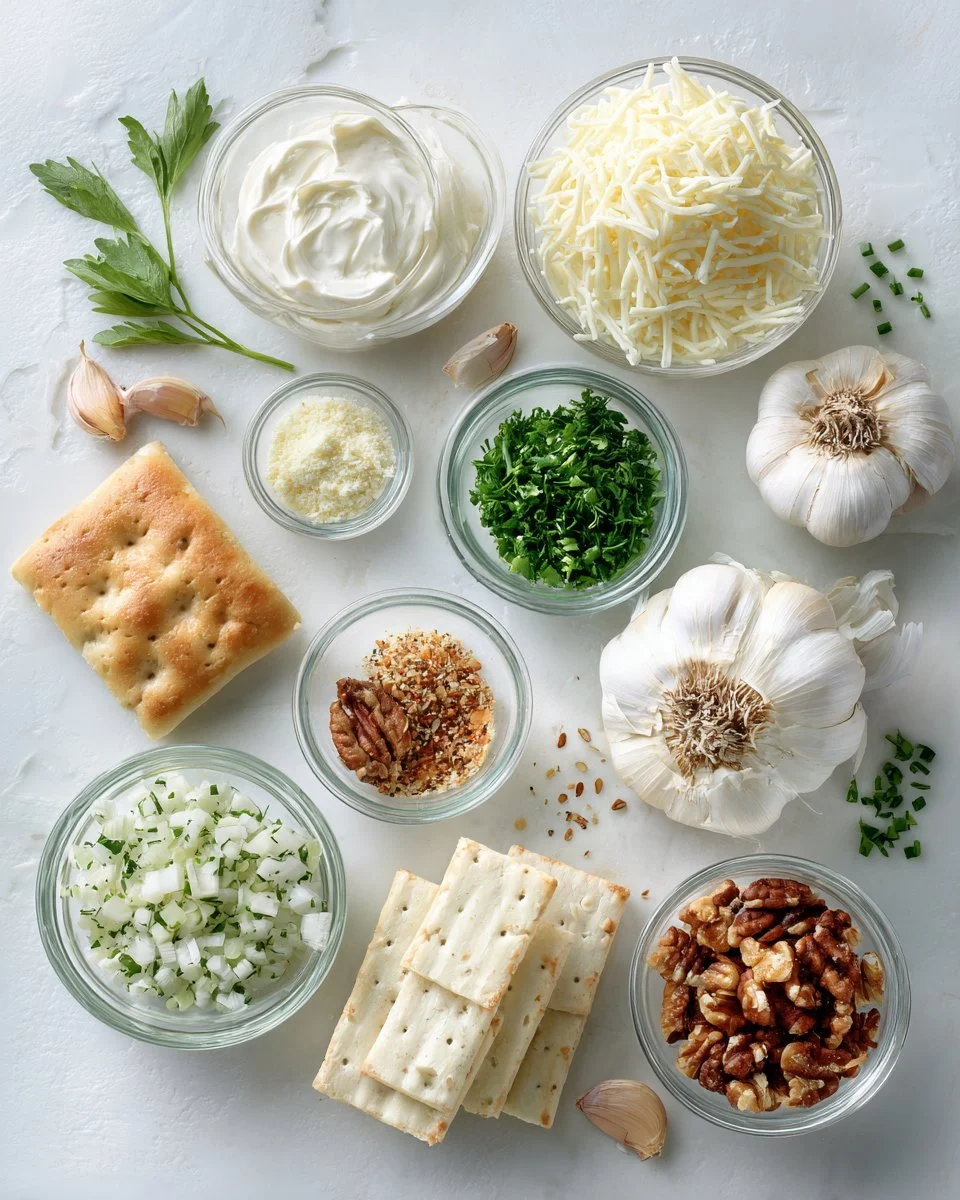
{image_template}
Ingredients Section
- 8 oz cream cheese, softened — Room temperature for easy mixing. I recommend using a full-fat variety for the best texture.
- 1 cup shredded Asiago cheese — Look for a freshly shredded or finely grated option for melting and mingling easily.
- 2 tbsp mayonnaise or sour cream — Both can give a lovely tang; choose your favorite!
- 1 head garlic (roasted) or 3 to 4 cloves roasted garlic from a jar — Fresh or from a jar is delicious, but I love roasting my own for the best flavor.
- 1 tsp lemon zest — Fresh zest elevates the entire dish with a burst of brightness.
- 1/2 tsp kosher salt — Adjust according to taste.
- 1/4 tsp black pepper — Freshly ground for the best flavor.
- 1 to 2 tbsp chopped fresh parsley and chives — Adds color and freshness; feel free to mix and match with herbs you love!
Optional Coating:
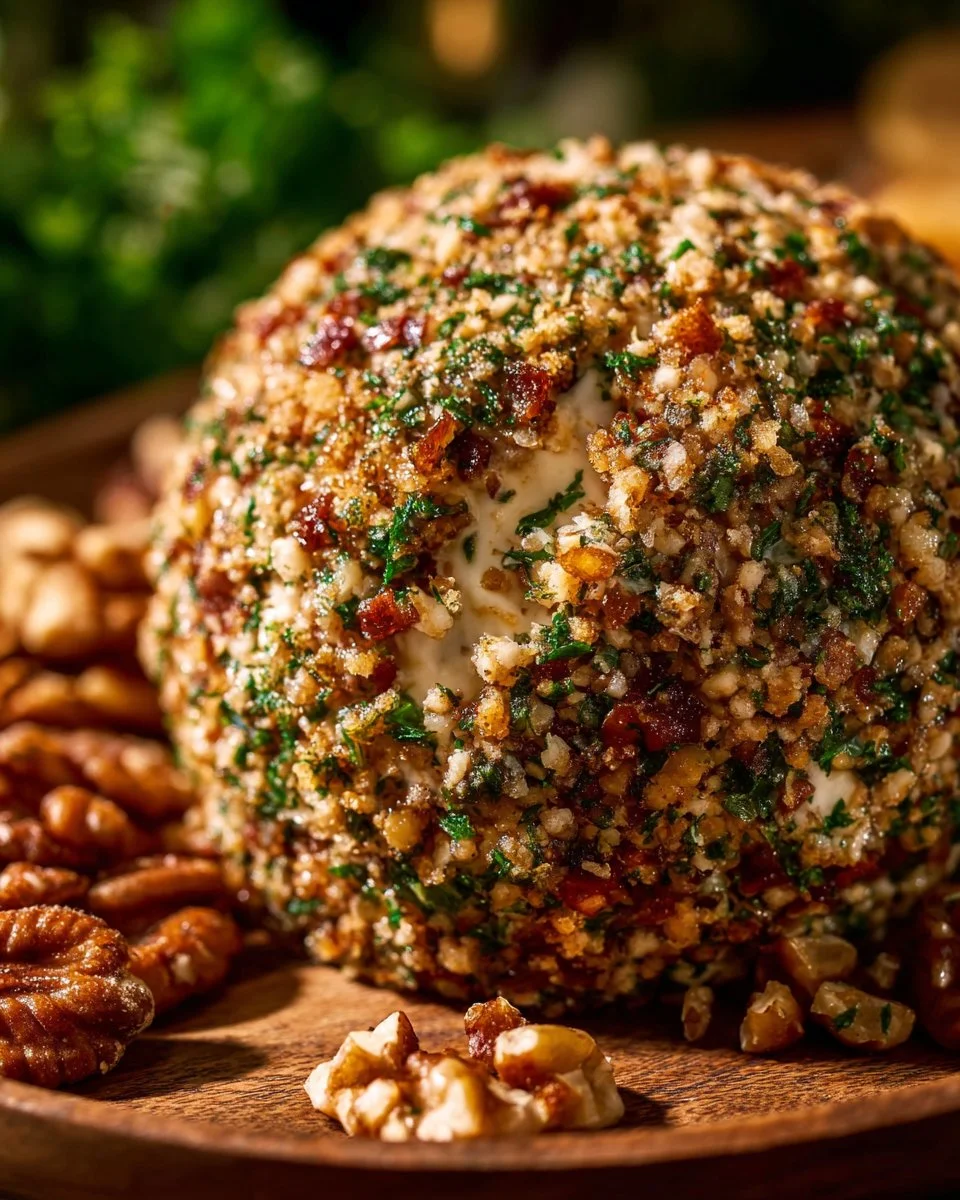
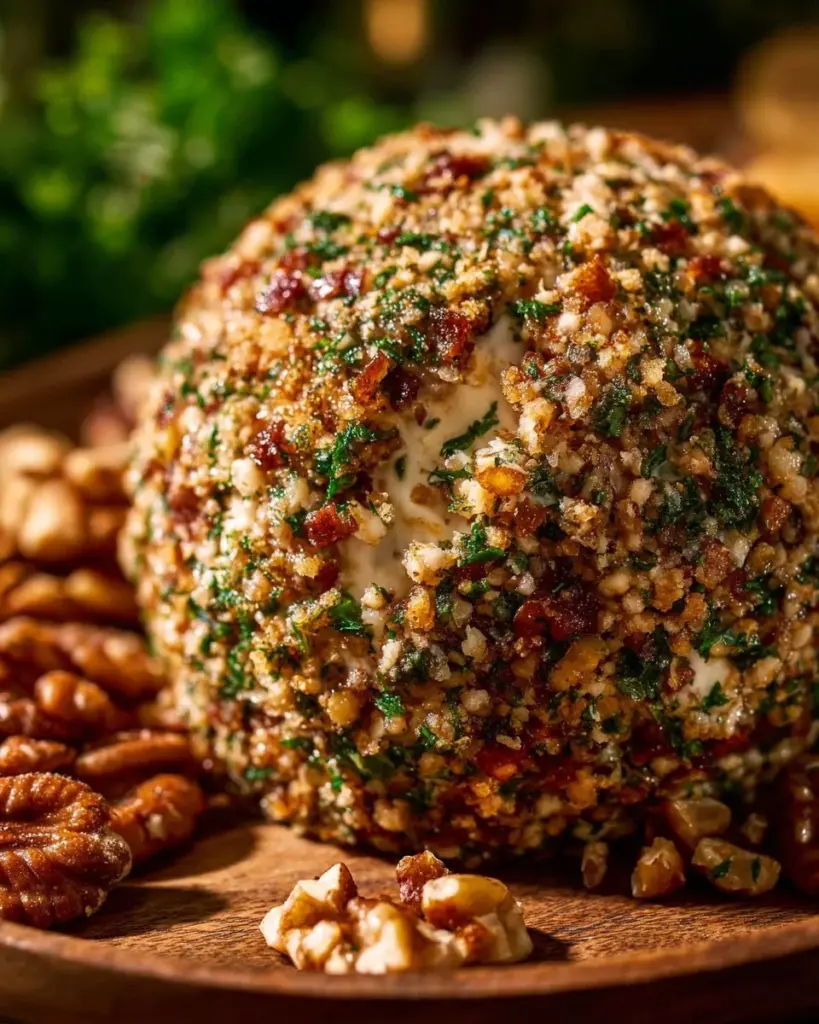
- 1/4 cup chopped toasted walnuts, pecans, or crispy bacon bits — For a crunchy, delicious coating.
- 1/4 cup extra shredded Asiago for coating — A cheesy and delicious option!
Serving Suggestions:
- 1 pkg crackers, sliced baguette, or vegetable sticks — Perfect accompaniments to scoop up that amazing cheese ball!
Feel free to experiment with high-quality ingredients; they make a noticeable difference! Aim for organic or locally sourced when you can.
Prep Tip: Make sure your cream cheese is at room temperature for easy mixing.
Step-by-Step Instructions
- Roast the Garlic: Preheat your oven to 400°F. Slice the top off the garlic head, drizzle it with a bit of olive oil, wrap it in foil, and roast for 30 to 35 minutes until it’s gloriously soft and golden.
- Mash the Garlic: After allowing the roasted garlic to cool slightly, squeeze the soft cloves out, and mash them into a paste. This process releases their sweet and caramelized flavors.
- Mix the Cheese: In a large mixing bowl, beat the softened cream cheese until it’s smooth and creamy. I usually use a hand mixer, but a sturdy spatula can work in a pinch.
- Incorporate Ingredients: Add in the mayonnaise or sour cream, shredded Asiago, mashed roasted garlic, lemon zest, salt, pepper, and your chopped herbs. Fold everything together until well combined.
- Chill the Mixture: Shape the cheese mixture into a ball or log and wrap it tightly in plastic wrap. Chill for at least 30 minutes (or up to overnight) to let the flavors meld.
- Prepare the Coating (if using): While waiting, chop your chosen nuts, bacon, or extra Asiago for coating.
- Coat the Cheese Ball: Once chilled, remove the cheese ball from the fridge. Roll it in your chosen coating—whether it’s nuts, bacon, or more cheese—to add a flavorful crunch.
- Serve: Allow the cheese ball to sit at room temperature for 10-15 minutes before serving. Pair it with your favorite crackers, crostini, or veggies, and enjoy!
Chef’s Tips:
- Avoid over-mixing; you want chunks of garlic and cheese to remain for that delightful texture.
- If your cheese ball is too soft, chill it longer; it should be easy to roll but firm enough to hold its shape.
- Want to avoid mess? Use gloves to shape your cheese ball!
Expert Tips & Tricks
- Use the Best Cheese: Quality cheese makes all the difference. Choose artisan Asiago for maximum flavor.
- Storage: If you have leftovers (but honestly, who has leftovers?), keep the cheese ball wrapped in plastic wrap in the fridge for up to 5 days.
- Make-Ahead: This cheese ball can be stored in the fridge for up to 2 days before serving. Perfect for prepping ahead!
- Troubleshooting: If your cheese ball is too salty, try to balance the flavors by mixing in more cream cheese or herbs to mellow it out.
- For a Creamier Texture: Add an extra tablespoon of mayo or sour cream for a softer finish, which pairs beautifully with crunchy crackers!
- Freezing: You can freeze the cheese ball before coating it. When ready to serve, thaw in the fridge overnight and coat with your toppings before serving.
Serving Suggestions
When it comes to enjoying your Roasted Garlic Asiago Cheese Ball, the options are endless! It pairs beautifully with an array of accompaniments such as:
- Crisp crackers or crostini for that perfect crunch.
- Fresh vegetable sticks like carrots or celery, adding a refreshing element.
- Don’t forget about selected wine pairings! A nice white wine or a light red brings out the flavors beautifully.
When it comes to presentation, feel free to garnish with extra herbs or even a drizzle of honey over the top for a fabulous touch. This cheese ball is perfect not just for casual gatherings but also for classy cocktails or game nights!
Variations & Substitutions
- Flavored Variations: Add sun-dried tomatoes, olives, or cranberries for a unique twist. Swap out the Asiago for mozzarella or sharp cheddar for flavor differences.
- Dietary Adaptations: For a vegan alternative, use cashew or tofu-based cream cheese and nutritional yeast in place of Asiago.
- Seasonal Flavors: In the fall, mix in pumpkin puree and spices, or for spring, replace the garlic with scallions and add a hint of dill for freshness.
Nutrition & Storage Info
- Prep time: 15 minutes
- Cook time: 35 minutes (for roasting garlic)
- Total time: 50 minutes
- Yield: Serves 6-8 people
- Estimated calories per serving: Approximately 150 calories (varies based on toppings and serving method).
Storage instructions: Keep the cheese ball in the fridge, wrapped tightly in plastic wrap. It will last up to 5 days. For longer storage, keep it in the freezer for up to a month and thaw in the fridge before serving.
FAQ Section
- Can I use different types of cheese? Yes! Feel free to substitute Asiago with your favorite cheese. Cheddar or cream cheese work well too!
- What if I don’t like garlic? If garlic isn’t your favorite, try using shallots or omit it entirely and replace it with herbs for freshness.
- Can I prepare this a day in advance? Absolutely! In fact, making this a day early allows for flavors to marry beautifully.
- Is this recipe gluten-free? Yes, as long as you use gluten-free crackers or serve with veggies.
- How do I manage leftovers? Keep any leftovers in an airtight container in the fridge for up to 5 days.
- What are some alternative coatings? You can roll it in herbs, sesame seeds, or even dust it with paprika for a smoky flavor.
- Can I freeze the cheese ball? Yes! Stop before rolling in the coating and freeze. Let it thaw in the fridge before preparing it to serve.
- How can I make it less salty? Offset the saltiness by adding more cream cheese or herbs to the mixture.
- Is there a vegan version of this? Yes! Substitute cream cheese with a vegan option, and use nuts or seeds for texture.
- What’s the best way to serve it? Serve it at room temperature with a variety of crackers, crostini, or veggie sticks for the best experience!
Conclusion
The Roasted Garlic Asiago Cheese Ball is more than just a dish; it’s an experience wrapped in layers of flavor, nostalgia, and connection. I encourage you to gather your loved ones, whip up this easy recipe, and create your own beautiful memories around the table!
I’d love to hear your feedback on this cheese ball. Did you try any variations? How did your friends and family react? Don’t forget to check out my other related recipes on the blog. Happy cooking!
Roasted Garlic Asiago Cheese Ball
Ingredients
Method
- Roast the Garlic: Preheat your oven to 400°F. Slice the top off the garlic head, drizzle with olive oil, wrap in foil, and roast for 30 to 35 minutes until soft and golden.
- Mash the Garlic: Allow roasted garlic to cool slightly, squeeze soft cloves out, and mash into a paste.
- Mix the Cheese: In a bowl, beat the softened cream cheese until smooth and creamy.
- Incorporate Ingredients: Add mayonnaise or sour cream, shredded Asiago, mashed roasted garlic, lemon zest, salt, pepper, and chopped herbs. Fold together until well combined.
- Chill the Mixture: Shape the mixture into a ball or log, wrap in plastic wrap, and chill for at least 30 minutes.
- Prepare the Coating: While waiting, chop chosen nuts, bacon, or extra Asiago.
- Coat the Cheese Ball: Roll chilled cheese ball in coating to add a flavorful crunch.
- Serve: Let sit at room temperature for 10-15 minutes before serving with crackers, crostini, or veggies.