As the leaves turn brilliant shades of orange and gold in the crisp autumn air, my kitchen becomes an inviting haven of warmth and spice. I remember the first time I made Pumpkin Scones—a chilly Sunday morning when the smell of freshly baked goods seemed to wrap around my family like a cozy blanket. My daughter, with her wide, eager eyes, could hardly wait for them to cool, and when she finally tasted one, her joyful squeal declared it—these pumpkin scones weren’t just tasty; they were magical.
What sets my Pumpkin Scones apart from the countless recipes out there? It’s all in the details. These scones embrace the flavors of autumn with the perfect balance of sweetness and spice, while their fluffy, tender texture will make you swoon. Unlike the dry, brick-like scones often found in cafes, my recipe ensures each bite is a delightful celebration of pumpkin goodness, complemented by a luscious glaze that feels like a warm hug.
In this recipe, you’ll learn how to whip up these scrumptious Pumpkin Scones effortlessly, bringing a little bit of that cozy magic into your own home. Let’s bring the heart of autumn into your kitchen!
What Are Pumpkin Scones?
Pumpkin scones are a delightful treat often associated with fall, best enjoyed alongside a steaming cup of tea or coffee. Originating in the British Isles, scones are typically crispy on the outside and soft on the inside. Imagine biting into a warm scone that crumbles slightly, giving way to a moist interior infused with rich pumpkin flavor and fragrant spices like cinnamon and nutmeg.
The unique twist here comes from the pumpkin purée, which adds not only a beautiful orange hue but also moisture, creating a tender scone unlike any other. They’re perfect for cozy mornings or festive gatherings. Bake them as a comforting family breakfast, or serve them at a holiday brunch to impress your guests. The versatility of pumpkin scones makes them a must-have treat for any occasion!
Why You’ll Love This Recipe
Unparalleled Flavor: Unlike store-bought or café versions that can taste overly sweet or artificial, these pumpkin scones capture the authentic flavor of fall with real pumpkin and spices.
Cost-Effective: With just simple pantry ingredients, you can create a batch that rivals any gourmet bakery’s offering—at a fraction of the cost!
Customizable: Want to spice things up? Feel free to add chocolate chips, dried cranberries, or nuts for an extra crunch. You can easily tailor these scones to your taste.
Beginner-Friendly: Don’t worry if you’ve never baked scones before! This recipe is straightforward and requires minimal baking skills—perfect for both novice and seasoned bakers.
Quick to Make: In just about 30 minutes, you can have a tray of freshly baked pumpkin scones ready to enjoy, making it a fantastic option for unexpected guests or lazy Sunday mornings.
Ingredients
Before we dive into the baking magic, let’s gather our ingredients. Here’s what you’ll need to make these irresistible Pumpkin Scones:

1/2 cup unsalted cold butter: For the flakiest scones, use high-quality butter and make sure it’s cold. Cold butter helps create those flaky layers we love in a scone.
2 1/2 cups all-purpose flour: All-purpose flour provides structure. For a gluten-free option, you may try a 1:1 gluten-free baking flour blend.
1/2 cup granulated sugar: Feel free to substitute with coconut sugar for a healthier option or reduce the sugar for a less sweet scone.
1 tablespoon baking powder: This ingredient is essential for leavening and gives the scones their airy texture.
2 teaspoons pumpkin pie spice: A must-have for that signature fall flavor. You can also make your own blend with cinnamon, nutmeg, ginger, and allspice.
1/2 teaspoon kosher salt: It enhances the overall flavor of your scones.
1/2 cup pure pumpkin: Ensure you’re using pure pumpkin, not pumpkin pie filling which is overly sweetened.
2 large eggs: Eggs provide richness and help bind the ingredients together.
1/4 cup heavy whipping cream: This adds moisture and richness to the dough.
2 teaspoons vanilla extract: For that extra layer of flavor.
2 tablespoons heavy whipping cream (for topping): Brush these on before baking for a golden finish.
1 cup confectioners’ sugar (for glaze): This makes our icing sweet and delightful.
1 teaspoon pumpkin pie spice (for glaze): Because why stop at the scone?
1-2 tablespoons whole milk (for glaze): Adjust to achieve your desired glaze consistency.
Now, let’s get to the fun part—baking these delicious scones!
Step-by-Step Instructions
Preheat the Oven: Begin by preheating your oven to 425°F (220°C). This high temperature ensures a perfectly baked, fluffy scone.
Prepare Your Butter: Grate the cold butter onto parchment paper and place it in the freezer for about 10 minutes. Cold butter is key for a flaky texture, so don’t skip this step!
Mix Dry Ingredients: In a large mixing bowl, whisk together the flour, granulated sugar, baking powder, pumpkin pie spice, and kosher salt until well combined.
Incorporate Butter: Remove the grated butter from the freezer. Using your fingers, mix it into the dry ingredients until the mixture resembles coarse crumbs. A few larger pieces of butter are okay!
Combine Wet Ingredients: In a small bowl, whisk together the pumpkin, eggs, heavy whipping cream, and vanilla extract until well blended.
Bring it All Together: Pour the wet mixture into the dry mixture and gently stir until just combined. Avoid overmixing to keep your scones tender.
Knead the Dough: Turn the dough onto a lightly floured surface and knead it gently just until it comes together. You should still see bits of cold butter for that flaky texture.
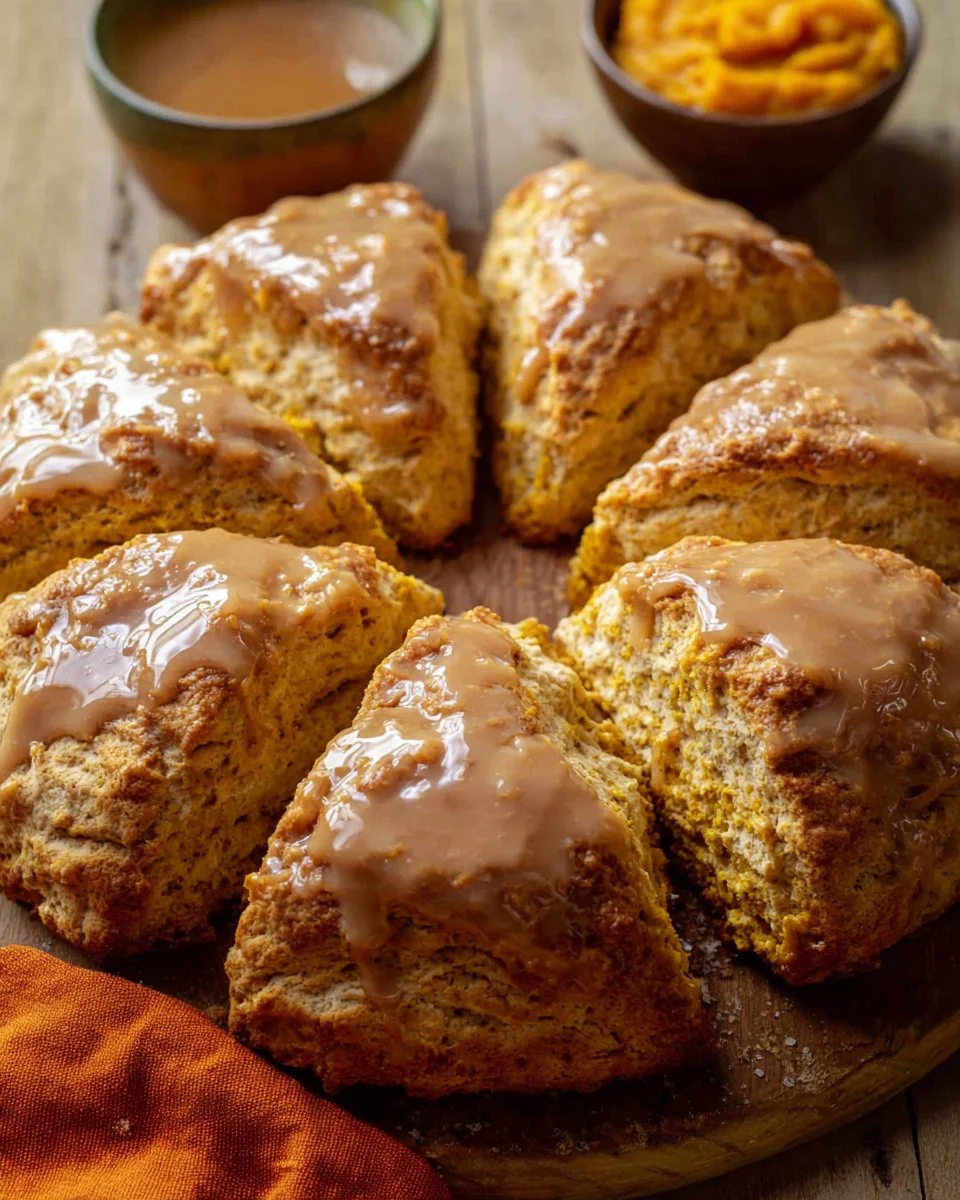
Shape the Scones: Pat the dough into a circle about 3/4 inch thick. Cut into 6-8 wedges and transfer them to a lined baking sheet, spacing them apart slightly.
Brush and Bake: Brush the tops with heavy cream for a beautiful golden crust. Bake in the preheated oven for about 18-23 minutes, or until they are golden brown and a toothpick comes out clean.
Make the Glaze: While your scones are cooling, whisk together the confectioners’ sugar, pumpkin pie spice, and 1-2 tablespoons of milk until you reach your desired consistency.
Glaze and Enjoy: Once the scones are cooled, drizzle or dip the tops into your glorious glaze. Let them set for a moment before serving (if you can wait!).

Expert Tips & Tricks
To ensure your pumpkin scones are the star of your kitchen, here are a few professional tips:
Chill Your Ingredients: Keeping your butter and cream cold contributes to that tender, flaky texture.
Don’t Overmix: The more you work the dough, the tougher your scones will be. Mix until just combined!
Storage: If you have leftovers (which is rare), store them in an airtight container at room temperature for up to 2 days or in the fridge for up to a week. You can freeze them for up to 3 months—just thaw and warm in the oven when ready to enjoy!
Make-Ahead Option: You can prepare the dough a day in advance. Wrap it tightly in plastic wrap and store it in the fridge, then shape and bake the next morning.
Common Mistakes: Always check your baking powder’s expiration date—old leaveners won’t give you the fluffy scone you desire.
Customization: Experiment with adding different spices, or replace half the flour with whole wheat flour for a heartier scone.
Serving Suggestions
Pumpkin scones are delightful on their own, but a few additions can elevate your experience! Serve them with:
A Warm Beverage: Pair with a spiced latte, apple cider, or a simple cup of black tea.
Extra Toppings: Serve with a dollop of clotted cream or butter, or a side of cranberry compote for a tart contrast.
Charming Presentation: Arrange them on a rustic wooden board, dust with powdered sugar, and place a few fresh pumpkin sprigs for a cozy, autumn display.
These scones are perfect for brunch gatherings or a festive holiday table!
Variations & Substitutions
If you’re looking to mix things up, consider these variations:
Chocolate Chip Pumpkin Scones: Stir in semi-sweet chocolate chips for a decadent twist.
Maple Pecan Scones: Incorporate chopped pecans and a splash of maple syrup instead of regular sugar for a warmed sweetness.
Gluten-Free Options: Substitute the all-purpose flour with a gluten-free blend, ensuring the baking powder and other components are also gluten-free.
Dairy-Free Modifications: Use coconut oil instead of butter and almond milk instead of heavy cream for a dairy-free twist.
Nutrition & Storage Info
- Prep Time: 10 minutes
- Cook Time: 18-23 minutes
- Total Time: 30-35 minutes
- Yield: 6-8 scones (depending on size)
- Estimated Calories: Approximately 250 calories per scone
- Storage Instructions: Room temperature for up to 2 days, refrigerated for up to a week, or freeze for up to 3 months.
FAQ Section
Can I use canned pumpkin instead of fresh?
Absolutely! Canned pure pumpkin is perfect for this recipe. Just be sure to avoid pumpkin pie filling as it has added sugars and spices.What’s the best way to reheat frozen scones?
Thaw in the fridge overnight, and warm them in a 350°F oven for about 10 minutes for a fresh-baked feel.How can I make these scones more pumpkin-y?
Increase the pumpkin to 3/4 cup while reducing the cream slightly, or add pumpkin pie spice to the glaze for more flavor.Can I add different spices?
Yes! Nutmeg, ginger, or even a dash of cardamom can enhance the flavor profile.What if my dough is too sticky?
Add a little extra flour, a tablespoon at a time, until it becomes manageable but don’t overmix!Why are my scones dense?
Overmixing or using warm butter can lead to denser scones. Stick to the instructions for best results.How can I make these scones vegan?
Substitute butter with vegan margarine, use flax eggs instead of regular eggs, and replace cream with a plant-based alternative.Do I need to flour my work surface?
Yes, lightly flour the surface where you knead and cut your dough to prevent sticking.Can these scones be made in advance?
Yes! Prepare the dough and store it tightly wrapped in the fridge for up to 24 hours. Just shape and bake when ready.What’s the secret to flaky scones?
Using cold butter and minimal mixing are key—keep that dough as light and airy as possible.
Conclusion
In conclusion, these pumpkin scones are not just a treat; they are a promise of comfort, family, and the warmth of the season. Easy to make and absolutely delightful, I encourage you to give them a try—you won’t regret it! Whether it’s for a cozy breakfast or an afternoon tea, these scones will surely find their way into your heart and home. I’d love to hear what you think, so drop a comment or share your experience! And if you’re feeling adventurous, check out some of my other seasonal recipes on the blog.
Bang Bang Salmon: 7 Irresistible Tips for Flavor Bliss
Happy baking!

Pumpkin Scones
Ingredients
Method
- Preheat your oven to 425°F (220°C).
- Grate the cold butter onto parchment paper and place it in the freezer for about 10 minutes.
- In a large mixing bowl, whisk together flour, granulated sugar, baking powder, pumpkin pie spice, and kosher salt.
- Remove the grated butter from the freezer. Mix it into the dry ingredients until it resembles coarse crumbs.
- In a small bowl, whisk together the pumpkin, eggs, heavy whipping cream, and vanilla extract.
- Pour the wet mixture into the dry ingredients and gently stir until just combined.
- Turn the dough onto a lightly floured surface and knead it gently until it comes together.
- Pat the dough into a circle about 3/4 inch thick and cut into 6-8 wedges.
- Transfer the wedges to a lined baking sheet.
- Brush the tops with heavy cream.
- Bake in the preheated oven for about 18-23 minutes or until golden brown.
- While the scones cool, whisk together the confectioners’ sugar, pumpkin pie spice, and milk until desired consistency.
- Once scones are cooled, drizzle or dip the tops into the glaze.