Imagine coming home from school, the faint smell of peanut butter wafting through the air, beckoning you into the kitchen. As a child, that was my favorite spell—knowing my mom was whipping up a batch of Peanut Butter Balls with Rice Krispies. The combination of creamy peanut butter, crunchy Rice Krispies, and the luscious chocolate coating brought pure joy to my afternoons. These little nuggets of happiness are not just treats; they are love wrapped in sweetness, memories of laughter filling the kitchen, and the perfect blend of textures that dance on your palate.
What makes my recipe for Peanut Butter Balls with Rice Krispies better than the rest? It’s simple! I use only the finest ingredients and techniques that elevate the flavor while keeping it easy for you to recreate at home. Whether it’s for a party or a cozy night in, you’ll find these delightful morsels perfect for any occasion.
In this post, I’ll walk you through the entire process from start to finish, so you can impress your family and friends with these indulgent bites of nostalgia. Ready to make some memories? Let’s dive into how to craft these scrumptious bites of joy!
What Are Peanut Butter Balls with Rice Krispies?
Peanut Butter Balls with Rice Krispies are an irresistible no-bake treat that combines the rich creaminess of peanut butter with the satisfying crunch of Rice Krispies. Originating as a simple homemade snack, they quickly became a staple at family gatherings and potlucks, loved by both kids and adults alike.
The taste is a delightful experience—a smooth layer of sweet, nutty peanut butter, perfectly balanced by the crunch of cereal, all enveloped in a silky chocolate coating. The combination is pure bliss, making these peanut butter balls a favorite among snack enthusiasts.
These treats shine in their versatility—they’re perfect for any occasion! Whip them up for birthdays, holiday gatherings, or just as a sweet treat to enjoy at home. No baking required means you can enjoy these delightful bites whenever the craving hits!
Why You’ll Love This Recipe
Quick and Easy: With only a few simple steps, you can whip these up in no time. No baking means you can have a delicious treat ready and chilling in the fridge in under an hour!
Kid-Friendly Fun: This is the perfect recipe to get the kids involved in the kitchen. They’ll enjoy scooping and rolling the peanut butter mixture into balls, making it a family affair.
Cost-Effective: Why shell out for store-bought snacks when you can create these decadent bites at home for a fraction of the cost? With common pantry staples, these Peanut Butter Balls with Rice Krispies are a budget-friendly treat!
Customizable Delight: Feel free to mix things up! Add ingredients like crushed pretzels for extra crunch or sprinkle in some mini marshmallows for a twist. The possibilities are endless!
Long-Lasting Satisfaction: Once prepared, these little treats can be stored in the fridge for up to two weeks, making them a fantastic option for meal prep or late-night snacking.
Let’s get started on crafting these delightful bite-sized treasures!

Ingredients
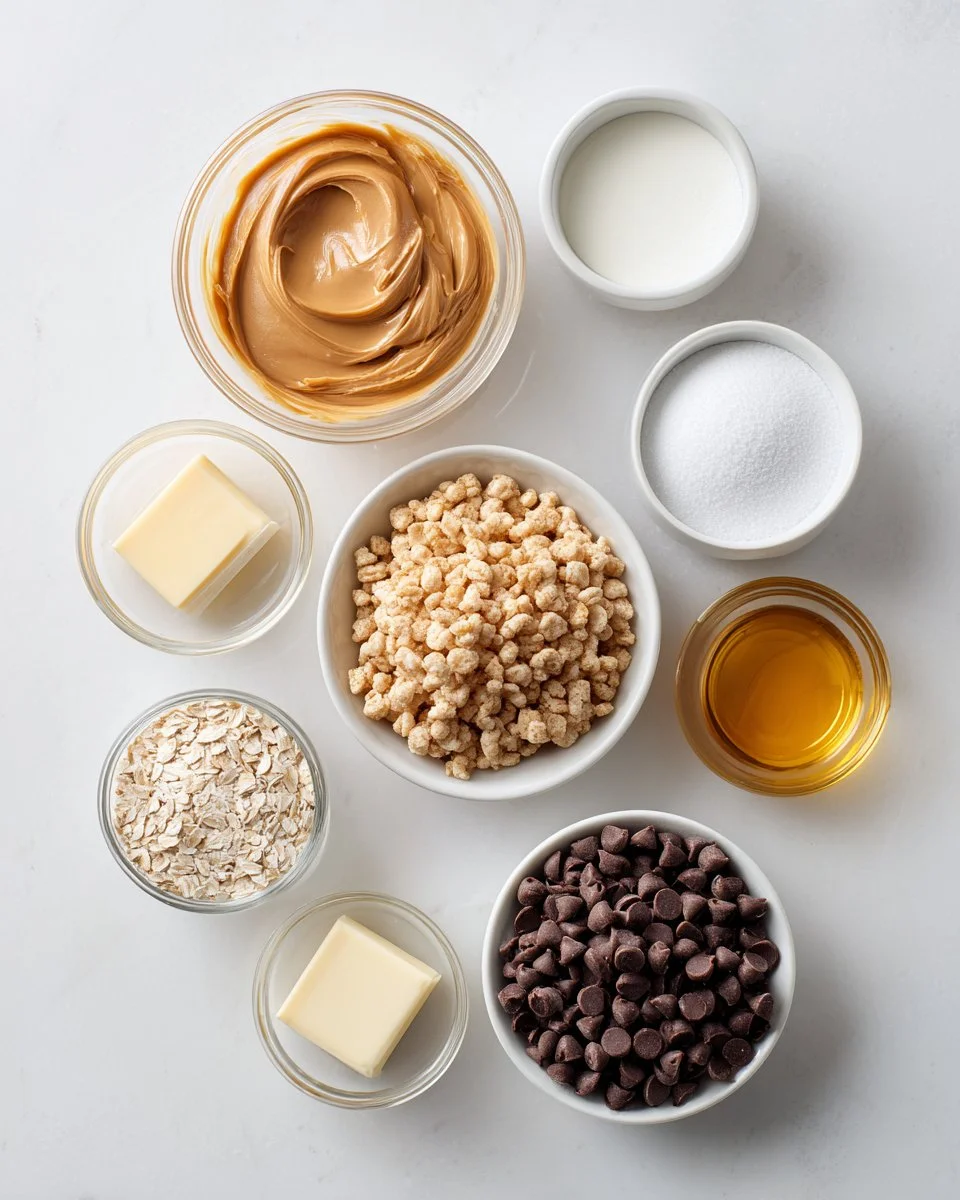
- 1 cup creamy peanut butter (I prefer using brands like Jif or Skippy for their rich flavor)
- 1 cup confectioners’ sugar (for a smooth sweetness)
- 2 tablespoons unsalted butter, melted (room temperature helps combine better)
- 1 ½ cups Rice Krispies cereal (don’t forget the crunchy goodness!)
- 2 cups semi-sweet chocolate chips (I recommend Ghirardelli or Nestle for a rich taste)
- 2 teaspoons vegetable oil (this helps achieve a smooth chocolate coating)
Notes:
- Make sure your butter is at room temperature to ensure the mixture blends easily.
- You can substitute crunchy peanut butter for an extra texture if desired.
Step-by-Step Instructions
Prep the Baking Sheet: Start by lining a baking sheet with parchment paper. This will make it easy to remove the peanut butter balls later.
Combine the Mix: In a medium mixing bowl, combine the peanut butter, confectioners’ sugar, melted butter, and Rice Krispies. Stir until everything is well blended and holds together nicely. It should be thick enough to roll but not crumbly.
Chef’s Tip: Use a rubber spatula for easier mixing, ensuring all ingredients are combined without over-mixing.
Roll the Balls: Using a 1-tablespoon scoop, portion out the mixture and roll it into smooth balls. Place them on the prepared baking sheet.
Chill: Transfer the baking sheet to the refrigerator and chill for at least 1 hour, or until the balls are firm.
Prepare the Chocolate Coating: In a microwave-safe bowl, combine the chocolate chips and vegetable oil. Microwave in 20-second intervals, stirring after each, until melted and smooth.
Visual Cue: The chocolate should be glossy and pourable without any chunks.
Coat the Peanut Butter Balls: Dip each chilled peanut butter ball into the melted chocolate, ensuring they are fully covered. For easy handling, use a fork to lift them out and let any excess chocolate drip off. Place the coated balls back onto the parchment-lined sheet.
Set and Store: Refrigerate until the chocolate is set, about 30 minutes. Once set, transfer to an airtight container.
Chef’s Tip: They can be stored in the fridge for up to 2 weeks—if they last that long!

Expert Tips & Tricks
- Quality Matters: Always use high-quality chocolate and peanut butter for the best flavor.
- Make-Ahead Magic: You can prepare the peanut butter balls a day in advance; the flavor only gets better!
- Storage Recommendations: Keep these treats in an airtight container in the fridge. If you’re looking for longer storage, consider freezing them for up to 3 months.
- Troubleshooting: If your chocolate is setting too quickly, try adding a bit more oil to thin it out.
Serving Suggestions
These Peanut Butter Balls with Rice Krispies are perfect for various occasions! Serve them on a beautiful platter at your next family gathering, alongside a glass of cold milk for a nostalgic snack. For a festive touch, package them in cellophane bags as delightful homemade gifts during the holiday season.
Variations & Substitutions
Feel free to get creative with your Peanut Butter Balls! Here are a few ideas:
- Flavor Twists: Substitute almond or cashew butter for a nutty twist. Add cocoa powder for a chocolatey variation.
- Dietary Adaptations: Use powdered erythritol or other sugar substitutes to make it low-carb. Swap the chocolate chips for dairy-free options for a vegan-friendly treat.
- Seasonal Variations: Add crushed peppermint candies around Christmas or sprinkle pumpkin spice during the fall for a seasonal touch.
Nutrition & Storage Info
- Prep Time: 15 minutes
- Chill Time: 1 hour
- Total Time: 1 hour 15 minutes
- Yield: Approximately 24 balls
- Calories: Roughly 100 calories per serving, depending on ingredients used.
- Storage: Store in the fridge for up to 2 weeks or freeze for up to 3 months.
FAQ Section
Can I use crunchy peanut butter instead of creamy?
Yes! Crunchy peanut butter will add extra texture and flavor to your peanut butter balls.
What if my chocolate doesn’t melt properly?
If the chocolate isn’t melting smoothly, try adding a bit more vegetable oil or microwaving in shorter intervals.
Can I substitute the Rice Krispies with another type of cereal?
Absolutely! Try using Chex cereal, or even granola, for a different flavor and texture.
How do I know when the balls are set?
The chocolate coating should be firm to the touch. If it’s sticky, give them more time to chill.
Are these gluten-free?
Yes, if you use gluten-free Rice Krispies and ensure all other ingredients are gluten-free.
Can I add extras to the peanut butter mixture?
Yes! Feel free to add mini chocolate chips, coconut flakes, or dried fruit for added flavor.
How long can I store them?
They last for up to 2 weeks in the fridge and up to 3 months in the freezer.
What’s the best way to freeze them?
Place them in a single layer on a baking sheet, freeze until solid, then transfer to an airtight container.
Can I use dark chocolate instead of semi-sweet?
Yes, dark chocolate will add a richer flavor to your peanut butter balls.
What should I serve with these balls?
They pair wonderfully with a glass of milk, hot tea, or coffee for an afternoon pick-me-up!
Conclusion
You can’t go wrong with these Peanut Butter Balls with Rice Krispies—they bring families together and are filled with joy and love. I encourage you to try this recipe, share your experiences, and let me know how your batch turns out. If you love these treats as much as I do, be sure to check out related recipes on my blog for even more delicious ideas.
Happy baking!

Peanut Butter Balls with Rice Krispies
Ingredients
Method
- Line a baking sheet with parchment paper.
- In a medium bowl, combine peanut butter, confectioners’ sugar, melted butter, and Rice Krispies. Stir until well blended and thick enough to roll.
- Using a tablespoon scoop, portion out the mixture and roll into smooth balls. Place on the prepared baking sheet.
- Chill in the refrigerator for at least 1 hour, until firm.
- For the chocolate coating, in a microwave-safe bowl, combine chocolate chips and vegetable oil. Microwave in 20-second intervals, stirring until melted and smooth.
- Dip each chilled ball into the melted chocolate. Use a fork to lift them out and let excess chocolate drip off. Place back on the parchment-lined sheet.
- Refrigerate until the chocolate is set, about 30 minutes.