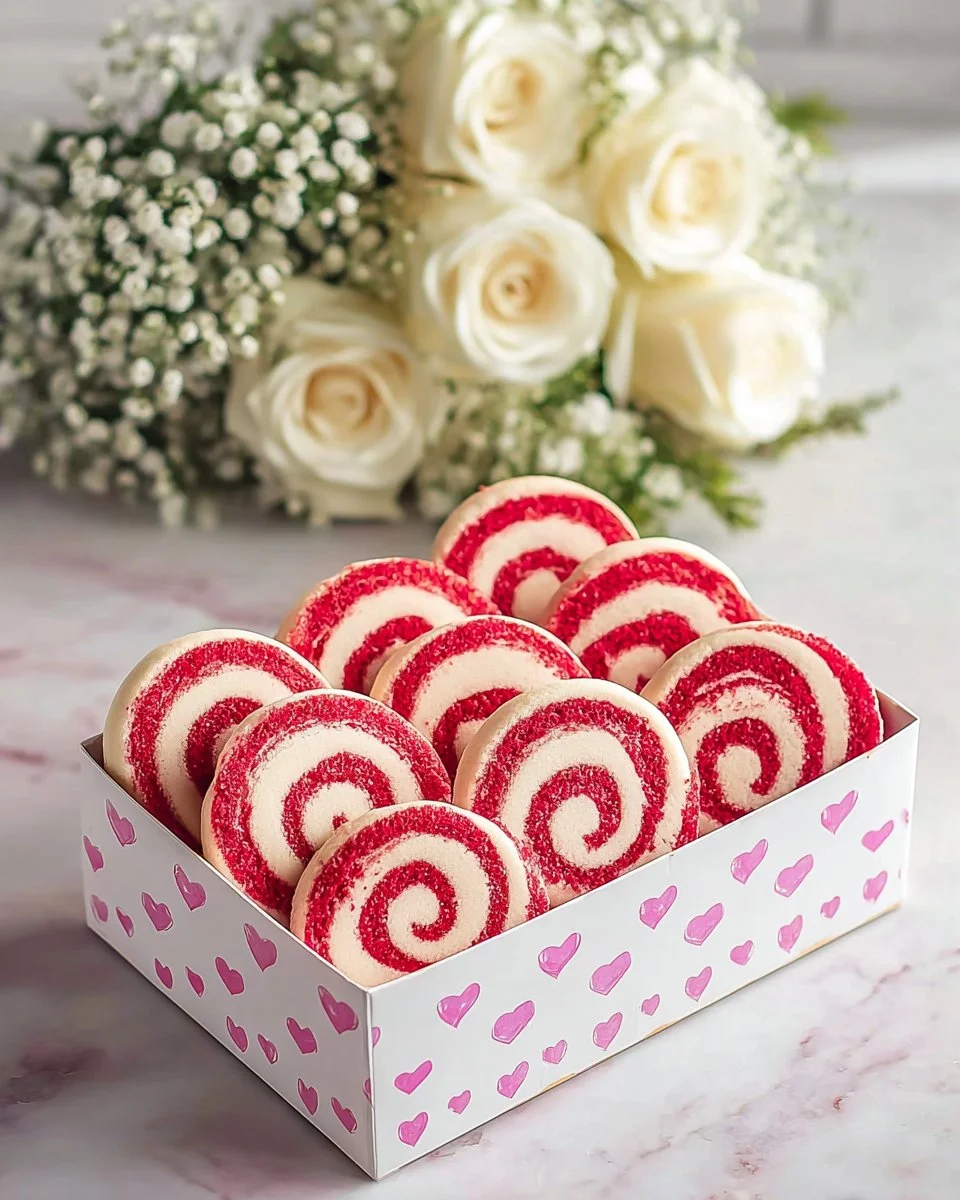
Irresistibly Festive Valentine’s Day Pinwheel Cookies: A Sweet Gesture of Love
Valentine’s Day has always held a special place in my heart, not just for the romance but for the sweet childhood memories filled with laughter and delicious treats. I remember binding little notes to a box of cookies, hoping my crush would share a smile over a homemade delight. That’s when I discovered the magic of these Festive Valentine’s Day Pinwheel Cookies—colorful, cheerful, and oh-so-delicious!
What makes these cookies so unique is the delightful combination of buttery sweetness and vibrant colors that swirl together in perfect harmony. Unlike other recipes that can be overly sweet or complicated, this one strikes the right balance and offers a fun baking experience. Whether you’re making them for a loved one, a friend, or simply to indulge yourself, these cookies bring warmth and happiness to every occasion.
In this recipe, I’ll share not just how to create these stunning cookies but also the stories and memories they hold. You’ll master the art of pinwheel cookies, impressing everyone with your baking prowess. Get ready to not only savor the taste but also create your own lovely memories in the kitchen!
What Are Festive Valentine’s Day Pinwheel Cookies?
Pinwheel cookies have a wonderful background that dates back to the classic era of baking, where the beauty of swirling doughs captured hearts and palates. These cookies are a delightful twist on traditional sugar cookies, offering a satisfying texture that is both soft and slightly chewy, melting deliciously in your mouth.
Their winning feature is the visual appeal—layers of colorful dough intermingling to create stunning swirls that remind you of a cozy wintertime treat. The best part is that they aren’t just eye-candy; the rich buttery flavor combined with the right amount of sweetness makes each bite utterly divine.
So, when should you whip up these cookies? They’re perfect for Valentine’s Day, family gatherings, or simply to spoil yourself while lounging on the couch. With these cookies, you can add a splash of joy to any occasion.
Why You’ll Love This Recipe
Gorgeous Presentation: Looking to impress? These cookies are true show-stoppers with their festive colors and intricate swirls. Perfect for gifting, sharing, or just to brighten your own kitchen!
Simple Yet Impactful: Many cookie recipes can be complex, but I promise you, mastering these festive beauties is surprisingly simple! If you can mix, roll, and slice, you can create these cookies.
Cost-Effective: Save some bucks while keeping your taste buds happy. Making cookies at home is not only cheaper than store-bought versions but also far better in taste.
Customization Options: The world is your oyster when it comes to these cookies! You can play with flavors by adding peppermint extract or even experimenting with different food coloring for other holidays.
Family-Friendly Baking: This is an excellent recipe to involve kids. Seeing their faces light up while they help roll the dough and coat it in colorful sprinkles is priceless.
With just a small investment of time and effort, you can create sweet magic that rivals any fancy bakery’s offerings.
Ingredients

- 2 1/4 cups all-purpose flour: For the cookie base. A high-quality brand like King Arthur Flour will give the best texture.
- 1/2 tsp baking powder: Helps the cookies rise slightly.
- 1/2 tsp salt: Enhances flavor.
- 2/3 cup powdered sugar: Essential for sweetness and lightness.
- 1/4 cup granulated sugar: Adds a bit of crunch and sweetness.
- 10 oz unsalted butter, softened: Make sure it’s at room temperature for easy creaming; I love using European-style butter for a richer flavor.
- 1 1/4 tsp vanilla extract: Go for pure extract for the best flavor.
- 1/4 tsp almond extract: Adds a lovely depth to the cookie flavor.
- 1/2 tsp food coloring: Pick your favorite color. I recommend a vibrant pink or red for Valentine’s Day.
- 1.5 cups sprinkles: The final touch that adds fun and festivity.
Pro Tip: Use room-temperature butter—it’s easier to cream and gives the cookies that scrumptious texture we all love.
Step-by-Step Instructions
Step 1: Prepare the Base Cookie Dough
In a large mixing bowl, cream together 10 oz of softened unsalted butter, 2/3 cup of powdered sugar, and 1/4 cup of granulated sugar until light and fluffy (about 3-4 minutes using an electric mixer). Then, add 1 1/4 tsp vanilla extract and 1/4 tsp almond extract, mixing until well combined.
In another bowl, whisk together 2 1/4 cups of flour, 1/2 tsp baking powder, and 1/2 tsp salt. Gradually add this dry mixture to the wet ingredients, mixing on low speed until a cohesive dough forms.
Step 2: Divide and Color the Dough
Divide the dough into two equal portions. Knead in your chosen 1/2 tsp of food coloring into one half, leaving the other plain.
Step 3: Roll and Chill Both Dough Sheets
Roll each piece of dough between two sheets of wax paper until about 1/4-inch thick. Chill them in the refrigerator for 1 hour until firm.
Step 4: Stack and Roll the Doughs Into a Log
Once chilled, peel off the top layer of wax paper from the colored dough and lay it on the plain dough. Roll it tightly into a log and trim the edges for a neat finish.
Step 5: Coat and Chill the Log
Roll the dough log in 1.5 cups of sprinkles for that festive touch, ensuring it’s well-coated. Wrap it up in plastic wrap and chill for at least 2 hours, or overnight if you can wait that long!
Step 6: Slice and Bake the Cookies
Preheat your oven to 350°F (175°C). Slice the log into rounds (about 1/4-inch thick) and arrange them on baking sheets lined with parchment paper. Bake for 15-17 minutes until the edges are lightly golden.
Step 7: Cool and Enjoy
Let the cookies cool on the baking sheet for 5 minutes before transferring them to a wire rack to cool completely. And there you have it—beautifully festive cookies ready to spread love!
Expert Tips & Tricks
- Use Room Temperature Ingredients: Ensure butter and eggs are at room temperature for the best consistency in your dough.
- Don’t Overmix: Once you combine the wet and dry ingredients, mix just until incorporated to ensure soft cookies.
- Storage: These cookies can be stored in an airtight container at room temperature for up to a week, but trust me, they won’t last that long!
- Chilling is Key: Make sure to chill the dough properly; this helps define the cookie shape and enhances the flavors.
- Make Ahead: You can prepare the logs ahead of time and keep them in the freezer. Just slice and bake when you’re ready to indulge.
Serving Suggestions
These lovely pinwheel cookies are delightful on their own, but pair them with a glass of milk or a cup of hot chocolate for that perfect sweet moment. For added flair, stack a few on a decorative plate, dust them with additional powdered sugar, and serve them at your next gathering. They are sure to steal the show at any Valentine’s Day party or family event!
Variations & Substitutions
- Flavor Variations: Try adding different extracts, like peppermint for a refreshing twist. You can also incorporate citrus zest for a zesty flavor.
- Dietary Adaptations: Substitute with gluten-free flour for those who are gluten intolerant. Dairy-free margarine can be used in place of butter for a vegan version.
- Seasonal Swaps: Consider using green and red food coloring for Christmas, or pastels for an Easter version of these beautiful cookies.
Nutrition & Storage Info
- Prep Time: 20 minutes
- Cook Time: 15-17 minutes
- Total Time: 3 hours (includes chilling)
- Yield: About 24 cookies
- Estimated Calories: 130 calories per cookie (varies by ingredient)
- Storage: Cookies can be stored at room temperature in an airtight container for up to a week. For longer storage, freeze for up to 3 months.
FAQ Section
Can I use margarine instead of butter?
- Yes, margarine can be used, but keep in mind it may change the texture slightly.
What if I don’t have almond extract?
- You can simply omit it or substitute it with extra vanilla extract.
Can I freeze the dough logs?
- Absolutely! You can freeze the logs wrapped tightly and bake straight from frozen. Just add a few extra minutes to the baking time.
How can I store the baked cookies?
- Allow the cookies to cool completely before storing them in an airtight container at room temperature.
Can I add chocolate chips?
- Yes! Feel free to add chocolate chips to the dough for an extra chocolaty surprise.
What if my dough is too sticky?
- If your dough is sticky, sprinkle a little flour onto your work surface before rolling it out.
How can I make the swirls more prominent?
- Make sure to roll the dough tightly and evenly. The tighter the roll, the clearer the swirls will appear.
Is it necessary to chill the dough?
- Yes, chilling the dough is crucial for shaping and maintaining the cookies’ aesthetic during baking.
What’s the best way to slice the dough log?
- Use a sharp knife and employ a gentle sawing motion to avoid squashing the dough.
Can I use other colors for food coloring?
- Of course! Get creative and match the colors to the occasion.
Conclusion
These Festive Valentine’s Day Pinwheel Cookies are not just a treat; they’re a canvas for memories, laughter, and sweetness. They symbolize love in every swirl and bite, making them a perfect gift for your loved ones or a special treat for yourself.
I encourage you to try making these delightful cookies—let me know how they turned out! Share your experiences and any creative spins you put on this recipe. Be sure to check out my other fun and delicious recipes on the blog for more baking inspiration!
Happy baking!

Festive Valentine's Day Pinwheel Cookies
Ingredients
Method
- In a large mixing bowl, cream together the softened unsalted butter, powdered sugar, and granulated sugar until light and fluffy (about 3-4 minutes). Then, add the vanilla extract and almond extract, mixing until well combined.
- In another bowl, whisk together the flour, baking powder, and salt. Gradually add this dry mixture to the wet ingredients, mixing on low speed until a cohesive dough forms.
- Divide the dough into two equal portions. Knead in your chosen food coloring into one half, leaving the other plain.
- Roll each piece of dough between two sheets of wax paper until about 1/4-inch thick. Chill them in the refrigerator for 1 hour until firm.
- Once chilled, peel off the top layer of wax paper from the colored dough and lay it on the plain dough. Roll it tightly into a log and trim the edges for a neat finish.
- Roll the dough log in sprinkles for that festive touch, ensuring it’s well-coated. Wrap it in plastic wrap and chill for at least 2 hours, or overnight.
- Preheat your oven to 350°F (175°C). Slice the log into rounds (about 1/4-inch thick) and arrange them on baking sheets lined with parchment paper. Bake for 15-17 minutes until the edges are lightly golden.
- Let the cookies cool on the baking sheet for 5 minutes before transferring them to a wire rack to cool completely.