Decadent Chocolate Peanut Butter Bars: An Easy Recipe for Sweet Satisfaction
There’s something truly nostalgic about the rich, sweet aroma of Chocolate Peanut Butter Bars wafting through my kitchen. I still remember the first time I stumbled upon a recipe for these delightful treats—my younger self, grabbing a snack after school, found joy in the simple combination of chocolate and peanut butter. Fast forward to today, and I’ve perfected my own twist on these bars that whip up easily and satisfy even the toughest sweet tooth.
What makes these Chocolate Peanut Butter Bars so special? Unlike those store-bought options with long lists of ingredients you can’t pronounce, my version is simple, wholesome, and customizable! It’s the comforting taste of your childhood combined with the satisfaction of knowing exactly what goes into your dessert. These bars hold family memories, bringing everyone together around a shared love for peanut butter and chocolate—a bond strong enough to resist even the most dedicated diets.
In this post, I promise you will learn how to make your very own batch of these scrumptiously indulgent bars, perfect for any occasion, from a cozy night in to a special gathering with friends. Buckle up, because your new favorite dessert adventure is about to begin!
What Are Chocolate Peanut Butter Bars?
Chocolate Peanut Butter Bars are a classic no-bake dessert that combines the delightful and creamy richness of peanut butter with the velvety smoothness of chocolate. Originating from humble homemade treat roots, these bars have taken kitchens by storm with their gooey texture and luscious flavor. They may vary in preparation and taste across different regions, but the fundamental elements of creamy peanut butter and decadent chocolate remain constant.
These bars have a unique texture—think crunchy yet creamy, a blissful contrast that hits all the right notes. They’re luscious enough to satisfy dessert cravings while being easy to prepare, making them the perfect go-to recipe for birthdays, potlucks, or just a sweet reward after a long day.
Whether you make them to impress guests or simply to enjoy a little "me time," Chocolate Peanut Butter Bars are the ultimate sweet treat that wraps you in comfort with every bite.
Why You’ll Love This Recipe
Simplicity at Its Best: This easy recipe requires minimal ingredients and time, making it an accessible choice for both novice and experienced bakers. You won’t need to spend hours in the kitchen—this can be whipped up in less than 30 minutes (plus chilling time!).
Cost-Effective Deliciousness: Homemade treats can often save you a bundle compared to buying similar desserts from commercial bakeries. You can make a large batch of these bars for a fraction of the cost, allowing you to indulge guilt-free!
Customizable and Versatile: Whether you prefer crunchy peanut butter, milk chocolate, or a sprinkle of sea salt on top, this recipe allows for endless variations. Substitute with different nuts, spices, or toppings to make each batch uniquely yours!
Healthier Wholesome Ingredients: This recipe uses natural peanut butter and other simple ingredients, making it a more wholesome choice than many sugary desserts. You can indulge without the guilt that usually follows.
Perfect for Sharing: Cut these bars into bite-sized pieces, and you have the ideal treat for entertaining guests. They’re always a hit at potlucks, picnics, and family gatherings, bringing people together over their shared love for chocolate and peanut butter goodness.
Ingredients
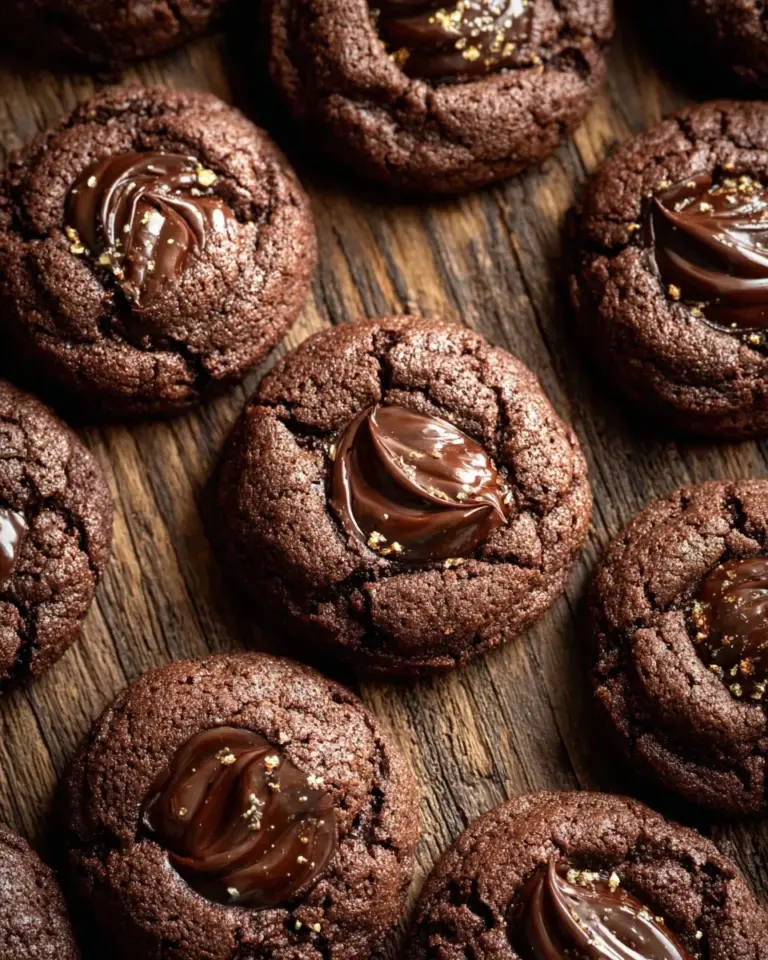
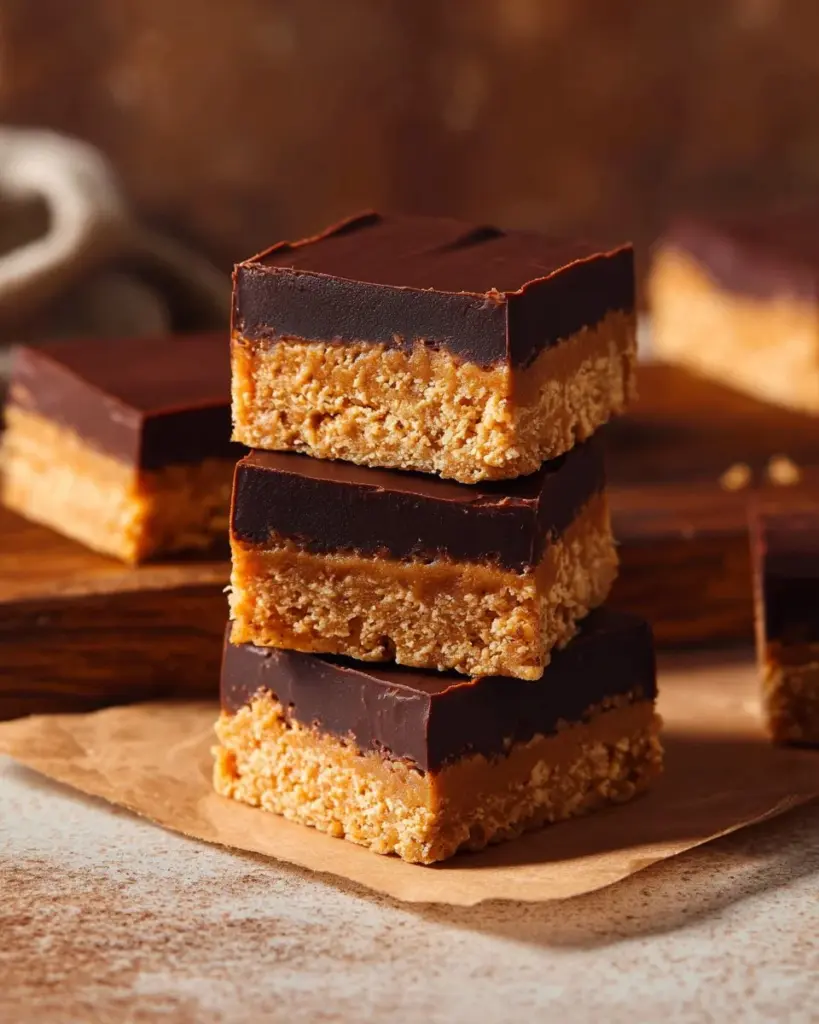
{image_template}
To create these delicious Chocolate Peanut Butter Bars, you’ll need the following ingredients:
- 200 grams natural peanut butter (smooth for a creamy texture; you can substitute with crunchy for added texture)
- 50 ml maple syrup (or honey if you’re not vegan)
- 1 tablespoon non-dairy milk (use any milk alternative you prefer, like almond or oat milk)
- 3 tablespoons coconut oil (melted and cooled to room temperature—this helps with the texture)
- 1 teaspoon vanilla extract (for a warm, aromatic touch)
- 1/2 teaspoon sea salt to taste (adds depth to the sweetness)
- 150 grams digestive biscuits or graham crackers (crushed into fine crumbs; you can use gluten-free versions if needed)
- 100 grams dark chocolate (finely chopped; opt for a high-quality chocolate for the best flavor)
- 1 tablespoon natural peanut butter (for the topping)
- 1 teaspoon coconut oil (for the topping)
Notes on Ingredient Quality:
- Always choose natural peanut butter without added sugars or oils for the best flavor and health benefits. I love brands like Smucker’s Natural or Justin’s.
- For the chocolate, opt for at least 70% cocoa for a richer taste. Brands like Lindt or Ghirardelli offer fantastic options.
Preparation Notes:
- Make sure your coconut oil is melted but not too hot before mixing it into your ingredients, as high temperatures can alter the consistency.
- If using butter instead of coconut oil, let it soften at room temperature before creaming with the peanut butter.

Step-by-Step Instructions
Prepare the Loaf Tin:
Line a loaf tin with parchment paper, letting the edges hang over for easy removal later. This is a key step for clean cuts!Mix the Base:
In a mixing bowl, combine 200 grams of natural peanut butter, 50 ml of maple syrup, 1 tablespoon of non-dairy milk, 3 tablespoons of melted coconut oil, 1 teaspoon of vanilla extract, and 1/2 teaspoon of sea salt. Whisk until the mixture is slightly thickened and well combined.Chef’s Tip: Whisk vigorously to help the ingredients meld together, creating a silky base.
Crumble in the Bickies:
Crush 150 grams of digestive biscuits or graham crackers into fine crumbs. Gently fold these into your peanut butter mixture until fully incorporated.Transfer to Tin:
Pour the peanut butter mixture into the lined loaf tin. With clean hands or a spatula, press it down into an even layer.Chef’s Tip: Make sure it’s evenly distributed for uniform cutting later.
Chill:
Place the loaf tin in the freezer for 30 minutes, or in the refrigerator for about 4 hours, until set.Melt the Chocolate:
For the chocolate topping, place 100 grams of finely chopped dark chocolate, 1 tablespoon of natural peanut butter, and 1 teaspoon of coconut oil in a heat-proof bowl over simmering water. Stir until smoothly melted together.Spread the Chocolate:
Once the peanut base is chilled and firm, pour the melted chocolate mixture over the top, spreading it evenly across the surface.Final Chill:
Place it back in the refrigerator for an additional 20 minutes, allowing the chocolate to set.Serve:
Once set, carefully lift the bars out using the parchment paper. Transfer them to a cutting board, slice into eight squares, and store the leftovers in an airtight container in the fridge.Chef’s Tip: Use a hot knife for cleaner cuts—the heat will slice through the chocolate and peanut butter easily!
Expert Tips & Tricks
Storage Recommendations: Store any leftovers in a sealed container in the refrigerator; they’ll last for up to a week. For longer storage, you can freeze the bars for up to three months. Just thaw them in the fridge when you’re ready to enjoy.
Make-Ahead Instructions: These bars are fantastic for meal prep! Make them ahead of a busy week.
Troubleshooting: If your bars don’t set well, it could be due to too much liquid in the peanut butter mix—next time, consider adding an extra 50 grams of crumbs to help bind it together.
Testing Sweetness: Feel free to adjust the sweetness to your preference. If you like it a little sweeter, add an additional tablespoon of maple syrup.
Flavor Variations: Add a hint of cinnamon or nutmeg for a spiced version, or include shredded coconut or chopped nuts for extra texture alongside those rich flavors.
Temperature: Make sure your ingredients are at room temperature to ensure even mixing and a smooth consistency.
Serving Suggestions
Pair these luscious Chocolate Peanut Butter Bars with a glass of cold almond milk or a warm cup of coffee for a delightful afternoon treat. To impress, consider plating them with fresh berries or a drizzle of extra melted chocolate on top. They’re ideal for gatherings—set them out on a beautiful platter for a stunning presentation that will have everyone reaching for seconds!
Variations & Substitutions
- Flavor Combinations: Explore unique flavors like coconut and dark chocolate, or even add a layer of raspberry jam for a fruity twist.
- Dietary Restrictions: For a vegan twist, ensure all ingredients, including chocolate, are dairy-free. Gluten-free graham crackers can be substituted for a gluten-free version.
- Seasonal Variations: Use pumpkin spice in the fall for a delightful autumn treat, or peppermint extract during the holidays for a festive flair.
Nutrition & Storage Info
- Prep Time: 15 minutes
- Chill Time: 30 minutes (or 4 hours)
- Total Time: 45 minutes (or longer, if chilling)
- Yield: 8 servings
- Estimated Calories per Serving: Approximately 180 calories per square
Storage Instructions: Keep these bars in the refrigerator in an airtight container, where they will last for about a week. They can also be frozen for up to three months—just be sure to separate layers with parchment paper.
FAQ Section
Can I use crunchy peanut butter instead?
Absolutely! Crunchy peanut butter will give the bars an extra texture and a bit of a nutty bite.How do I make these bars vegan?
Ensure all your ingredients, including chocolate and sweeteners, are vegan-friendly. Maple syrup is a great choice as a plant-based sweetener.What can I substitute for digestive biscuits?
Graham crackers, Oreos, or even crushed nuts can be great substitutes, depending on your flavor preference.Will these bars hold up in warmer climates?
They should hold up in warmer weather for short periods. However, it’s best to keep them chilled to prevent melting.Can the bars be made nut-free?
Yes! You can use sun butter or soy nut butter instead of peanut butter for a nut-free alternative.How do I store leftovers?
Store them in an airtight container in the refrigerator. If they start to dry out, wrap them in some plastic wrap first.Can I adapt the recipe for other flavors?
Definitely! Try incorporating almond butter, cashew butter, or flavored extracts like almond or coconut.What if my chocolate doesn’t melt smoothly?
Make sure the bowl isn’t in direct contact with boiling water, as too much heat can cause chocolate to seize.How long do these bars last?
They’ll stay fresh in the fridge for about a week and can be frozen for up to three months.Can I make these bars gluten-free?
Yes, just use gluten-free digestive biscuits or graham crackers as a substitution.

Conclusion
These Chocolate Peanut Butter Bars are not just any dessert; they’re a nostalgic journey wrapped in layers of chocolatey goodness and creamy peanut butter. Perfect for any occasion, they promise comfort and joy with every bite. I urge you to give this recipe a try and bring a little sweetness into your world. If you do, drop a comment below and let me know how your batch turned out! For more delicious ideas, check out my other dessert recipes—there’s always something sweet next to explore! 🍫❤️
Chocolate Peanut Butter Bars
Ingredients
Method
- Line a loaf tin with parchment paper, letting the edges hang over for easy removal later.
- In a mixing bowl, combine peanut butter, maple syrup, non-dairy milk, melted coconut oil, vanilla extract, and sea salt. Whisk until slightly thickened and well combined.
- Crush digestive biscuits or graham crackers into fine crumbs and gently fold them into the peanut butter mixture.
- Pour the mixture into the lined loaf tin and press down to create an even layer.
- Chill the mixture in the freezer for 30 minutes or in the refrigerator for about 4 hours, until set.
- For the topping, melt dark chocolate, natural peanut butter, and coconut oil in a heat-proof bowl over simmering water until smooth.
- Once the base is chilled, spread the melted chocolate mixture evenly over the top.
- Refrigerate for an additional 20 minutes to allow the chocolate to set.
- Lift the bars out using the parchment paper, transfer to a cutting board, and slice into squares.